I do two different things, which I have consolidated to just one and it seems to be plenty.
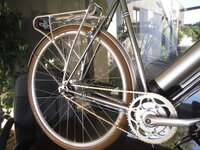
The first of the two is to use a pair of interlocking hose clamps. One really big one goes around the body of the BBSHD, front to back. Interlocking with this 'ring' is another that wraps the down tube of the bike. You use black heatshrink to line the one wrapping the black BBSHD (no need to heat it up) and some silicone tape or color-coordinated heatshrink (or both) around the frame tube to prevent any scraping and also to render the clamp well nigh invisible. This makes a physical, unbreakably stable connection to the frame using $5 worth of materials. Done right, it is invisible. I have BBSHDs I installed in 2017 still locked up tight with this method.
View attachment 112088
The second method, used in conjunction with the above, is now the only one I use, and it has turned out to be plenty sufficient on its own.
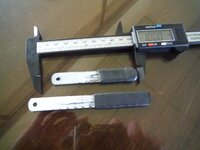
Step 1: Rather than using the inner lock ring and the outer trim ring that comes with your install kit, buy a second inner ring. The outer ring is largely for cosmetic use and it cannot take much in the way of torque. So toss it aside and use a nut that is. Stack the two of them one atop the other to make them jam nuts. The inner ring doesn't look like it but it uses about the same threads as the outer trim ring, so you aren't going to have a thread space issue. Also since you only use one type of ring, you only need to buy one type of ring socket. NOTE: In the pic above, from 2018, you can see I used a thin washer (a BB spacer) between the two rings. Turns out this was a dumb idea. Largely negates the jamming force the second ring adds. Don't do that.
Step 2: Use a real torque wrench. Not those little hobbyist Bafang two sided thin installation wrenches. They work best to remove skin off your knuckles and make your fingers hurt like hell. With your real torque wrench, use a proper Bafang socket. These things are like forty bucks these days but we are talking right tool for the job here and this is it.
8fun has made a nice set of sockets specifically designed to tighten the lockrings of the mid drive BBS02 motors for a secure mount that will not loosen.

www.empoweredcycles.com
The torque wrench I use is a 1/2" automotive wrench and this is a big sucker. It needs to be given the next step:
Step 3: I got this advice straight from Luna when they were building all of their retail BBSHD'd bikes: Tighten the lock ring ... not to the 30 or 40 ft lbs Bafang says to... do it to 100 ft lbs. Yes the threads will take it just fine. You will probably want the bike to be off the repair stand and on the ground when you do this. You need that big wrench to make this happen without forcing it. And remember: Since we are using two of these outer rings as jam nuts, you will do this twice. 100 ft lbs for each.
Step 4: Draw a line with a Sharpie across the bottom bracket and the two rings so you can glance down and instantly, visually tell if anything ever moves. None of mine have, ever. Except for my Bullitt recently because I forgot to use a torque wrench and just eyeball/farmer tightened it. It loosened in a few months as a result of not following protocol.
Notice I never used the word 'loctite' anywhere. I have always found that thread lockers are the necessary substitute only if torque wrenches and a proper torque spec are not used.
View attachment 112087


")