Do you really need to torque a through axle?

It is impossible to install a through axle wrong.


My through axle will install the wrong way.
It isn't threaded and will go through the dropout either way.
(The end piece the axle is threaded onto the skewer to adjust preload though)

20241124_210427.jpg


My freind got a 10-speed in 1977 that had a QR rear wheel.
Within a couple weeks he broke his axle in half and had to have his wheel rebuilt.

I've hated QR axles ever since. They're just not strong enough.

You're still going to need tools to do any work on your rear wheel that requires removing the wheel.
Saving ten seconds with a QR isn't worth the tradeoff with reliability and safety.
 
Last edited:
I recently added a PrestaCycle TorqRatchet to my bike kit, which I use for my T25 needs and hex keys where I can with the included bits. Its also a 3-12Nm beam-style torque wrench that seems to be quite accurate (compared it to my Wera 5-25Nm wrench and the two came out equivalent), and its really small. 12 Nm is enough to work on everything but a crank bolt, and its nice to not need to guess on torque roadside.

Thru axles are darn near the only thing I don't use a torque wrench on when it comes to a bike, where using a torque wrench keeps you from guessing or making the common stupid mistake of overtightening. (5-6 Nm on an M5 bolt is not a whole lot and a human will almost always screw that up). I get the axles pretty tight and leave them at that. The nature of a thru axle means it has to rotate a few times (which is visible via the lever long before it gets to a single rotation) to come loose and even then the axle is fully captured, unlike a QR skewer. I do make a point of checking them every month or two.
My digital is limited to 6 Nm. It will be useful on handlebars to get 2 or 4 screws the same. I like to do bigger stuff by feel. Years ago I bought a 24" breaker bar for lug nuts on cars and trucks. A smooth-handled bar that long made it a pleasure to feel the change in torque versus rotation, which told when I'd taken up the elasticity. I'd note the position, back off 30 degrees, switch to a torque wrench, and find that it came to about the same position when I reached the specified torque.

I don't know most of the specs for my bikes. I thought Reljah Novovic, AKA Bike Gremlin, recommended 5 Nm for the screws that secure disc-brake calipers. I backed one off and found that 5 Nm on that fastener didn't feel like enough. I took it to 6.00. With a breaker bar it didn't feel quite tight enough. It felt right with about 30 degrees more, or 5 minutes on a clock. Compared to the measured 6 Nm, I estimated that I'd applied 7. I pulled up Bike Gremlin's page and found that I'd been wrong. He recommended 7, not 5. We'd come out the same. What's more, doing it by feel had saved me from a big mistake.

In a 37-minute video, he explained several kinds of torque wrenches in his shop, including one like yours. He says he always uses them on carbon fiber, but with steel or alloy, it doesn't hurt to be a bit off. He has never used them for his own bikes, even on bottom brackets, but always uses them professionally. If a customer were hurt in a crash, he could be held liable if he couldn't prove he torqued fasteners by the book. Buying torque wrenches and keeping certifications up to date is expensive. Using and caring for them is a hassle. He doesn't recommend them for DIY work.

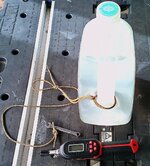
My torque screwdriver is an enjoyable toy. It came with a calibration sheet, but I used a 1/4" box wrench and a gallon jug to see for myself. The wrench weighed 19.1g, contributing a negligible .007 Nm. The jug and string weighed 3663.7. The point of suspension was 70mm from the center of the bit. I calculated 2.52 Nm. The gauge read 2.51, both CW and CCW. However, the calibration sheet found that it would read about 0.5% low in that area, meaning it would read 2.51. Right on!
 

Attachments

  • torque check.jpeg
    torque check.jpeg
    599.8 KB · Views: 19
View attachment 186654
A thru-axle after 3.5 years of use. Never greased. It still has the paint on!

That's the kind of axle I want, but it doesn't fit my forks with a Q-loc boost axle,..

Screenshot_20241125-072634_AliExpress.jpg


Screenshot_20241125-074804_AliExpress.jpg


So I'd need to get this,..

Screenshot_20241125-075721_AliExpress.jpg


And this,..

Screenshot_20241125-082602_AliExpress.jpg
Screenshot_20241125-074602_AliExpress.jpg
Screenshot_20241125-082942_AliExpress.jpg


But the axle is ~3mm too long, so I'd need this so the threads don't bottom out on axle,..

Screenshot_20241125-081413_AliExpress.jpg


Or, since the axle is only threaded for 9mm, and the nut is 14mm tall, I could just drill out the first 4mm of threads of the nut to take up the slack.
The drilled out threads will fit like a sleeve over the axle so the nut will compress on the fork drop-out.

That way I'll get the serrations on the nut directly contacting the fork dropout instead of the smooth sided spacer to help keep things from loosening up.
 
Last edited:
Buying torque wrenches and keeping certifications up to date is expensive. Using and caring for them is a hassle. He doesn't recommend them for DIY work.
Nobody needs to keep up certifications on a bicycle, so thats not a problem. Use and caring for a torque wrench is also a non-issue. Just dial it back to its minimal value at the end of use. Beyond that, even with frequent use a quality wrench will last for many years. Even a Harbor Freight wrench will last at least a couple of seasons before it gets wonky.

And they are EXACTLY the best choice for DIY work. As a population, the home bicycle mechanic is the last person who is going to be able to point to a level of lifelong experience that allows them to achieve an otherwise superhuman level of accuracy.
...The wrench weighed 19.1g, contributing a negligible .007 Nm. The jug and string weighed 3663.7. The point of suspension was 70mm from the center of the bit. I calculated 2.52 Nm. The gauge read 2.51, both CW and CCW. However <snip>
Dude... you either need a girlfriend, or you need a new one so you aren't hiding in the shed doing stuff like this.:D
 
Also...
I don't know most of the specs for my bikes.
You shouldn't need to for the most part. Almost all bike bolts are either M5 or M6. You want to match up with the generic recommendations for those bolt and material types. One example:


Good rule of thumb is M5 is 5 ft lbs, and M6 is 7. But it varies depending on the bolt material and the threads. An M5 can go from 2 to 7 on the linked chart.

If you have bike parts that state the torque spec right on the part (which is almost every quality bike part on the planet, even the Chinese stuff) that further relieves the brain strain.

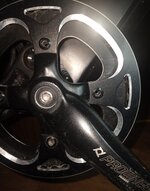
I think the only spec that truly matters thats not commonly covered is the M8 crank bolts, which vary by crank manufacturer. I stick to 25 ft lbs. I have seen 35 - at the upper end of the common recommendation - shear the bolt. Most people who just farmer-tighten a square-taper/JST crank (the kind on most DTC ebikes) will take it to far less than even 25, which means rounded (and ruined) crank sockets when that chicken comes home to roost.
 
If you have bike parts that state the torque spec right on the part,..

I think the only spec that truly matters thats not commonly covered is the M8 crank bolts, which vary by crank manufacturer. I stick to 25 ft lbs. I have seen 35 -

My new e-bike isn't labeled but my first ebike is, so I went with 35 ft lbs. on both e-bikes.

20241125_121707.jpg


PS,.. Every farmer knows that when you tighten up the big bolts, you put a two foot pipe on the ratchet handle and step on it. 😂
 

Attachments

  • 20241125_121835.jpg
    20241125_121835.jpg
    276.3 KB · Views: 17
  • 20241125_121953.jpg
    20241125_121953.jpg
    267.8 KB · Views: 16
My new e-bike isn't labeled but my first ebike is, so I went with 35 ft lbs. on both e-bikes.
Well, that bolt is totally NOT an authoritative source :) Plus, it says max to 31 ft lbs, not 35. I've learned to go on the low side of 'certainty' when it comes to crankarms. When you tighten a square-taper crankarm, you are tightening a (relatively) soft alloy crankarm onto a harder steel shaft that is tapered wider at its base. So as you tighten the crankarm, it squishes down and widens itself a hair. Over time, if you remove and replace that arm a few times, it will squish down further as it forms itself to the axle. So... overdoing the torque makes it spread faster. I've never had one go bad on me from this but I'm in no hurry to have it happen for the first time. I've found 25 ft lbs is definitely tight enough to have squished on the axle properly, and never gets a hint of wobble.

In your case, the horse is already out of the barn :)

Don't forget to torque-check that bolt every few months. JST/square-taper cranks loosen. Do NOT just set the torque wrench and torque-to-click. That creates a very slight torque increase every time you do it. Back the bolt off 1/8 of a turn and then re-torque it to spec.

PS,.. Every farmer knows that when you tighten up the big bolts, you put a two foot pipe on the ratchet handle and step on it. 😂
Just like doubling the dose is doubly good for taking medication, double the torque is best for the threads etc.
 
Well, that bolt is totally NOT an authoritative source :) Plus, it says max to 31 ft lbs, not 35.

Ahh Crap !!
I thought that was a 7. 😂

Screenshot_20241125-151008_DuckDuckGo.jpg


I had to put on my reading glasses and take another picture.

20241125_150326.jpg


I guess a 7 is supposed to be leaning like the 7 at the bottom of the picture. 😂


In your case, the horse is already out of the barn :)

Maybe I'll just leave it until the horse comes home to roost? 😂


Don't forget to torque-check that bolt every few months. JST/square-taper cranks loosen.

I'll check the torque again with my beam style torque wrench. I'll just make sure it's over ~25

Do NOT just set the torque wrench and torque-to-click.

I don't like the clicky ones.
The one in the picture was a joke.
It reads from 50-250 ft lbs. 😂


That creates a very slight torque increase every time you do it. Back the bolt off 1/8 of a turn and then re-torque it to spec.

I'm not going to back them off. I'll just make sure they're at least at 25.


Just like doubling the dose is doubly good for taking medication, double the torque is best for the threads etc.

You can bake a cake in half the time if you double the oven temperature too. 😂
 
@BEC111: I have found something quite interesting. I removed the front thru-axle from my Vado SL to take a picture this morning. Then I user my Pro Bike Tool torque wrench and tightened the axle at 12 Nm (which I think is a pretty correct figure). Then I decided to loosen and re-torque the real axle properly. Will you believe if I tell you that the axle, which I had previously tightened by the feeling had been over-torqued?

Nothing can replace a good torque wrench!
 
Nobody needs to keep up certifications on a bicycle, so thats not a problem. Use and caring for a torque wrench is also a non-issue. Just dial it back to its minimal value at the end of use. Beyond that, even with frequent use a quality wrench will last for many years. Even a Harbor Freight wrench will last at least a couple of seasons before it gets wonky.

And they are EXACTLY the best choice for DIY work. As a population, the home bicycle mechanic is the last person who is going to be able to point to a level of lifelong experience that allows them to achieve an otherwise superhuman level of accuracy.

Dude... you either need a girlfriend, or you need a new one so you aren't hiding in the shed doing stuff like this.:D
Reljah would be thrilled to hear that. As a pro, he believes he would be in legal jeopardy without his currently certified torque wrenches.
As a pro, he claims that no DIYer needs a torque wrench for a metal bike because it doesn't require superhuman precision. Why don't you phone him and tell him off?

Your manufacturer doesn't seem to make any claims about accuracy, and you're scornful of testing. Three years ago I bought a torque wrench like that. Lately I got a chance to test it. The variance is a random pattern of 27%. That's not superhuman accuracy.
 
@BEC111: I have found something quite interesting. I removed the front thru-axle from my Vado SL to take a picture this morning. Then I user my Pro Bike Tool torque wrench and tightened the axle at 12 Nm (which I think is a pretty correct figure). Then I decided to loosen and re-torque the real axle properly. Will you believe if I tell you that the axle, which I had previously tightened by the feeling had been over-torqued?
I wasn't born yesterday. Static friction can make it harder to break a fastener loose than to tighten it. If it's been sitting months, the initial torque requirement may be quite high. Don't you wish you'd used grease? 🧐
 
Also...

You shouldn't need to for the most part. Almost all bike bolts are either M5 or M6. You want to match up with the generic recommendations for those bolt and material types. One example:


Good rule of thumb is M5 is 5 ft lbs, and M6 is 7. But it varies depending on the bolt material and the threads. An M5 can go from 2 to 7 on the linked chart.
You tell me to use a chart that the publishers warn not to use. Too many variables, such as the parent material and the depth of thread.

Until 1970, I believed in rules of thumb. I also knew of readily available torque wrenches that might be more reliable than the spring-loaded kind: common sets of box wrenches and allen keys. For each size fastener, the length was short enough for pain to tell you when you were reaching the rule-of-thumb limit.

I learned my lesson when I used a 10mm box wrench to secure a valve cover to an aluminum cylinder head. I don't think I've damaged another tapped hole in the 54 years since. You could say bolt diameter, thread pitch, lube, finish, parent material, etc etc, are above my pay grade. All I have to know is that screw joints clamp by taking up elasticity, and the elasticity keeps everything tight. On that valve cover, it didn't take much torque to compress the gasket. After that, the compressed gasket would keep everything tight.

On one bike, 3 M5 bolts hold the plastic chain guard against a bracket of 16 gauge sheet steel. That soft steel may not be thick enough for more than one turn of the thread. I knew it was delicate. It worked because the plastic was easy to compress. When I felt the end of the compression, I was done; pressure from the compressed plastic would hold everything tight. In the past year, I may have removed the chain guard 20 times without stripping a hole. I've ridden every day without having a screw come loose.

My new precision toy let me see how much torque it takes to "bottom out" the plastic. Instead of the rule-of-thumb 5 newtons, I use 1 newton. As the chart says, "Tables are given for informational use only. The exact torque values are found by tests based on work experience."
 
Last edited:
Very important torque settings on a bike is the handlebar stem, do not overtighten, better it becomes slightly loose in use rather than an overstressed snap, which will ruin your day
My clamp says 8 Nm max. I use 2.5. I do something else. I stack playing cards as feeler gauges to adjust the corner screws for the same gap. Otherwise, the screws might put twisting force on the clamp.
 
Back