hastle removing the rear wheel

Garrick Staples

New Member
This is a bit of a PSA... if you've never removed the rear wheel on your new Evo*, you should do it once at home before you need to fix a flat on the road. Not only is the space around the disc so tight that it is about impossible not to scratch the paint, but there are zip ties that you have to cut! That's right, you need to cut off 2 zip ties to remove the rear wheel! The motor wire is zip-tied twice to the chain stay before the plug.

I've now added spare zip ties and some small dikes to my flat fixing kit.

* Mine is an Evo Race, but I assume other models have the same problem.
 
I removed the rear wheel on my Neo Carbon (just to be familiar with how to do it). Had to take it to the dealer where two techs worked together to reseat the rear wheel. PIA
 
It's shocking how difficult it is. I scratched the paint a little bit next to the disc. The fancy spring-loaded axle nuts are almost but not quite really cool. And what's the point of that retainer plate on the non-drive side? And what's the tiny allen screw inside the axle?

PIA, indeed!
 
Yeah. Wow! I was going to post something about this, but I was waiting to cool off a bit.

I took the rear wheel off my Prodeco X3, to change the tire and tube. Removing it was enough of a chore, since the wheel had to be pried out. Swapping tires and tubes was painless.

To reinstall the rear wheel? The manual says that you have to pull the chain over the sprockets and then:

"Slide the motor into the frame dropouts by aligning the axle into the dropouts"

Well, gee. That isn't remotely what you have to do. First off, the chain is going to fight you all the way. Second, the derailleur is going to be in the way. Third, the axle has flat sides so you have to align the wheel at a very precise point, but then you have to come in, over the derailleur, and the disc brake is going to hang unless it is precisely aligned to slide in. I tried ten times, maybe more, over 90 minutes. I thought I had found a system just to keep the chain and derailleur out of the way. Nothing I tried came close to getting the wheel in the dropouts, and this is a heavy piece of equipment to deal with.

I took it to the ebike shop (where I bought it) the next day. I asked how hard this was supposed to be? They smiled and said "You need to have the bike on a repair stand." When I went back to pick it up they said it had taken two guys and several tries.

I'm miffed because I scratched stuff up and I was afraid I'd bent the disc brake. The shop was fantastic, saying they would treat it as a warranty issue, even though it isn't. I bought some tire liners.

I didn't realize they would have a massive problem with the reinstallation. At that point, I really felt I should swap the rear tire for the absolute most bullet proof tire I could find, maybe the Schwalbe Marathon, which they stocked. It is very thick. I put some tire liners in the new tire and new thick tube. I hope that works. I don't see how I could fix this beside the road, and having a loose rear wheel would make life really complicated.

I'm going to cross post this to the Prodeco forum.
 
@George S. Yeah, I just finished fixing a rear flat on a Phantom X2 and the issue appears to be the spacing between the dropouts; it's about 2 mm too narrow to readily reinstall the rear wheel-even with the chain off the front sprocket. It was a bear! I understand the need to not have the motor wires not get twisted, but that is why the rear wheel has the special slots. This is an issue that has come up repeatedly in our shop with several brands of hub motor ebikes. Maybe it was just luck, but its not been such a problem with the BionX kits/OEM bikes. Feedback from other of you BionX riders, please!
 
If someone has a good technique, I'd like to see a video. I think Court has mentioned this problem in the rear hub videos. Someday I might break and remove the chain, plus remove the rear derailleur, just to look at how things line up. The X3 has the advantage that even without a chain, or derailleur, it will still move quite nicely.
 
This is a bit of a PSA... if you've never removed the rear wheel on your new Evo*, you should do it once at home before you need to fix a flat on the road. Not only is the space around the disc so tight that it is about impossible not to scratch the paint, but there are zip ties that you have to cut! That's right, you need to cut off 2 zip ties to remove the rear wheel! The motor wire is zip-tied twice to the chain stay before the plug.
I've now added spare zip ties and some small dikes to my flat fixing kit.
* Mine is an Evo Race, but I assume other models have the same problem.

Couple of instructional videos from our friends at Blue Monkey Bicycles in Utah. Both for the EVO and the NEO line up.

EVO:


NEO:

 
So I just watched the first video.

"cute little clips?" What cute little clips? My bike had zip ties. I bet the the LBS replaced them when they installed their kickstand!

Otherwise, that video was so oversimplified as to be nearly lying about the entire process.

In reality, even after loosening the quick release axle nuts (is there a proper name for those things?), the wheel doesn't budge. You try to pull it out but nothing happens. You yank and push and pull in different directions. You look around for another bolt to remove. And then suddenly the wheel moves and the disc just scratched the chain stay.

Then when putting the wheel on, you have to shove and wedge the axle into the dropouts, rubbing the disc along the chain stay along the way, and chip the paint off of the bottom of the drop outs.

It's doable and I'm sure you get better at it. It was the zip ties that pissed me off.
 
Is this one of those areas that some tri-flow lube would help to make the wheel release from the axle easier? (obviously that wouldn't help with the zip ties part).
 
Flip,the bike on its seat using a rag. Much easier. U may need to remove the torque arm. And be gentle with the electrical connections. No biggie
 
This is a bit of a PSA... if you've never removed the rear wheel on your new Evo*, you should do it once at home before you need to fix a flat on the road. Not only is the space around the disc so tight that it is about impossible not to scratch the paint, but there are zip ties that you have to cut! That's right, you need to cut off 2 zip ties to remove the rear wheel! The motor wire is zip-tied twice to the chain stay before the plug.

I've now added spare zip ties and some small dikes to my flat fixing kit.

* Mine is an Evo Race, but I assume other models have the same problem.
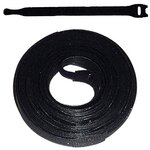
A possible solution to the cable tie issue is something like this:
velcro cable ties.jpg Velcro Cable Ties
Available here on Amazon. I've used these in a variety of ways on bikes and motorcycles. I don't know why I haven't used them for the motor quick disconnect, but it would make it really quick and save for having to carry something to cut. You would think the bike manufactures would use something to make the "quick disconnect", quick!
 
Total common sense; thank you @J.R. ...yeah 'quick connect' might need a redefinition :) don't get me started on changing flats on those rear wheels!
 
I have had three flats in 12oo miles, all on the rear of my Neo Xtreme. I had the luxury of being indoors all times to fix them. No stand is needed, just turn over your bike. The hardest repair was the third and it took about 60 minutes. If it were outside in the rain or in poor lighting I doubt I would have succeeded. I decided, thats it and just ordered a Schwalbe Marathon Plus tire which is puncture proof. I don't care if there is a little more weight and drag, its an electric bike after all. EDIT: After watching the video and having to again fix a flat, I have it ALL figured out. The key mistakes I made in the past were,

A) removing the loosened nuts, washer and torque arm from the axle. This is unnecessary, just leave them on loose when you pull the wheel off the bike.

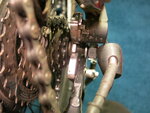
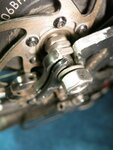
B) the wheel won't drop back in because the frame is like one millimeter narrower than what you are trying to fit in there. To spread the frame slots, simply put your thumb of against the wired end of the axle and the next two fingers against the wheel side of the derailleur or the torque plate as shown in the pic below
IMG_2931.JPG
IMG_2933.JPG IMG_2932.JPG . Now after ensuring that the axle is ready to fit in the slots (positing the torque arm where it will be when you reinstall its little bolt), and the washers are where they are supposed to be, push on the axle to spread the frame a little and the wheel just drops in from gravity! The brake disc is not an issue, since everything is where it should be.

Now I am ready to conquer the wilderness without fear of being stranded. Oh, and this lesson was learned on flat that would not have happened with the armoured tire I ordered but got lost in delivery! So much good came out of what at first seemed a gross inconvenience.
 
Last edited:
Geared and direct drive hubs are great at speed and very efficient once up to speed, but the weight and that I have to carry a wrench everywhere I go, I could do without.
 
Back