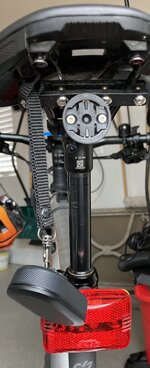
Here’s an idea to eliminate the concern for a Garmin radar unit popping off while riding. Tethers can be purchased, however, tethers were out of stock when I wanted one. Here’s a way to make your own.
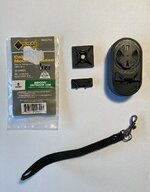
Parts & Tools needed:
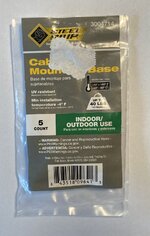
(1) Steel Grip Cable Mounting Base with adhesive backing
Dremel tool or equivalent
Cutting disk
Sanding disk or arbor band
Tether strap
Method:
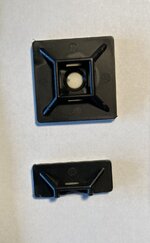
1. Cut the mounting base in half with a rotary cutting disk
2. Smooth edges with arbor band
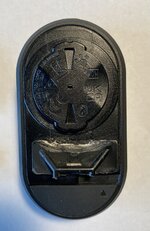
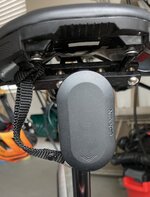
3. Bevel the uncut (long side) that will be positioned opposite the radar locking disk.
(See photo). The bevel is circular to match the radar unit’s circular locking mechanism. The circular bevel is necessary to be able to lock the radar unit to the bike.
4. Check the fit of the modified based by placing it passively on the back of the unit. Smooth and bevel as needed
5. Ensure that the rubber charging door can open.
6. Remove the backing from the modified cable mount and press onto the back of the radar unit. No going back once it’s attached, although I was able to modify the bevel with an arbor band without destroying the back of the radar unit.
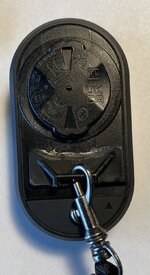
7. Attach tether strap. I had one at home. Sorry, I don’t have the exact source but tethers can be found online.
8. Loop the strap around the bike seat rails and loop the radar unit through the loop in the strap.
9. Attach the radar unit to your bike. Easy on off for charging, too.
10. Go ride, have fun and don’t worry about the radar unit falling off and loosing it.
Disclaimer: Please forgive any typos, grammar or likeness to another design. It’s not my intention to copy, only to improve on any previous iterations.
Attachments
-
 2F17E505-52BC-4987-8873-C8109D192612.jpeg231.3 KB · Views: 347
 -
 2D5BB6B3-E788-4FD4-9F9B-74FE02E4D6CA.jpeg157.1 KB · Views: 315
 -
 A50C853A-CAAD-454C-9EA2-F0EBE6AC05F1.jpeg279.4 KB · Views: 315
 -
 0B51D753-CB6D-460E-9CDC-ED3340671603.jpeg270.6 KB · Views: 323
 -
 A2CBFD34-4B35-4FBE-A4F6-F74366F0452E.jpeg164.4 KB · Views: 309
 -
 8EE96926-A3DB-40B7-ADD1-5DC9B9731C05.jpeg251.6 KB · Views: 325
 -
 A63F4593-78B1-4511-B9F0-48844499819A.jpeg198.7 KB · Views: 328
