My DIY builds: GMAC, BBSHD, 9C RH212, CYC Photon, ToSeven DM01

Nice, I like the build choices. So the Soma is effecively a suspension geometry enabled version of the Ogre?

I've not had personal experience with the Maguras but I've heard about similar issues (with not enough retraction) in some configurations. So far I've not seen any consensus on what to watch out for.
The Soma Juice 29r has a little longer top tube and slacker head tube angle (see attached pic). The Ogre is a a commuter based do-it-all bike and the Juice is a MTB based do it all bike.

Took the Soma out for a ride today and LOVE it. Only issue was it was super windy which isnt the best for the ride I did (25 miles, 1500ft vertical, winds 20+) on the Photon. On windy rides, I typically prefer the BBSHD power as the last 5 miles of my ride is typically fighting a headwind thru rolling 4-6% hills. I forget how comfortable a front shock is on less challenging terrain and think at my age, all bikes will now have front suspension. Of course I know this being an early adopter of front suspension back in the 90s having first ridden rigid MTBs and then transitioning to the MAG 21 and better forks as they developed. I also currently own two full suspension bikes but only ride them on dedicated off road trails I wouldnt dare try on a rigid bike.

So the solution Im thinking is to build another Soma Juice with BBSHD and convert the Ogres back to acoustic and sell them as surlys demand a pretty high price out here.

Yeah, bummer on the magura MT5s. Initial research and things I tried to get more rotor clearance didnt work on the front set. I had maguras on a 2018 Bulls eMTB and loved them...much better feel than the Shimano Deore (4potF/2potR) I have now. Need to do more research.
 

Attachments

  • Screenshot 2024-10-05 173944.png
    Screenshot 2024-10-05 173944.png
    166.7 KB · Views: 63
Last edited:
I decided I dont need a 120mm axle because the frame will allow me to pedal closer, so I bought this 100mm replacement from Aliexpress for a whopping 20 quid delivered.
Original part or cheese?

IMG_20241014_142222846.jpg
 
Havent done it yet, Im away from home, Im thinking I could actually run the smallest one.
Obviously going smaller will involve tapping the BB shaft further down and shortening it.
Bit scary.
 
Soma Juice #2 (BBSHD)
I like my CYC Photon Soma Juice so much, I decided to build a second one(BBSHD) for off days where I just want to go faster or for the windy days we have out here in the plains north of denver. Scored a Fox 34 AWL shock (ebike approved..thicker wall stanchions) for $300.

The DeathWobble
On the Surly Ogres, I would get headshake/high speed wobble with a second battery mounted on a rear rack. This 'only' happens when I use the inner aero bar positions and am at speeds above 20mph and with a em3ev jumbo shark pack on the rack (super shark pack was fine). It was annoying and concerning but never to the point of sheer terror. It would slowly get worse but I would have plenty of time to react. Im guessing I would have 10 seconds to react before it got too serious. I tried this setup on the Soma Juice and came within a millisecond of dumping the bike at 25mph. The headshake was much lower in frequency but each cycle got progressively worse. I am guessing I had 2 seconds to react. Luckily I got my right hand on the rear brake in time (leaving a nice s-shaped skid mark on the road).

I was hoping the slacker head tube and additional trail on the Soma Juice would have cured this, what seems to have happened is the frequency changed to the point where every cycle was timed just right to make the situation much worse and very quickly.

No issues one handed or two handed(normal flat bar handlebar position) even if I tried to induce it by quickly upsetting the steering. That being said, I will never put a battery on the rear rack again as Im not interested in finding other scenarios where it might be an issue. Besides it just makes the bike handle like crap anyway

Cable Cleanup
I have been using a grin stretchable velcro sleeve for awhile now to hide all the nasty wiring clutter that can appear on a DIY setup. While this has worked, its not ideal. I decided to use an old top tube bag I had lying around to contain all the wiring. Just needed to add a hole in the bottom for all the wiring. See attached pics

The 200/203mm disk fiasco
I mentioned earlier having an issue with the magura MT5s on the front not retracting enough. As it turns out it was the disc brake adapter. I was using a 200mm adapter but had a 203mm rotor. I realized this when having the same issue with my used Deore brakes and a 203mm rotor up front. Yes, I knew the sizes were different but I figured it would all work out as the 203mm could just require an additional 1.5mm clearance with the caliber. It was close but not good enough. I could get it to work with the 200mm adapter as long as I didnt tighten the caliber mounts too much which I was not a fan of. Even then, as the brakes got hot and expanded, the rubbing got pretty serious.
 

Attachments

  • IMG_20241026_185922985.jpg
    IMG_20241026_185922985.jpg
    260.4 KB · Views: 64
  • IMG_20241026_185829667.jpg
    IMG_20241026_185829667.jpg
    283.6 KB · Views: 63
  • IMG_20241026_185942056.jpg
    IMG_20241026_185942056.jpg
    158.1 KB · Views: 72
  • IMG_20241026_185820778.jpg
    IMG_20241026_185820778.jpg
    313.8 KB · Views: 63
Last edited:
Surly Ogre GMAC
After about a year without the GMAC Ogre, I decided to get it back on the road to sell since I had all the parts and a now spare ogre frame. This was replaced by the CYC photon as from a thermal perspective they seemed to be the same on my rides and the CYC had better torque sensing and was lighter although it had less overall power

I forgot how fun this GMAC setup was to ride. Now that I have it running again, I want to keep it but just have two many ebikes (5 including the GMAC).

Final thoughts: She was a great ride and the reason for originally starting this thread, I will miss her. A highly recommended setup

CYC Photon Failure
With the CYC Photon now on a more capable offroad setup, I have been running it alot harder on actual technical MTB trails where the BBSHD would never compete. Im at about 2400 miles now and have been running it in the highest power setting almost exclusively for a month or so, only reducing power when reaching 90C.

One thing i have always noticed is that on the rare occasion I really blow a shift (usually starting out), the motor would make a different higher pitched sound and the motor would not engage the drivetrain unless I let off the pedal pressure and started again. I always thought this might be some sort of shift detection. This behavior seems to be happening more and more recently and today it seemed to be enough that I didnt ride it further. If I start out agressively, I get this behavior and moreso at higher power levels. If I start off slowly, no issues.

I believe the issue to be the sprag clutch(one way bearing) slipping. It seems like several people on the CYC photon facebook group have had the same issues. Since the motor is still under a 2 year warranty, electrify ebike has agreed on looking at the issue as soon as I send it back to them.

Luckily its not a total onset failure likely to leave one stranded. That being said, not sure what I am going to do yet as I have several spare BBSHD lying around
 
Last edited:
Soma Juice ToSeven DM01 install
I have started the process of installing my new unused ToSeven DM01 onto the Soma Juice replacing the CYC Photon. Both the CYC Photon and BBSHD have a chainline of 52mm when installed with driveside bb spacers to clear the chainstay. The DM01 with 42t offset chainring has to use the offset chainring with the offset away from the BB to clear the motor. Luckily the 46t offset chainring is much better in clearing the motor and the offset can be towards the BB. That being said, the DM01 chainline with 46t chainring and 1.5mm spacer is 55mm which is close but should work for this frame with rear boost spacing. Given that the linkglide/cues 9 speed cassette I am using will give a better chainline as the linkglide system used 11 speed cassette spacing but on a 9 speed cassette with the additional cogs for 10 and 11 speed being added towards the center of the hub.

https://www.oneupcomponents.com/pag...glcKW1Nkql0BJ104ANo0mcb2akI5ABgRSynvnO0s3k9n5

I have never been a fan of the stock BBSHD bracket used to keep the motor from rotating, especially the use of raised bumps to dig into your BB. Maybe not an issue on a used clunker frame but I just cant get myself to do this on my new $700+ frame. A such I have always been a fan of different stabilizer braces like those sold by california ebike (I am using the ones for full suspension on my BBSHDs for about 4 years now, cost $30). I tried modifying one of these for the DM01 and it was just too much work and likely too weak once completed.

Some have described the use of these stabilizer braces as "It is a half-assed solution that uses a sledgehammer to swat a fly" which seems like a highly emotional response to a surefire way of keeping your motor from rotating and chewing up your BB. I would never consider swatting a fly with a sledgehammer a half ass solution, more of a guaranteed solution. I know people doing the double locknut 90ft-lb which have still had issues.

I have decided to try a brace like the one shown in the attachment(marine grade stainless steel m5 turnbuckle), only $7 which is about the same cost as a BBSHD locknut (you actually need 2 for the DM01 as the DM01 locknut will not work with the $$lekkie tool needed(which I actually have)). That being said, I am going to use a BBSHD locknut so I can use the lekkie tool. I will be using the DM01 bracket with the raised bumps(same as BBSHD) as well but will have a aluminum BB spacer to keep from chewing up my BB.

FWIW, the double hose clamp method will not work with the DM01 as there are bumps needed for various bolts around the circumference which would interfere with the hose clamp.

In the end, I will likely make my own stabilizer brace (similar to the california ebike full suspension model)
 

Attachments

  • image_15300.jpg
    image_15300.jpg
    243.6 KB · Views: 51
Last edited:
Soma Juice ToSeven DM01 install
I got my m5 turnbuckles (5 for $13) but they dont have the adjustable thing out lined in red in the attach pic.. See the other attached pic for the turnbuckle I have. I have been modifying/bending the mounts but they are now at an angle that I need to ovalize the hole for the bolts to fit thru..see the third attached pic.

At this point, I am just going to go with another BBSHD (with california ebike full suspension stabilizer bar....another attached pic) and revisit the DM01 around Jan/Feb when I am snowed in for a few weeks.
 

Attachments

  • bbshd-brace-edited.png
    bbshd-brace-edited.png
    1.8 MB · Views: 6,230
  • turnbuckle.png
    turnbuckle.png
    459.8 KB · Views: 52
  • IMG_20241113_225737551.jpg
    IMG_20241113_225737551.jpg
    73.1 KB · Views: 54
  • IMG_20241113_230136914_HDR.jpg
    IMG_20241113_230136914_HDR.jpg
    197.7 KB · Views: 51
I have several surly`s including the bridge club. I run a rock shox recon with 120mm travel on the BC. The bike is run with 27.5 x 2.8 schwalabe moto x tires. The bike actually performs better to me with the suspension up front. I know surly sez not corrected but I have built up 2 of them with the recon and both owners agree and would never go back to non suspension set ups. Don`t take everything you read to be by the manufacture to be solid. Try it yourself.
Well actually I have been trying it myself since I first got into mountain biking in the early 90s (before suspension forks) and having continuously upgrading frames/forks (more travel) ever since.

The general rule of thumb is adding 10mm of travel slackens the headtube angle by 1/2 degree, raises the bar/stack height (can negate with lower stem), raises the BB and slackens the seat tube.

The overall result is less user weight on the front wheel which reduces climbing performance as the front wheel is more prone to lift. Also less traction at the front on flat terrain while cornering.

Its usually ok to add up to 20mm (accepted wisdom + my experience) before handling degrades too much. I know of people using higher numbers but nowhere as extreme as the suggested 120mm fork on a BC.

FWIW, I recently had a professional bike fitting due to hip problems due to alot of riding (25 mile per day usually). One of the things we determined was that I would benefit from a steeper seat tube angle which was a consideration.

The BC has 71 degree headtube and 73 degree headtube. The BC fork has an axle-crown of 420mm

A RockShox Judy 120mm fork has a axle-crown of 510mm so you are raising the front end 90mm(3.5 inches):eek:. So roughly your headtube angle is now (71-4.5->66.5) and your seattube angle is now (73-4.5->68.5). I cant imagine how badly your setup would work with all that weight on the back wheel due to the bar height being raised 3.5 inches and the seattube angle at 68.5. To get the weight balance back in check would require extended chainstays like on Jones Bikes.

You made a bad assumption that I was 'blindly following surlys recommendation" which couldnt be further from the truth. I did the math and the research which was backed up by my 30 years of cycling experience on this very subject.

Worst advice I have seen in awhile and thats saying something.
 
Last edited:
Well actually I have been trying it myself since I first got into mountain biking in the early 90s (before suspension forks) and having continuously upgrading frames/forks (more travel) ever since.

The general rule of thumb is adding 10mm of travel slackens the headtube angle by 1/2 degree, raises the bar/stack height (can negate with lower stem), raises the BB and slackens the seat tube.

The overall result is less user weight on the front wheel which reduces climbing performance as the front wheel is more prone to lift. Also less traction at the front on flat terrain while cornering.

Its usually ok to add up to 20mm (accepted wisdom + my experience) before handling degrades too much. I know of people using higher numbers but nowhere as extreme as the suggested 120mm fork on a BC.

FWIW, I recently had a professional bike fitting due to hip problems due to alot of riding (25 mile per day usually). One of the things we determined was that I would benefit from a steeper seat tube angle which was a consideration.

The BC has 71 degree headtube and 73 degree headtube. The BC fork has an axle-crown of 420mm

A RockShox Judy 120mm fork has a axle-crown of 510mm so you are raising the front end 90mm(3.5 inches):eek:. So roughly your headtube angle is now (71-4.5->66.5) and your seattube angle is now (73-4.5->68.5). I cant imagine how badly your setup would work with all that weight on the back wheel due to the bar height being raised 3.5 inches and the seattube angle at 68.5. To get the weight balance back in check would require extended chainstays like on Jones Bikes.

You made a bad assumption that I was 'blindly following surlys recommendation" which couldnt be further from the truth. I did the math and the research which was backed up by my 30 years of cycling experience on this very subject.

Worst advice I have seen in awhile and thats saying something.
I made no assumption of you at all. But I stated what has been built and the results of a few riders around here. I did miss state the travel of the fork I used. But no matter as you are a expert. Riding 25 miles a day. Wow! I`m impressed. That is a usual single track day for us in the morn. and another run in the eve. I would post some of my builds but won`t. Matter of fact you can have this damn site ace.
 
CYC Photon Update
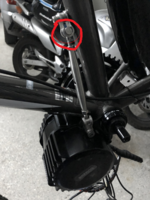
As mentioned previously, my CYC Photon seemed to stop engaging the motor for assist. You could hear the motor spinning, it just wasnt engaging. This didnt happen out of nowhere, I noticed it more and more over a month or so.

Kudos to Electrify Bike Co. who sold me the photon. I contacted them since my photon was only a year or so old and it comes with a two year warranty. They replied with a prepaid shipping label to send it back to them. I just never got around to it and eventually decided to just fix the problem myself since if this is going to be a recurring problem sending it back for repair would be a major hassle. The Photon comes with two sprag clutches (one way bearing). The stage 1 is at the motor output and the second stage is embedded in the chainring mechanism.

Research indicated I needed a chainring removal tool ($15) and stage 1 sprag clutch ($15) of which I bought 2. I ordered all of this from CYC in Hong Kong and it arrived within two weeks or so (roughly).

The stage 1 sprag clutch can be seen starting at 11:30 in the following video

As it turns out, the Photon is easy to disassemble and replacing the stage 1 sprag clutch is super easy. The hardest thing is getting past the gasket compound as shown around 1:30 in the following video

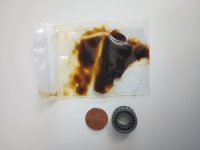
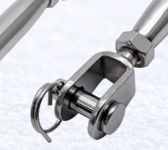
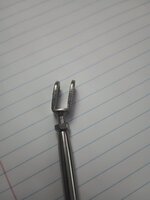
As can be seen in the attached pic, the stage 1 sprag clutch is super small, about the size of a penny. They also supply sprag clutch specific grease although I bought some brose sprag clutch grease from an ebike motor repair shop for backup.

The only special tool other than an allen wrench was snap ring pliers required to remove the sprag clutch from the gear assembly it was in.

Easy Peasy, 30 minutes the first time. Now that I know what I am doing, it would probably take about 15 minutes next time.

I by no means have been easy on this motor. I have been running in the highest asisst levels quite alot although I backoff as the temps reach 90C.
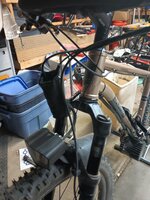
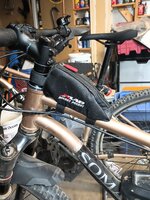
Magura MT5 upgrade
I decided to reinstall the Magura MT5 brakes on the Soma Juice. While there were no issues with the Shimano Deore setup, I always liked the feel of magura brakes on previous bikes. I like the feel so much that I installed a second kit. Its hard to quantify why I like the feel so much more. In a nutshell, the Shimanos are more off/on and SRAMs(which I have on two bikes) are all about modulation which can take more lever travel. The maguras seem somewhere in between and the MT5 kit was a steal at ~$230 at jensonusa
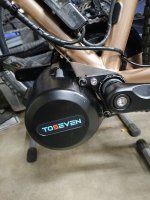
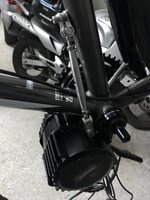
ToSeven DM01
I figured out how to make a california ebike motor brace work with the DM01 so I will eventually put it on one of my bikes once it becomes chain replacement time. Sometime this summer

Surly Ogre GMAC bike
Unfortunately trying to sell this bike in the Nov timeframe had no potential buyers thru the end of the year so I took it off the market and have been riding it about once a week. I really like this bike and setup...especially the torque sensing which leads to the next subject.

Torque Assist vs Cadence
While the BBSHD is such a powerhouse, its non torque based pedal feel is about as fun as working out on a treadmill while staring at a blank wall.

Comparing rides around 17.5mph average speed, 1500ft elevation gain, 25 miles, its hard to see much less than 17wh/mile on the BBSHD and I dont enjoy it at that level. I typically seem to run about 19wh/mile when it 'feels good'. My heartrate is also much reduced on BBSHD rides (about 20BPM). It easy to do the same ride details on the GMAC and photon at about 16wh/mile.

And yes, I am pedaling and getting a workout (at least on the torque assist rides). Torque assist rides usually end up at 130/160 bpm avg/max heart rate and BBSHD rides are about 110/130 avg/max bpm. Human power average according the cycling analyst is usually 150watts (torque assist setup)

In the end, having a Torque based assist AND a cadence based assist works best for me as I can have on/off days and still ride everyday. I also have two torque based strictly offroad eMTBs
 

Attachments

  • IMG_20250224_163346364.jpg
    IMG_20250224_163346364.jpg
    131.9 KB · Views: 23
Last edited:
ToSeven DM01 update #2
Despite the fact that I am going to use a modified california ebike BBSHD motor brace (the full suspension model), I decided to buy some spare BBSHD axle/retaining nuts (clamps unit to BB) so I can use my lekkie socket tool to tighten these nuts with a torque wrench.

They dont work. Despite being the same thread, the BBSHD diameter is 32.75mm and the DM01 is 33.24..WTF :eek:so I will have to use their wimpy nut and even worse tool to tighten it (with a hammer). The DM01 nut does go on the BBSHD (loosely..scared to torque down) but the BBSHD nut will not go on the DM01 past a thread or two.

The more I look at the DM01, the less I like it. Everytime I get into all the DM01 install details, it seems to end in frustration. Anyone in the Denver/Boulder area interested in a discounted DM01?.

Future Potential additions/changes
Considering a second CYC photon as a spare. Wish they were not so $$.

Considering a Grin all axle rear motor for one of the Soma Juice. While I love the GMAC setup on the Surly Ogre, its 135mm axle spacing will not work on the 148mm boost spacing on the Somas. Compared to the GMAC, it has less acceleration due to being DD instead of geared hub drive but with statorade should be better heat wise when really pushed and only slightly higher weight (1#). I would have to limit elevation grades to around 6%(just guessing, needs further analysis) but I could do that, only using this setup for faster and flatter rides.

The Somas do have replacable dropouts which could 'potentially' be redesigned for the GMAC spacing(needs more research) and I do have 3d CAD experience and a 3d printer which could be used for prototyping. Not sure if its worth the effort though

A CYC Photon and Grin All Axle(+spokes+quality rim, use existing CA and phaserunner) both come out to about $1k .
 
Last edited:
Back