KidWok
Member
Got my ST1 LE 19 months ago and have put on 6k miles so far. Last year was the wettest year on record in Seattle for quite some time. It was pretty obvious that the fenders wouldn't be long enough so I added mud flaps, as I have many times before on road and commuter bikes. I quickly discovered that speed pedelacs kicked up the water fast enough that the water stream atomized on contact with the mud flap. Over the last year, I've revised my mud flap design multiple times and now have one I'm really happy with. Here's how they evolved:
Version 1: Used the long side of an orange Tide laundry bottle and attached it to black plastic fender plug with two M4 bolts and lock nuts. As noted, high speed water spray atomized on contact, enveloping feet and drive train in a fine mist that flushed the lube out of the chain after any short amount of time on wet pavement.
Version 2: First tried folding the flap so that water impacted at an angle, which didn't noticeably help. Then drilled some holes to add a series of vertical strings (chalk line) along the inside of the flap. The idea was for the strings to wick the water down, which helped a little. This assembly started getting heavy and version two ultimately disappeared when the black plastic fender plug fell off mid-ride.
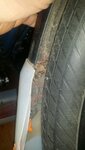
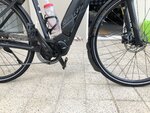
Version 3: Stromer sent me another plug. The plug has a small hole in it, presumably for water to not collect in the fender cavity. I drilled a 1/8th inch hole just above that on the inside of the aluminum fender so that I can run a small zip tie to make sure the plug is firmly attached (picture attached...you can barely see the pink zip tie covered in road crud). This time I also wanted to lengthen the flap so I used an old water bottle (LDPE) and the long section of another detergent bottle zip tied together, mostly because the orange looks good with the blue on the LE. This worked fairly successfully for some time, but the wind eventually blew back the flap so that it was flying almost horizontally. That actually was fine because it was enough to protect the drive train and I had started commuting in Hunter Chelsea rain boots. However, the LDPE bottle was repeatedly creased where it attached to the plug and eventually broke off mid-ride. The plug stayed put thanks to the zip tie.
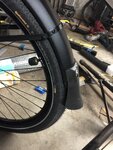
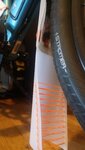
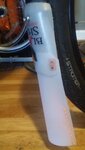
Version 4: Now I'm using two halves of the water bottle (LDPE) for the top, connected to both inside and outside of fender plug. This creates a very rigid top half that keeps the lower flap in line with the fender. Played with various materials and have found that HDPE from a gallon vinegar bottle is light, durable, and flexible enough to be scraped and knocked around. Middle section of vinegar bottle where label is attached yields two flaps, but at this time I'm still only running a front flap because I don't care about spraying behind on my commute. In addition to vertical lines, I've now added a pair of zip ties horizontally in the middle of the lower HDPE section, which holds the curvature of the flap and elevates the lines off the plastic. This dramatically reduces the amount of mist at high speed as it seems the gap between the lines and the plastic create a pocket for the disrupted/decelerated spray to mix with any remaining mist and exit downward. Version 4 pic attached.
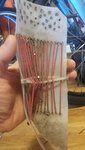
Version 5: Needed a flap for the rear due to towing my son around on a trail-a-bike, so I took another LDPE bottle and the other half of the HDPE to make another flap. Once more, the flap is attached to the fender plug with two M4 bolts and the plug is zip tied on to the fender body. Having realized that a large gap between the strings and the plastic lower flap greatly reduces mist, I decided to run the strings horizontally with holes drilled along the side edges, instead of vertically as before. This serves to both hold the flap in a eye pleasing parabolic curve and maximized the de-misting pocket. Am now running version 4 on front and version 5 on rear. Version 4, with its vertical endpoints at the bottom of the flap has always collected a bunch of leaves, dead worms, etc. Version 5 clearly stays cleaner and does a better job eliminating mist. I ran out of vinegar again today, so the front flap has now been updated as well (pictures attached).
This has been a fun design challenge and I hope it helps other speed pedelac owners get the most out of their bikes year-round.
Tai
Version 1: Used the long side of an orange Tide laundry bottle and attached it to black plastic fender plug with two M4 bolts and lock nuts. As noted, high speed water spray atomized on contact, enveloping feet and drive train in a fine mist that flushed the lube out of the chain after any short amount of time on wet pavement.
Version 2: First tried folding the flap so that water impacted at an angle, which didn't noticeably help. Then drilled some holes to add a series of vertical strings (chalk line) along the inside of the flap. The idea was for the strings to wick the water down, which helped a little. This assembly started getting heavy and version two ultimately disappeared when the black plastic fender plug fell off mid-ride.
Version 3: Stromer sent me another plug. The plug has a small hole in it, presumably for water to not collect in the fender cavity. I drilled a 1/8th inch hole just above that on the inside of the aluminum fender so that I can run a small zip tie to make sure the plug is firmly attached (picture attached...you can barely see the pink zip tie covered in road crud). This time I also wanted to lengthen the flap so I used an old water bottle (LDPE) and the long section of another detergent bottle zip tied together, mostly because the orange looks good with the blue on the LE. This worked fairly successfully for some time, but the wind eventually blew back the flap so that it was flying almost horizontally. That actually was fine because it was enough to protect the drive train and I had started commuting in Hunter Chelsea rain boots. However, the LDPE bottle was repeatedly creased where it attached to the plug and eventually broke off mid-ride. The plug stayed put thanks to the zip tie.
Version 4: Now I'm using two halves of the water bottle (LDPE) for the top, connected to both inside and outside of fender plug. This creates a very rigid top half that keeps the lower flap in line with the fender. Played with various materials and have found that HDPE from a gallon vinegar bottle is light, durable, and flexible enough to be scraped and knocked around. Middle section of vinegar bottle where label is attached yields two flaps, but at this time I'm still only running a front flap because I don't care about spraying behind on my commute. In addition to vertical lines, I've now added a pair of zip ties horizontally in the middle of the lower HDPE section, which holds the curvature of the flap and elevates the lines off the plastic. This dramatically reduces the amount of mist at high speed as it seems the gap between the lines and the plastic create a pocket for the disrupted/decelerated spray to mix with any remaining mist and exit downward. Version 4 pic attached.
Version 5: Needed a flap for the rear due to towing my son around on a trail-a-bike, so I took another LDPE bottle and the other half of the HDPE to make another flap. Once more, the flap is attached to the fender plug with two M4 bolts and the plug is zip tied on to the fender body. Having realized that a large gap between the strings and the plastic lower flap greatly reduces mist, I decided to run the strings horizontally with holes drilled along the side edges, instead of vertically as before. This serves to both hold the flap in a eye pleasing parabolic curve and maximized the de-misting pocket. Am now running version 4 on front and version 5 on rear. Version 4, with its vertical endpoints at the bottom of the flap has always collected a bunch of leaves, dead worms, etc. Version 5 clearly stays cleaner and does a better job eliminating mist. I ran out of vinegar again today, so the front flap has now been updated as well (pictures attached).
This has been a fun design challenge and I hope it helps other speed pedelac owners get the most out of their bikes year-round.
Tai
Attachments
Last edited:


")