Specialized Electrak 2.0: An Irremovable Tyre!

Stefan Mikes

Well-Known Member
Region
Europe
City
Mazovia, Poland
Had a hard day, and still no resolution.

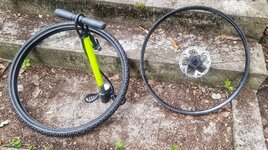
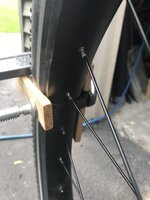
This morning, I could successfully remove a Specialized Electrak 2.0 from the custom DT Swiss rear wheel. It was not easy to break the tyre bead but doable. (I needed to replace the Electrak with a Smart Sam for better traction in mixed terrain).

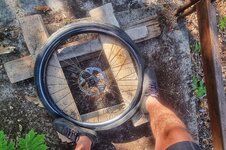
When I removed the front wheel (a Specialized one), it turned out I could not remove the tyre bead totally clinched inside the rim! I am afraid that even three strong men could have issues to break the bead on this specific tyre!

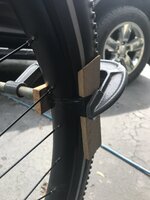
I'm worried. It looks that the tyre will remain on the wheel until the death of the latter. Things made worse as the Electrak is a wired tyre...

ANY ideas?
 
Stefan, I encountered the same issue when swapping the 45North Wrathchild studded tires off my Norco BF VLT to Maxxis Minions earlier this year. The bead would simply refuse to release off the rim and so I resorted to a more extreme method of extrication. I elevated the wheel using several boards/2 x 4s and while holding one side of the wheel as leverage, I applied downward pressure on the other side of the wheel using my shoe until the bead released its grip. A wood pallet would likely do in a pinch. Worked like a charm for me on both F/R rims. This technique should work regardless if the tire beads are wired or folding. There’s no way I could possibly remove them with the strength of my hands and tire levers alone.

PXL_20230426_200337681.jpg

PXL_20230426_202651968.jpg

PXL_20230426_204828441.jpg
 
Thank you so much Art! I have some wood and could try your technique in my Old Home (which undergoes reconstruction post-fire now!)
 
The main purpose of the wood is to elevate and protect the rotors/cassette so the platform doesn’t have to be that high off the ground. Just make sure that the wood that you use is of uniform width/thickness and that the wheel is level and not wobbly when placed on top. It actually works better if both/all sides of the wheel are supported by the wood underneath creating a stable surface. Good luck!
 
@Prairie Dog thank you! The operation according to your method has been successful! I don't think I could replace the tyre without your advice! Have a nice day!

P.S. The other side of the bead was torn off with fingers by a construction worker Mariusz whom I hired for my Old Home reconstruction!
 

Attachments

  • 20230711_073903-01.jpeg
    20230711_073903-01.jpeg
    843.9 KB · Views: 96
  • 20230711_081054-01.jpeg
    20230711_081054-01.jpeg
    990.1 KB · Views: 94
  • 20230711_083850-01.jpeg
    20230711_083850-01.jpeg
    857.6 KB · Views: 102
Last edited:
Glad to hear that it worked for you. It's not often that I get the chance to help others out as much so hopefully this technique will provide some solace to those who need a quick fix when it comes to stubborn beads.
 
great suggestions! thanks! i didn't want to risk stomping on the tire and damaging the wheel so i got a C clamp and some wood and pinched it from the wheel.
it worked good! thanks for the ideas!

(the pics are from the front tire with air...i just wanted to show what i did)
 

Attachments

  • IMG_2638.JPG
    IMG_2638.JPG
    168.2 KB · Views: 24
  • IMG_2639.JPG
    IMG_2639.JPG
    140 KB · Views: 20
Back