REVIEW: QR-E 250W ELECTRIC BOOSTER BICYCLE MOTOR AND B60i AND B70 BATTERY

To answer my own question about Brompton compatibility.

It does fit in the rear but involves removal (or trimming) of the mud guards. Fold is affected because the seat post doesn't go all the way down. There is also this option for front mounting which I might explore at some point:
Would the Qiroll quick release help with your folding/seat post interference issue? It's not expensive, $24 USD.
1746101435703.png

At one point I installed my Qiroll on the front fork of a 26" bike that had an easy install unlike your Brompton. It seemed to work as well as it does on the rear wheel (caveat, I only did a couple short test rides).
 
Would the Qiroll quick release help with your folding/seat post interference issue? It's not expensive, $24 USD.
View attachment 192835

At one point I installed my Qiroll on the front fork of a 26" bike that had an easy install unlike your Brompton. It seemed to work as well as it does on the rear wheel (caveat, I only did a couple short test rides).
The quick release would help in the sense that the motor can be removed without tools, but that's not something I can see myself bothering to do every time I fold so I think I will just have to live with the slightly bigger folded size.

By the way, where did you get that spring hinge from? I can't seem to find anything similar at my local hardware store
 
The spring hinge is 3" stainless steel that I got off Amazon. I needed cobalt drill bits to make the Qiroll attachment holes and one for a bolt to the kickstand platform, if you don't have cobalt bits it might be better to source a hinge that isn't stainless. I have used a similar 4" hinge on a different bike where I mounted the Quiroll on seat stays but 4" is to long for this bike and location (would hit chainring or left crank arm). Couldn't use 3.5" self closing hinges because the knuckle/barrel portion length is the same as on a 4" hinge.
 
Yeah, I abandoned the idea to drill my hinge to mount directly to the motor, and then also had to return some brackets I thought might serve as an adapter but didn't quite fit. Considered a few other options but ended up designing an adapter to have 3-D printed, which should arrive any day now. Hopefully soon after I'll have this thing on my tandem.

Bummer that other (non Qiroll) friction drive motor burned out so quickly! Short lifespan + weight penalty doesn't sound like an appealing combination.

Interested in your latching switch project. Certainly a neater solution than the rubber band I've used to hold the switch closed!
 
Interesting, post up when you get your custom printed adapter - I hope it works out like you want.
I had my reasons for the non Qiroll purchase but my experience with it is a reminder for me to not have a credit card close by while browsing on the computer with my morning coffee - lesson learned (sort of).
 
The spring hinge is 3" stainless steel that I got off Amazon. I needed cobalt drill bits to make the Qiroll attachment holes and one for a bolt to the kickstand platform, if you don't have cobalt bits it might be better to source a hinge that isn't stainless. I have used a similar 4" hinge on a different bike where I mounted the Quiroll on seat stays but 4" is to long for this bike and location (would hit chainring or left crank arm). Couldn't use 3.5" self closing hinges because the knuckle/barrel portion length is the same as on a 4" hinge.

Thanks for the info. It's certainly neater than the zip tie, bent coat hanger and springs from an IKEA desk lamp contraption that I had going on before 😅
 

Attachments

  • 1000046599.jpg
    1000046599.jpg
    282 KB · Views: 70
Ha, I understand your lesson only too well.

Just had an email exchange with the 3d printer (which I farmed out via a site called craftcloud) - at first it sounded like there was some weird problem and he needed me to revise the CAD model, but I think we've clarified that there's just a rough edge which could use a little filing and sanding, and he'll ship it soon.

It's only my second go-round with CAD & 3d printing. The first was for a nylon shim which sat between QiRoll's Strida adapter and my tandem's smaller-diameter tube. The shim itself turned out fine, it just wasn't a great mounting arrangement on my bike,
 
Still trying alternatives to the stock control switch. This time using latching pushbutton switches instead of temporary blade. The mode button can remain latched for the regen function or blipped on then off to switch between low and high assist levels. The other button to actuate boost will stay on until switched to off so I might wire in one of the normally closed brake switches repurposed from my burned out non-Qiroll friction drive to cut assist while braking without having to use the push button.
IMG_20250513_112227611.jpg
 
Hey Guys

I have a new Qiroll Flex that I won't be able to use in my area with big hills. It has maybe a mile on it, roller is clean - no wear, comes with a roll of abrasive tape and a 6 mo waranty from Jason at Qiroll. LMk if anyone has any interest. I live in San Diego.
 
Getting close. 3D printed adapter seems fine, and simply bolting it to a stretchy velcro-based strap seemed like it'd be plenty secure on the bike. But the strap's flexibility gave the assembly too much freedom to easily rotate in multiple planes (viewed from above, viewed from the side of the bike).

1747442482398.png

1747442539243.png


1747442760424.png

I'll have another go with a nylon ratchet strap which should arrive tomorrow. The ones I already had turned out to be much narrower than I recalled.
 
Predictably this project has me repeating "this is why I'm a software guy."

Bolted hinge/motor assembly to strap

1748120139470.png


But even this non=flexible nylon strap, tightened as much as I could manage on the bike, twisted a lot with the tension of the spring hinge. Clearly I either needed to use a very rigid strap - like the hose clamp EMGX suggested earlier - or, the light bulb went off, give this hinge assembly enough length so that I could anchor it in two places, front and back. I had some scrap wood nearby, formerly louvers on a closet door. Cut a piece and bolted the hinge to it.

1748120975012.png


Even my very stretchy velcro-based straps hold this reasonably securely, wrapped around both the front and rear of the assembly. Good enough for a short test ride, though I think a cleaner, more secure solution will involve bolting this to a universal bottle cage mount I have, which I've confirmed will strap firmly where it'd need to go on the bike's frame.

The problem that quickly arose surprised me: my 3D printed hinge-to-motor adapter snapped in half! Apparently the "tough resin" material I selected for this part isn't tough enough.

1748121762260.png


Maybe I should just find a way to drill holes (or have holes drilled, so I can avoid accumulating more tools I'll use exactly once) in the hinge so I can attach it directly to the motor without need for an adapter.
 
Your hinge looks like it might be galvanized/zinc steel which should drill fairly easily with standard drill bits if they're sharp. If it's stainless then cobalt bits might be necessary (Home Depot has a sale on a good looking Milwaukee cobalt drill set this weekend). Use a center punch to mark the spot you want to drill otherwise the drill bit will tend to wander. I hope the fabric strap you use will work for your application but a stronger more stable attachment might be needed. Good luck with your project, I hope you get it to work for you.
 
Last edited:
Thanks. Stainless, and confirmed my cheapo "high speed" bits got nowhere. I had +some 1/4" aluminum intended to make a sturdy platform, and had plenty extra to fashion a hinge-to-motor adapter.

1748800215230.png


This assembly now feels rock solid. But you're right about needing a more stable attachment than anything I've tried so far, including the two-strap bottle cage adapter I currently have this bolted to. After tightening those straps it felt reasonably secure, statically, requiring a fair bit of force to nudge it out of position. But moving the pedal through a few revolutions, causing the bike wheel & motor wheel to rotate, has the assembly rotating toward and eventually into one of the cranks it's nestled between.
 
Thanks. Stainless, and confirmed my cheapo "high speed" bits got nowhere. I had +some 1/4" aluminum intended to make a sturdy platform, and had plenty extra to fashion a hinge-to-motor adapter.

View attachment 194551

This assembly now feels rock solid. But you're right about needing a more stable attachment than anything I've tried so far, including the two-strap bottle cage adapter I currently have this bolted to. After tightening those straps it felt reasonably secure, statically, requiring a fair bit of force to nudge it out of position. But moving the pedal through a few revolutions, causing the bike wheel & motor wheel to rotate, has the assembly rotating toward and eventually into one of the cranks it's nestled between.
Does your spring hinge hold the roller tight enought on the tire to prevent slipping especially in the high setting?

I tried my Qiroll on a 20" folder riding a gravel rails to trails. Qiroll did fine but 20" folder wasn't a good bike choice on this sometimes loose and bumpy gravel. Fun few days anyway.
IMG_20250602_120338604.jpg
IMG_20250603_105800486.jpg
IMG_20250603_121003958.jpg
IMG_20250603_122305467.jpg
 
Last edited:
$200 Walmart folder I bought many years ago to put in the back of my car and ride a gravel dike path after work. Rode after dark in the winter with coyotes and deer for company, eyes glinting from my headlamp. Was a good ride for limited distances on gravel.
I like the bike and wanted to give it a longer distance gravel try after reading that bike friday and brompton have marketed 20" folder "gravel" bikes. Not the right tool for the job for other than shorter rides IMO. Was contemplating taking it on the Mickelson trail in SD but after this experience I'm taking a large wheel bike.
our local "Wally world" has very few bikes and usually there are no big discounts like "kevcentral" wrote about on his podcast,anybody that's interested in MTBs I recommend "kevcentral" blog pretty interesting at times. Wow you got some great places to ride,my part of the "Eastern trail" looks like a war zone,with the trail bikes tearing it to pieces.
 
Does your spring hinge hold the roller tight enough on the tire to prevent slipping especially in the high setting?

That's the 64 thousand dollar question I hadn't really considered until an hour ago when I attached this assembly once again to by bike and noticed the force holding motor to tire was less than I expected. Can't say for certain it was less pressure than in earlier attempts, but it was the first time in all this fiddling it occurred to me that it might be insufficient.

And the test ride confirmed it is too little force. Rotated fine with the wheel while pedaling normally, but pressing the boost button - even in eco mode - had it just spinning against the tire. And this is with rough carpet gripper tape, not the smoother stock stuff.

That's... a setback. I could play a little with front-back positioning of the assembly so that the hinge is at a little greater or lesser angle, but I really don't see this making enough difference. Spring force doesn't seem to be adjustable. When I began this project, I had some concern a door-closing hinge might be too strong for this application, not too weak.

Well, I have a little over two weeks before we take the bike on tour to figure out & execute a solution, which I very much hope to do. We can certainly ride without the motor and our route this summer (Toronto -> Ottawa -> Montreal) is pretty flat, but it's just a heavy, inefficient, shockingly slow bike... and I've planned our stops with the motor in mind, covering a little more ground than we're comfortable with in acoustic mode.

- -

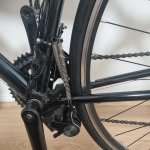
The water bottle cage adapter has slots for 1/2" wide straps, which conveniently seems to be the standard width for hose clamps. I bought a kid which let me cut my own clamps to desired length. It took a few tries to work out to position and orient stuff in this tight space between two cranks and with other neighbors like brake/shifter cables, but once that was solved it was pretty straightforward. As expected, tightening these stainless clamps holds the assembly in place extremely securely. Nothing is moving a millimeter!

The adapter's original velcro-based straps work well for holding the hinge closed, to physically disconnect the motor from the tire, so when I bolted my platform to the adapter I slid one of those straps in between..

1749682249964.png


I had also drilled a couple more holes in my aluminum platform, to try the standard "clamp to chain stay" method:

1749683089971.png

but between the cable guides and the irregular welded joint, I couldn't get it to lie flat and securely. Though in theory I now have a more universal hinge/motor assembly - if only I can get it to actually, you know, work! - with both chain stay and bottle cage mounting options, so I could I could move it to my road-ish/randonneur bike.

And trying to get this to work emphasized how shockingly out-of-round this bike's rear wheel is! Had this thing (inadequately) mounted in a position that gave several mm of clearance, only to have the tire rub & get stuck along the platform's edge after half a rotation. Seems like the mounting the motor on a spring/hinge should allow it to follow the contour far better than fixed/rigid mount.

Also want to mention, in case it's useful to anyone attempting something similar: there's plenty of places who will laser cut aluminum (or stainless, etc.) and would've done a neater job than I managed, and saved me acquiring a few tools. I chose to DIY to have more control over the timing: I was getting nervous about having everything finished before our end-of-June trip. (Of course I remain nervous, with still no working solution...)
 
Last edited:
Back