Radrover Controller & Display Upgrade Kit

I've been using a stock '17 Rad City battery to power my 1000w+ MAC geared hub for 4 years now. I've never had it shut down on me in that time - BUT - I charge the battery when it gets down to 46v or so. An event that might cause a big sag in voltage (wide open blast while crossing a busy street for instance) is exactly why I've chosen the 46v as a point to get serious about charging. It simply would not do to have the battery crap out on me while crossing a busy street! Clearly the bike could be nursed to go much further than the 35 miles or so I get on an average charge, to take it down to 46v, but I've no need to do that.

No clue on the 48kmh reading. Mine is rock solid.
 
I installed the Upgrade kit last night on my 2019 Rad Rover and everything went well. I'm having a issue where its putting out to much wattage even on PAS 1. Its going over 100 watts even on PAS 1 and can't seem to get lower wattage even adjusting C5 to 1 and C14 to 1. On PAS 2 its going up to 300 watts which seems to high and my cruising speed is 17 mph and I'm barley pedaling. PA3 is just crazy fast and is almost like PAS 5 and goes 25 mph and I'm barely peddling. I had to change C1 to 7 because when starting to pedal it would take to long before the PAS would kick in. I've changed C1 to 1 just to make sure that's not what's causing the high wattage but that has no effect on why PAS 1 is using over 100 watts. I'm also on flat ground with no hills here in Florida. I was hoping I could dial in the wattage under 100 on PAS 1. I'm not sure what else I can try at this point.
 

Attachments

  • 20211113_130838[8574].jpg
    20211113_130838[8574].jpg
    159.4 KB · Views: 201
In the manual I'm looking at, C5=01 and C5=02 are "undefined". C5=03 would be as low as you can go, and that value should cut available power in half. I doubt you'll need to go that low. I think I'm running C5=05 or C5=06 on my 1000w rig, and a little more more power (C5=10!) for the 500w rigs I run.

In any case, it takes some tinkering with C5 and C14 to get it right where you want it. Something just under 100w in PAS 1 is a good target for good low speed control. Worth the trouble to get it just right for sure.

PAS sensitivity (C1) is a matter of 'druthers. I like it set pretty sensitive for good low speed control in tight quarters, as in trail work.

Have fun, and don't be shy if you need a hand. There's a couple of us that have spent some time with these KT's. -Al
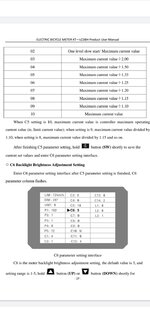
Thank you for the Info. I really appreciate the help! I Just found this from the PDF I downloaded from this forum. I attached the page. If I had C5 set to 1 I was getting maximum current. Thats why PAS 1 was going over 100 watts. I'll give it a shot tomorrow and and Adjust the C5=3 and go from there to see if it cuts the wattage down some.
 

Attachments

  • Screenshot_20211113-180401_Drive.jpg
    Screenshot_20211113-180401_Drive.jpg
    131.4 KB · Views: 203
Last edited:
Thank you for the Info. I really appreciate the help! I Just found this from the PDF I downloaded from this forum. I attached the page. If I had C5 set to 1 I was getting maximum current. Thats why PAS 1 was going over 100 watts. I'll give it a shot tomorrow and and Adjust the C5=3 and go from there to see if it cuts the wattage down some.
I Just wanted to post a update. I changed C5 to =3 and it cut my watts almost in half in PAS 1. Its closer to Rads stock Controller wattage. PAS 1 is around 75 Max watts now and PAS 2 around 175 wattage max. I'm pretty satisfied with the settings on 3 but may go up to 4 or 5 after more testing. :)
 
There you go! You're off and running. Good job....
 
What's the point here Timpo? Just somebody else rebranding KT controllers? I see NOTHING indicating it will work with the latest generation of RAD bikes.
 
Thanks for the link. Mine is still working and turns the ole city into a different bike. No issues with battery because you hit top speed so quick. Hilly country would be a different story but I advise people to walk it up real steep hills rather than cooking the whole system and risking a problem. Especially if you are over about 175lbs.
 
Thanks for the link. Mine is still working and turns the ole city into a different bike. No issues with battery because you hit top speed so quick. Hilly country would be a different story but I advise people to walk it up real steep hills rather than cooking the whole system and risking a problem. Especially if you are over about 175lbs.
There's also the option of converting a 'City to a geared hub rear wheel. Most hills will no longer be an issue, and pretty sure many will see a little better range on a charge. The KT controller works AWESOME on geared hubs as well as the stock 'City direct drive hub. It's just a change regarding the wires leading to the motor. There's no other changes required...
 
There's also the option of converting a 'City to a geared hub rear wheel. Most hills will no longer be an issue, and pretty sure many will see a little better range on a charge. The KT controller works AWESOME on geared hubs as well as the stock 'City direct drive hub. It's just a change regarding the wires leading to the motor. There's no other changes required...
I looked several months ago and none to be found with the correct dropout spacing for a city. 135mm I think it was. 140mm will fit too. Anyone know where to find one around 1000 to 2000 watts geared with 135 to 140mm dropout spacing?
 
I looked several months ago and none to be found with the correct dropout spacing for a city. 135mm I think it was. 140mm will fit too. Anyone know where to find one around 1000 to 2000 watts geared with 135 to 140mm dropout spacing?
Have you looked at 1000w Mxus xf19r? Its 140mm dropout. Motor connector is z916 (stock Rad).
 
Well I just installed and tested out my Radrover Upgrade kit from Boltonebikes.com.
It's a 35a controller and I also chose the KT-LCD8H color display.
My 500W Canadian 2018 Radrover absolutely flies up hills now.
I recommend this to any Radrover owner who wants more power, especially if you bought the 500W Canadian model.
I affixed the controller to the frame with industrial velcro and a few zip ties, seems to be on there pretty good.

Finally I have access to the full potential of the motor.
I'm going up steep hills now at 33-35KM with light pedalling whereas before I'd be struggling to reach 15km/h.

Will post back after some longer rides and commutes to see how battery life is and top speed. Have only done a short test run.

The controller fits ok with the stock fenders too.


One thing to note my PAS sensor wasn't working right away, changing setting C1 to 3 fixed the problem.

View attachment 30623
Also have a 500 watt canadian version, have the rad-mini. Can you share your settings?

My pass sensor is also not working, will try your suggestion.
 
I installed the controller and display and a 12 magnet sensor on my 2016 Radrover a few days ago. After fiddling with the settings, especially C1, C5 and C14, I compared my upgraded bike with my wife's stock 2016 Radrover. What I found was that at PASS 2, the stock bike performed better during initial pedaling. The stock bike ramps up to 750 watts momentarily after half a turn of the pedals and then tapers off. Some people say that the stock Radrover has a soft start. Maybe the early models didn't have it? Anyway, to get the initial push to be more or less equivalent, I have to put the upgraded bike to PASS 3 or 4. Even then I don't get that momentary peak of 750 Watts. The upgraded bike does have more watts available to climb hills and I have seen it go past 1000 watts while climbing. But I miss that initial high torque of the stock bike. Believe me, I tried all different settings and even changed the sensor back to the original 6 magnet. Still no matter what I do, the Bolton upgrade does not have that initial kick of the stock bike. Any suggestions?
 
I installed the controller and display and a 12 magnet sensor on my 2016 Radrover a few days ago. After fiddling with the settings, especially C1, C5 and C14, I compared my upgraded bike with my wife's stock 2016 Radrover. What I found was that at PASS 2, the stock bike performed better during initial pedaling. The stock bike ramps up to 750 watts momentarily after half a turn of the pedals and then tapers off. Some people say that the stock Radrover has a soft start. Maybe the early models didn't have it? Anyway, to get the initial push to be more or less equivalent, I have to put the upgraded bike to PASS 3 or 4. Even then I don't get that momentary peak of 750 Watts. The upgraded bike does have more watts available to climb hills and I have seen it go past 1000 watts while climbing. But I miss that initial high torque of the stock bike. Believe me, I tried all different settings and even changed the sensor back to the original 6 magnet. Still no matter what I do, the Bolton upgrade does not have that initial kick of the stock bike. Any suggestions?
This is a Bolton kit, or something like a Bolton?
Regarding this initial pedaling. I'm wondering how many watts are indicated?

How many watts indicated when you give it full power from a stop using the throttle?

Your C-5 setting?

Re: C-1, note that this is clearly about polarity/which side of the crank the magnet and sensor are mounted on, but it's also about crank sensitivity. Set to the highest sensitivity (see RH column on chart), the motor is going to get power as soon as one of the magnets passes the sensor - makes no difference 6 magnet or 12 magnet, when one of those magnets passes the sensor, the motor is getting power. ASAP sounds cool, but I'm here to tell you if that magnet passes the sensor accidentally/unintentionally (like when climbing on or off the bike), and that motor fires up when you aren't planning on it (called a false start), that can be a real "thrill". I'm OK with it because I know what happened, but if it were to happen to the wife for instance, that would become an issue quickly. For that reason, mine are set to "higher", where the sensor is looking for at least 2 magnets to pass it before applying power (pretty much eliminating any chance for a false start). "Highest" gives the best low speed control for trail work, but suit yourself..... I just wanted to share how that works.


There's also the basic differences between SPEED based PAS (std. RAD), and POWER based PAS (KT kit). The lower initial (PAS 1) power is generally welcomed by those riding SPEED based PAS as it enable MUCH better control at lower speeds - say under 10 mph. The SPEED based PAS generally heads right to the max speed allowed in PAS 1 (12-13mph?). How is the RAD when trying to ride at 6 mph for instance?

The amount of power for PAS 1 CAN be set to the user's preference in the KT (using C-5/C 14). Where that's not possible for the RAD.

Point being, the RAD controller could easily accelerate faster than the KT when both are in PAS1, but most people would not view that as a plus, prefering better low speed control available with the KT. It's not like you're loosing anything with the KT. If you want to accelerate as fast as the RAD, use more power (higher PAS level or C-5 setting).
I will answer tomorrow when I have more precise numbers. But C1 is confusing to me. The table on the manual that I have has two columns, the left column is for the Kunteng Sensor and the right column is for the Kunteng V12 sensor, on the left column there is Forward 5 signal, Forward 8 signal and Forward F10 signal. On the right column there is Reverse 6 signal, Reverse 10 signal and Reverse 12 signal. The setting are 00, 01 and 02 on the left and 05, 06 and 07 on the right. There is no entry for 03 and 04. So which one do I use?
 
C-1 is telling the controller if you are using forward and reverse signal (which side of the crank your disk and sensor are mounted on). Stay with the one you have that's working (forward vs. reverse). 6 or 12 magnets make absolutely no difference. I don't iknow what manual you are looking at, but this one shows the 3rd "start sensitivity" column.
 

Attachments

  • ktlcd3.pdf
    2.7 MB · Views: 185
Yes, the 3rd column is the start sensitivity. But what is forward 5, forward 8 and forward 10? Is 00 the highest sensitivty?
 
I didn't find any difference in the 5/8/10 settings. Go ahead and play with them to see what you think? You aren't going to hurt a thing in my experience. 00 is the highest sensitivity for forward mode - just be careful with it. It WILL bite you. Not often, but after the second or 3rd time you'll be paying attention. I'll guarantee that! A dog only burns it's nose once, right? It taught me to have a firm handhold on one of the brake levers when mounting dismounting. If you want a REAL surprise, have that happen climbing on a Bafang Ultra powered mid drive with 1600 watts on tap. That torque sensing can bite the same way....

Please note confusion with this manual is normal. The English interpretation (Chinglish) leaves a bunch to be desired. I've been messing with these conversions (I've done 7 of them) since 2016. That's the ONLY reason I've been able to figure a lot of this out.... -Al
So I tried all C1 settings and did not find much difference. The controller does not respond until a few revolutions of the pedals and the assist increases gradually. Maybe something is wrong with the controller or the sensor?
 
So I tried all C1 settings and did not find much difference. The controller does not respond until a few revolutions of the pedals and the assist increases gradually. Maybe something is wrong with the controller or the sensor?
Maybe the P3 setting has something to do with it?
 
Back