Sorry I'm a little late answering.
From your experience, it really does sound like R1U has it pretty dialed w/ the cadence set up.
It's so easy to have problems arise from stretched wires, often during assembly.
I've been all through the wiring and found more than one that had 50 - 90% of the fine wires broken. Replaced and all gremlins left.
Some of, perhaps even all of the problems could have been my doing to some extent, and even if not, R1U's not at fault.
One hurried worker on an assembly line in China could also cause it.
I'm fine with digging in, learned a lot and got lucky figuring it out - well, I used others as the crash dummy this time. You replace 3 controllers in a row, either God hates you or it's not the controller, but a big clue came when I installed a new throttle and problems disappeared, so I carefully peeled the insulation down on the old wires and sure enough, there it was.
There's only so much R1U can do. They don't weasel out

, but a lot of owner problems are also bad settings and it takes time w/ back and forth to resolve. Never have I had them tell me "You're off warranty" sorry. In fact they took me to school. They didn't have to, but they spent hours of their valuable time to teach me what I needed to know. Why? I think it's their way of business - and that's not an easy path.
So I warn you: DO NOT pull hard on the wires, if you must pull at all - like changing out a display or throttle, as in when you need to get to the connectors through the hole in the frame. Always remember: those signal wires are some extremely flimsy hairs.
I plan to drill a different hole in the Battery Downtube, like the 700's have, but because of metallic particles being shed I'm waiting until I do a complete overhaul of all wiring that's a weak link and I can clean everything as well.
Not sure what would happen if some fragments of aluminum fell down through that bottom bracket hole into my torque sensor, and not going to find out, or I'd already have drilled. I must tape that hole shut first. That requires full disassembly of the battery compartment
Also, first I need to know what's on the other side where I'm drilling, so must see the inside first.
It's a major pain to get the lock and upper plate back in. Have to get it right the first time.
If you ever remove that upper plate and lock, here's a huge tip: Mark the plates position and depth with a fine marker before disassembly - or suffer endless attempts until you get it lined up perfectly - which is the only way it will fit. Last time I sprained two fingers before I was done.
The replacement twist-grip throttle(s) I've purchased have all had better wires than stock thumb throttle.
The Wuxing (right side) 1/8 twist throttle works great (See here:
Wuxing Throttle with plug $12.83), but w/ stock handlebars the shifter is near impossible to fit correctly because the throttle's housing interferes and the wing on the grips is in the wrong position - no problem w/ Jones bars.
My left thumb's not up to a thumb-throttle, but I have a leftie twist grip I plan to try.
It's a bit too busy w/ a shifter, throttle, turn signals and brake all on one side so I found a leftie twist grip I'd planned to try and it seems built a lot better than the others. It also has a shorter throw (twist), like 1/8 turn (I prefer) not 1/4 turn.
If you do decide to change, you'll like it so much, you won't even notice when your using the twist throttle. It becomes 'one' with you, totally intuitive control without even thinking about it. For me it completely changed the character and my riding experience was greatly improved.
There are pitfalls.
The wiring colors often don't match, but with the diagrams available in Google images that's not a problem.
Another, the grip must be fully installed where the outer (plastic) bearing is fully seated all the way on, or you'll have problems.
Another is the housing should not be touching any other part of the assembly. If it is when you start tightening down the grip, it will be pressing even more as you tighten and I've found the throttle acts crazy when stressed like that.
Another is, the connector plugs probably won't match. Be prepared to solder and shrink fit some wires, or better yet, to remove and re-install the pins in your old, correct plug (using the existing pins), with the little tool for that purpose.
This leftie came with just the pins installed
View attachment 124401 and much sturdier wiring (3 to 4 times the copper strands w/ thicker and stiffer insulation than stock).
Another (maybe) problem for some could be the inability to remove the plastic grip and install nice quality grips. For that you need a Domino ($110.00) IP67 Full Twist Throttle or a Magura ($95.00) throttle (which is not as good or ergonomic see:
Domino v Magura throttles) - the guys at SurRon say the same thing.
Both come with 5 wires - we only use three of them, the other two are for a cut-out. A big deal w/ serious power, like the WattWagon I have on order (160 - 200nm torque) which also has Magura brakes w/ a cut-out circuit. You tap brakes, power goes off regardless you might have brain lock and be on the throttle while also trying to stop w/ brakes.
Of course save the thumb throttle in case you sell the bike. Most ebikers don't like twist types (until they've tried them, lol). So it won't decrease the value to suit them.
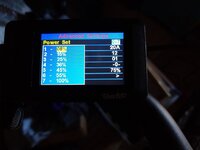
I’m beginning to understand your preference for the voltage display. Today, with 17 miles on my trip meter, it shows 92% remaining. A little optimistic IMHO, haha. The voltage to % algorithm isn't great, and with the effects of individual throttle use, the % readout doesn’t feel accurate.
It's not accurate, but the voltage reading is. The "92%" reading is 92% of an arbitrary setting. It can be set to read 92% with 40volts left, or 53.
I hate guesstimating. I got 24 mile range before changing to V, now I get over 30.
The older I get, the more I appreciate the degree that weight plays in the fun. I pity folks who buy a fat tire bike not realizing it’s gonna weigh 70+ lbs and handle like a truck. One of my favorite routes includes a spot where I have to lift the bike over raised railroad tracks. At 57+ lbs it's not a problem for me, but my riding buddy has to detour to a regular street crossing to get to the beach on his Rad Rover.
Your experience mirrors mine. Heavy is just not the feel I want and it's terribly inconvenient for me, carrying my machine up and down stairs - which I often do twice a day. Would have been no problem 15 years ago when I squatted 350 with ease, benched twice my weight to do my reps and had 20lbs more muscle, but it would still drive like a truck. lol
Your rack looks great, what brand is it? Mine is pitiful, came off a previous bike and is mainly used as a fender replacement for the odd puddle (since it never rains in California).
That's an 'Axiom Streamliner Disc DLX Bicycle Rack Pannier Carrier 27 - 29” 700c', I love it and they're priced right too. See:
DLX ebay (last one left) $51.81 . I tried several, even a Tubus at thrice the price - not impressed. This one is well worth the $$$, has great welds and a thick finish. A cool feature about a black rack is if you do mar the finish, you can easily touch it up.
Speaking of useful input: I check my tire pressure about every 10 days, and just like my previous ebike, there is usually at least a 3-4 psi drop each time I check. I normally run 52 psi: minimal rolling resistance without having to worry about sliding out on the odd gravel patch. It’s hard to beat the adrenalin from a curvy downhill run, going just a bit faster than what you know is “safe”.
I've been perplexed over the 30 - 55lb rating on the tire and cluelessly running at 35 - 45lbs.
I find you advice a better feel worth the effort.
You'd love my testing run. A slight downhill 1/4 mile straight, but you have to be careful as there are two street signals and * trash-pickers, will step in front of you, cross when their light's red, j-walk without bothering to look what's coming at them, or simply stand in the street screaming and babbling.
After the first straightaway, it turns into a high-speed 's' curve, then immediately, a left u-turn that converts to a tight right semi u-turn and on to a full throttle 1/4 straightaway - that even has a nice dip you can get air on. That straight has a fence and then trolley tracks on one side, no lights and clear visibility all the way to the end. Because there is no sidewalk on the trolley side, it's much safer from J-walking pedestrians.
I'm so far leaned over in those turns I'll get pedal strikes if my pedaling timing is incorrect - even a bit over 53volts
View attachment 124409 as you can see from this run on 5/23/2022 the bike is very quick.
That's running on level 2. I just don't use 3, so I haven't tested the Ltd at that power level, but now I think I will. Wonder if I can hit 32mph ? We shall see.
I must say running that course a couple times a week has vastly improved my skills and continues to.
Long Note*. I've clipped two J-walking trash-pickers so far, and suffered a laydown from another's huge construction trash bag full of cans who pushed his stolen shopping cart loaded (literally. it was gigantic) 8' high with stolen and trash-picked stuff out from hidden between two box-trucks; 25 -30' in front of me, and I'm going 28mph in the leftmost lane, on a 4 lane one-way - packed with commuters trying to get home as fast as they can.
Totally hemmed in by traffic on my ass, in front and on the side, I instantly decided I'd prefer hitting him to being run over by the impatient driver 10' on my tail, but he saw he was going to get clobbered and quickly pulled his body back between the trucks, (leaving 3/4 of the cart still in my lane and dumping the mother of all 'bag of cans', which fell off and blocked over 3/4 the lane.
Rapidly closing, I went as far to the right as I could get and I really thought I had it, but that 10' x 5' bag (he'd no doubt shoplifted at Home Depot or Ace Hardware, since those bags are expensive) was too big and it had burst, cars sending cans flying everywhere.
I hit the last foot or so, the bag hooked me and pulled me down.
He was nice enough to ask me if I was okay and that was good, because as soon as I saw him approaching I had my hand on my mini-bear spray - knowing how so many of the 'homeless' as a rule blame everyone else for the problems and if you disagree they get violent.
So I picked myself up and painfully rode home on throttle, my hip in a lot of distress and a month of healing (sigh).
My bars, the front and rear racks and pedals saved the bike frame and wheels from damage, but the bars were bent a bit (the rule there is 'replace immediately') so I bought those 2.5 rise Jones H-Bars to replace the stock bars I didn't get on well with anyway.
My display was cracked, left grip destroyed, left mirror broken off and my clothing ruined (why I wear heavy cotton pants - Carhartt - when I ride).
Anything protruding on the left side caught the damage (dang those cranks and pedals are strong!).
I had a pro-bike shop check the bike over and he said the frame seemed okay. No creaks going forward, bike is stiff as new. I'll risk it.
Certainly not that bad. I could have been killed and I healed up fine.
-
Sorry for the rant.
Another smart move: paying the eBikery shop in Santa Barbara to do the initial setup and tune turned out to be a good idea. My front wheel and rotor arrived out of true and there was some question about whether I had a warranty issue or a claim against FedEx for shipping damage. Having a certified mechanic do the initial assembly was a prudent move, and as you have pointed out, polite persistence was rewarded by R1U’s Customer Service, who took good care of me
My rotor was also bent and the box mangled. FedEx is brutal and often irresponsible.
I confess they left a horrible taste in my mouth when they claimed they'd delivered $450.00 worth of Snap-On wrenches and had my signature - while I was out of town?
Five days later - after causing a huge mess and the seller now sure I was a scammer, I came home and there was a big, red roll of wrenches ) with the word SnapOn in white, 4" high letters, in plain sight laying on my doorstep - in an apartment building?
I checked and they again claimed I'd signed for receipt.
I avoid doing business with them.
Those H-Bars on ebay went for more $$$ than new - lol. They were also 710mm and I want 660's. I'd have to buy a small pipe-cutter.
So, 10 minutes after the auction ended, I ordered a set from Jones, had them in three days and installed yesterday - right after changing out my rear pads.
I'd ordered 4 sets of
TEKTRO E10.11 P20.11 Brake Pads from aliexpress (the Red P20's, not the Green P10's) for $23.60, total cost.
Not bad. In USA 1 set's $20.00 total price and ordered on May 10th, they arrived the 20th.
You must have wrenched on stuff w MC's as a hobby?
Not sure if you don't know how to do the brakes, or can do it with your eyes closed, but if you're thinking about a shop doing it, there goes the $$$ for your nice bars or rack, to pay Retail and Labor. I don't much BYO parts moves with any (shop) mechanics, because I know the prices for the labor are supplemented by parts sales profits. If I do it's because they can't get it ... and I tip heavily.
LSS. I put the in same amount $$$ as the next guy to keep my bike running proper, but it all goes to the parts - and an occasional tool.
So, I'm going to lay out
the 20 minute procedure for changing f/r pads on the Ride1Up Ltd's TECTRO Disc Brakes and maybe help someone else too.
TEKTRO's made it easy. No need to remove your wheel. The bike remains upright and you need only remove three small bolts.
A problem can arise if you don't first use a screwdriver to pry the old ones to fully retract (esp if well worn down), then remove and replace them. Otherwise, the cups may be too out to fit over the new much thicker ones over the disc ... and you'll have remove them, put the old ones back (best option), then pry them apart (who cares if they're damaged). Or attempt to pry the new ones, and almost certainly damage them.
For convenience, I use a 1/4 drive ratchet; a speed driver handle; a 3" extension and 4mm/ 5mm hex-sockets.
Take photos of the assembly for reference regarding the spacer thick side/ thin side; then glove-up and prearrange your new pads in the steel 'Y' holder, familiarizing yourself with how they fit.
Disassembly
Loosen the small bolt that holds the brake pad retainer.
Then remove the two bolts holding the caliper.
View attachment 124501 From this point on
DON'T EVEN BUMP YOUR BRAKE LEVER Here's my brilliant work with MS Paint - lol lol.
Rather than annoy you with a huge photo, it's remove green YES, red NO, green YES.
I firmly, but slowly pry them apart to fully open the cups and don't care that the pads surface is marred.
Now unscrew and remove the pad retainer bolt.
The pads press out (with whatever. I use my hex socket's shank) easily at the chrome 'Y' pad holder clip's end.
Best practice is to immediately install new pads and get them on the rotor. I've noted that without resistance the cups can continue to open to a point the new pads won't fit over the disc. Let us

not go there. This is a piece of cake.
Grab the new set assembly (gloved) w/ pads in the metal 'Y' pad holder clip, pinching a bit to hold and inset them into the caliper.
If you fail the first time the bike will explode, simply pull them out and do it.
They are magnetic and will snap right in place. Feel the 'click'?
Now screw in the retainer bolt (not completely tightening it yet).
If the retainer bolt won't slide right in and through, jiggle it a bit to seat the pads. This is the alignment 'fail-safe'.
Check your photos and set the 'assembly stack' up.
Sliding the caliper onto the disc and tighten down the 5mm bolts until you can just move the caliper side-to-side.
Attach a gapping tool
View attachment 124616 to the rotor and roll it in place between pads.
If it won't easily fit, pump the brake a few times and try - that will reset to the correct gap for the thickness of your new pads.
Fully tighten the pad retainer bolt.
The Home Stretch !
Pump the appropriate lever a few times and hold firmly closed while you tighten the calipers bolts down snug.
Roll the wheel back, remove the gapping tool (yes I forgot and left one one once).
Snug to specs you're comfortable.
I can feel a bolt's snug points - and often use a torque wrench. Up to you.
There's also a tool for truing your rotors for about 10 bucks on aliexpress. They work great.
This is too long so Bleeding will have to wait.
............................................................................................................................................................................................
So I tried the P20's .........
Next up!
Fn'F


 crash dummy.
 .
.


![20220516_145719[1].jpg](/data/attachments/123/123714-6b89af1589d744d4666ffd5060ae2bcf.jpg)
![20220527_092823[1].jpg](https://forums.electricbikereview.com/data/attachments/124/124596-1c980379b117e0b1b89c52eb264c249f.jpg "20220527_092823[1].jpg")


 ? I'm definitely getting that low.
 's' for 'tire info'!