Known Issues & Problems with Rad Power Products + Help, Solutions & Fixes

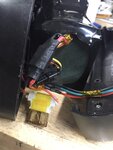
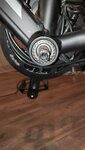
2018 Radwagon - 2 of them just arrived last week and I put them together. One came in a damaged box and the front rotor was bent. After photos of box and a video, support is sending me a rotor. The second one seems to have an issue with the rear fender as the wheel spins straight but the fender rubs right at the rear of the bike where that rubber thing attaches to the plastic fender. Thinking fender was deformed a bit in shipment. Had to remove the rear tire, which was actually a good practice to learn, and try and loosen the screw to move the fender over a bit. First attempt failed so I had to remove the tire again. Took screw out all the way to learn there is no play at all. The hole is only as big as the screw. So I took a hobby knife and made it just a small bit wider so I could move it over a bit and tighten it down. That fixed it. So now on that second bike I moved on to try and align the disc brakes.... Oh, I forgot to mention, every single disc rotor was rubbing on the brakes! Ok, yes, one was bent... but I’m sure it would have as well since the others were as well. So I’m an engineer, pretty good DIY’er and mechanically inclined. I have taken care of all of our family bikes, have a good set of tools and torque wrenches etc etc.... but I have never had disc brakes and these have been a pain in the royal ______ to adjust. The first tire I attempted to adjust was the front on the second bike that was not bent... I watched all kinds of videos on mechanical disk brakes and even the one that someone put together on the Radwagon and the business card trick. You know how when the bike arrives and the brake levers are tight, I mean a short pull and the brakes engage... well there was no way I could get that to happen without this rotors rubbing... Oh I eventually got that front tire spinning nicely with no rub and the brakes work, but I have to squeeze them a bit more than I’d like. So today I moved to the rear tire and with the pads installed in these it seemed even closer to the disc rotors than the front. I had to remove the rotor to even get to the rear fixed pad adjustment. Trying to use the various business card tricks was a pain. I finally got it as adjusted as I could, but there is still a slight rub. I had to give up. Yes I tried all the alignment tricks out there... remember, I watched a ton of videos. I had to come to the conclusion that these are Just difficult to adjust calipers. The fixed pad side seems to be too close to the rotors and even if I try and push the calipers in to make a larger space back there I can’t do much, they don’t go back much. I tried to retract the pad, but you can only go so far and the disc would be pushed against the metal frame of the caliper instead of the pad. Next I’ll have to try the rear brakes on the first bike as I’m still waiting for the replacement rotor for the front..... Oh yea, I had to remove one of the bolts on the plastic shield so I could get an extension in with my torque wrench to tighten the bolts...

I’m waiting for a new spoke wrench \ tool to show up as all the ones I have are too small. Based on many comments it sounds like I should try and give each a 1/2 turn to make sure they are tight to start...

BTW... yes the brakes should have been easy to adjust... heck every video I watched made it look very easy... yes I tried them all... no, I’m not incapable of following directions, heck I write them as part of my job and have to do way more difficult things than adjust disc brakes...

Ok, now the big question, can I replace these ____ disc brakes with a set of those hydraulic ones that still use a cable without voiding the warranty? If so, which ones are plug and play with the 2018 Radwagon? One guy on a RadRover was using the Junitech M1’s, but they seem to possibly be and older option based on what or who I find selling them.

Still no ride, no joy... Mostly my fault as I have the bikes at work as I’m trying to surprise my wife for Xmas. Thus I can only work on them for a few hours after work... I spent 2+ hours trying all those tricks on all those videos grrrr...

Batteries are charged and I can’t wait to test drive each bike soon...

Hey, another question from an eBike Neophyte... the front wheel spins great and freely. The rear, even when the disc rotor is not rubbing, seems to want to come to a stop much faster. Acts like the motor is adding friction or resistance to free spinning. Is that typical on an eBike with a rear axel motor?

Wow I ramble... enough for now... thanks for a great forum...
 
Last edited:
Oh shoot... seems like my really long post was hidden until someone approves it so my reply below has no context....

Here is the question I eventually asked in the message still waiting approval

Ok, now the big question, can I replace these ____ disc brakes with a set of those hydraulic ones that still use a cable without voiding the warranty? If so, which ones are plug and play with the 2018 Radwagon? One guy on a RadRover was using the Junitech M1’s, but they seem to possibly be and older option based on what or who I find selling them.

Alright, I found this one as well

https://radpowerbikes.zendesk.com/hc/en-us/articles/115004786874-Disk-Brake-Adjustment

Seems a little rubbing is Ok for the first 50 miles... hmm... maybe I may not adjust the other rear tire and see what happens...

Rubbing just seems bad to the engineer side of me, but I have no experience with these disc brakes.

Possibly I should tighten the ones I adjusted already so they rub a little again?
 
Last edited:
Personally, I don't consider "rubbing" part of a good plan either. Maybe some "engineering" has rubbed off on me over the years as well? I look for a minimum gap that's pretty much equal on both sides.
 
@windmill :rolleyes:!

Anyone know what that proper spoke tension should be for those RadWagon wheels? Particularly the rear motor wheel.
Our shop repaired a RadWagon that was about to tear up the motor wires. The lock nut that Rad Power uses is not strong enough for such a heavy cargo bike. We replaced it with a heavier duty one; there wasn't enough room for the GRIN torque arm to fit which is what we wanted to use. Need a slightly thinner torque arm. For cargo bikes in general torque arms would be a better choice than the lock nut.

According to a Rad employee: 100 kgf
 
I agree plug is a pain to install since new. I found that a little lube helps slide in and actually stays in place. Would like to see an upgraded plug.
I now use a modified plastic golf tee to assist installing rubber plug. Do not use metal screwdriver or you will have to split battery case and replace automotive style blade fuse
1550631105729.jpeg
1550631105729.jpeg
 

Attachments

  • 1550630996133.jpeg
    1550630996133.jpeg
    161.7 KB · Views: 888
Just to report an issue I just had. Some time ago I was rubbernecking, looking everywhere but where I was going, and ran the bike ('18 Rad City) through a 4" deep hole in the pavement. This caused the entire bike to loose power, including the LCD display. (WHAT THE....?). I hit the button to turn the display back on, and it responded. Good to go again, I finished that trip, and have gone on several since, covering maybe 100 miles. Yesterday, while riding locally, I managed to do the same thing, and lost power again. This time it wouldn't come back on. I tried the LED display on the battery, and it showed no power. With no choice but to pedal home, I rode the bike in 1st and 2nd gear all the way, as it was mostly up hill.

Using the hint the LED gauge on the battery pack gave me (no power when I knew it was nearly fully charged), I assumed the issue was internal to the battery pack. I double checked the LEDs when I got home, still dead/no power. I turned the key switch to unlock and removed the battery for trouble shooting. Checking again, power had been restored. I've now bypassed that on/off switch permanently, hoping the switch is the root of my evil. Fingers crossed at this point, I may run the bike through another pot hole intentionally to test - this one will be MUCH closer to home! -Al
 
Yesterday my Rover started giving me "error 30" messages again? I'm getting real tired of looking at that message! But this time it would lead to system shutdown in the middle of the ride.

Just last week I replaced the wiring harness, display and controller. Has rolled without issue since then ... until yesterday.

The only old wires left on the bike are the brake and motor connections. What would happen if I disconnect the brake plug-ins? I don't care about auto motor shutoff anyway...
 
Joe, brake is ground to kill, so unplugging just eliminates that possibility. For troubleshooting you should be fine unplugged.

After the trouble I noted above, I'd be suspicions of the key switch as a potential issue. Really light wire going to/from it tells me it's controlling something on the BMS board that's capable of shutting the whole shootin match down. -Al
 
It's amazing how fast these radrovers deteriorate along the coast! It started out great, long rides, no issues.

Now it's all issues and lots of frustration. I'm tired of swapping out parts and wiring harnesses only to have brief moments of success.

Does anyone know where I can get a trouble shooting tool to chase down electrical connection problems, so I don't have to keep swapping out parts? A poking type tool similar to what would be used to chase down electrical issues on a car or trailer?

Tx!
 
The problem with a test light (poker) is they run on a single voltage. Your bike, depending on where you poke, may be 5-6v or 48v. A 48v poke with a bulb that will be visible on 5 or 6v will result in a very short flash, then darkness! Nothing saying you couldn't attach a poker to a voltmeter lead. Problem is, every time you poke a wire, you're leaving a vulnerable spot to start corroding.
 
Want to say that first off, Rad power bike's has awesome customer service, but it is still a bummer when something you spend over a G on has issues. I got my Radrover a few weeks ago and have only put 30 miles on it. I lucked out that nothing was really damaged in shipping, however, I did not luck out on a few things.

First off, I think I over tightened the LCD mount? It is just a plastic mount, so be careful when tightening it or else you will tighten it too much and it pushes the plastic through and it will never get tight enough. They sent me a new mount and I installed it no problem.

Second, I was on my way to work for the second trip ever and as I was going along I noticed my left pedal felt like it was slipping. I was about 1/3rd of the way to work and I noticed the bolt that holds the pedal arm into the crank was super loose. I did not at the time have an 8mm allen wrench on me (picked up a crank brothers multi tool to avoid these situations in the future).

I was able to straight pedal assist back to my apartment (yay ebikes).

Today I tightened the bolt and it felt like it was on there very well. I went out and got about a block out when I noticed it felt like it was slipping again. Went back to my apartment and unscrewed the bolt completely and found metal shavings everywhere.

After emailed customer service and following their instructions (take off the pedal arm and see if there is damage to the crank/arm) it appears there is. The crank is "stripped" and the pedal arm is just slipping as I pedal. I am waiting for a response to see if they will send me a new crank. (check out photos of damage).

I only have 30 miles on the bike and I am super bummed as I know this will take even more time away from riding. I'm confident they will make it right, but if you have the same issue, make sure and take that arm off and check!!
 

Attachments

  • 20190418_185029.jpg
    20190418_185029.jpg
    989.3 KB · Views: 943
  • 20190418_184949.jpg
    20190418_184949.jpg
    1.1 MB · Views: 981
All due respect, but for me, a note like yours should serve as a reminder for others that part of the "assembly" process SHOULD include going over every nut and bolt on the bike to make sure they are all tight. YOU, as the assembler, are the final QC inspector, and as such are responsible for making sure the bike is right, from front to rear, prior to riding it.

"If it ain't broke don't fix it" logic will not fly here. Nor are "the bike is junk because it fell apart the first time I rode it" comments appropriate, when you've agreed to assemble the bike yourself.

An issue like your crank arm is a big deal if allowed to get to the point your is. Kinda like driving a car on a flat tire. It'll be interesting to see what Rad does here. I hope you're able to work it out with them.

I think, with some carefull "dressing" using a flat file, you may be able to save the shaft and replace just the crank arm. That joint depends on a fairly close fit between the parts, and proper tightness of that bolt, for strength. Filings and rough spots are going to prevent that from happening, as will threads too far gone to allow the bolt to be tightened properly. It would not surprise me if the bike is going to need to be taken to a shop for repair at this point.
 
I had the same issue with my pedal crank on my newley purchased 2016 Radrover. It would always become loose when riding. Found this out the hard way the 1st time when the crank fell off at 5:30am work commuting. I was able to locate the black crank in the dark; but, lost the crank screw (had to throttle it back home). My issue was with the Rad being damaged during shipping in the underprotected shipping boxes.

My spindle part wasn't as damaged as yours and a new crank arm+screw+blue loctite is still holding after +2 1/2 years and +3500 miles.
 
All due respect, but for me, a note like yours should serve as a reminder for others that part of the "assembly" process SHOULD include going over every nut and bolt on the bike to make sure they are all tight. YOU, as the assembler, are the final QC inspector, and as such are responsible for making sure the bike is right, from front to rear, prior to riding it.

"If it ain't broke don't fix it" logic will not fly here. Nor are "the bike is junk because it fell apart the first time I rode it" comments appropriate, when you've agreed to assemble the bike yourself.

An issue like your crank arm is a big deal if allowed to get to the point your is. Kinda like driving a car on a flat tire. It'll be interesting to see what Rad does here. I hope you're able to work it out with them.

I think, with some carefull "dressing" using a flat file, you may be able to save the shaft and replace just the crank arm. That joint depends on a fairly close fit between the parts, and proper tightness of that bolt, for strength. Filings and rough spots are going to prevent that from happening, as will threads too far gone to allow the bolt to be tightened properly. It would not surprise me if the bike is going to need to be taken to a shop for repair at this point.

I understand your point, but I never said the bike was junk. I never said if it ain't broke don't fix it. Putting words into my mouth isn't really necessary. I think the initial sentences of your post are valid, but the second two statements are not.

I would not drive a car or a bike on a flat tire, but this is not a tire issue. This is a brand new $1,500 bicycle that I would expect system critical components (such as the pedals) to work. If I bought a brand new car from the dealership, I shouldn't have to take it to my mechanic to make sure the engine is ok... I would expect it would work well with appropriate maintenance.

I haven't ridden a bike in years but I am learning about how to take care of them again. I would say you are right that everyone should do a full inspection of all moving pieces before they hit the road, but that is why I posted this. Not to dog on Rad Power Bike's, but to let people know if they have this issue, they need to check it out.

Again, Rad Power Bike's has been amazing since day one. They are sending me a new crank set. I am hoping that will be the last issue I have so I can ride more.
 
I wrote regarding people assembling their own bikes in general. I wasn't intending all of what I wrote to point directly at you or your situation. Many apologies if I came across differently. That happens sometimes, and is a good reason not to be too thin skinned participating in forums like this one. There is no intent to attack anyone here, only to inform.

"This is a brand new $1,500 bicycle that I would expect system critical components (such as the pedals) to work."

This is the kind of comment I was thinking of with regard to "the bike is junk" comment I wrote about. You aren't saying the bike is junk for sure - but you are not exactly taking ownership of/responsibility for the fact that bolt was loose either, or the fact the parts are now so torn up because you tried to ride it that way. Makes no difference what the bike cost. A bike costing 3 times that much is just as susceptible to the kind of issue you have. They ALL need to be checked out thoroughly....

What you have is a perfect example of what people need to know when they are considering whether to attempt a project like prepping a bike for the road on their own, or having a shop do it for you. Either way, SOMEBODY needs to go through that bike from front to rear prior to operating it on the road. Even if something LOOKS right, you need to check it out, especially those with a lack of experience. For instance, if the brake cable is routed properly, and installed with the clamps in place, you aren't going to know if that cable can't be pulled right through that clamp unless you check it, to see if that clamp is tight, and to see if the brake works as designed in a test hop!

Regarding new cars, a brand new car, even the least expensive ones, comes from a dealership that pays a mechanic to make sure that new car is OK before you get it. There is no option for you to take it home and check it out yourself.

Last, I'm glad they are taking care of you. -Al
 
Ah, alright, it came off like I was trying to trash Rad and I'm for sure not. I know I will do my due diligence moving forward with assembly/maintenance and as you said, I hope others do as well. Thanks for the clarification.
 
It's amazing how fast these radrovers deteriorate along the coast! It started out great, long rides, no issues.

Now it's all issues and lots of frustration. I'm tired of swapping out parts and wiring harnesses only to have brief moments of success.

Does anyone know where I can get a trouble shooting tool to chase down electrical connection problems, so I don't have to keep swapping out parts? A poking type tool similar to what would be used to chase down electrical issues on a car or trailer?

Tx!
Get you some dielectric grease and put in all the hole the pin go in. Use a small toothpick as you don't want grease going from one pin to another. You have to keep the salt out are you will go nuts. 72+ I had a lot of problems with cars and motor cycles when I was surfing a lot from the 60's till the 90's. Plus you has to rinse out the salt water from the outboard motors and trailers too.
 
Hey guys!
New RadRhino over here from Sweden.
Had my bike for 2 weeks now and I have not yet been able to get the gears going smooth.

I have followed several guides online and also guides från Rad Tech support.
I have set H-limit and L-limit so no problems there.
My dilemma is with the wire/barrel tension.
I can adjust the wire so I have good shifting on gear 2-7. Not first gear/largest chainring. When in first gear it makes noise and goes down to second gear sometimes.

So I adjust barrel/wire with one quarter of a turn untill first gear runs smooth, but then when I shift down to 4th gear the derailleur is not in line under 4th gear. It more wants to go to 3rd gear.

So it is either good gearing 2-7 or good gearing on 1-3 when adjusted.

Also noticed that almost all chainrings/cogs looks bent. This was from it was brand new, is this normal? It makes some chipping noise even with the derailleur dead straight in line with the selected gear.

Taking it to a bike shop soon as a last resort.
Have 10+ years experience as a car mechanic so it feels embarassing not being able to solve this to me haha!

Thanks for letting me join the forum and here is a video of the cogs.
 
Back