Those are great links
@J.R. thanks for sharing!
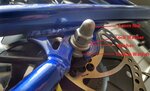
Just spoke with our technical support and service managers, and the only common questions they receive regarding the rear axle hardware on the RadWagon is how to re-install/arrange/what order the washers go on after being removed to change flats. I believe the round axle, versus double D shaped axles (two flats) results in more friction grip because of more thread engagement and the thick steel frame + locking washers prevent self-loosening normally caused by side sliding or rocking of the hub motor axle under accel and decel. Vibrations and twisting torque also contribute to loosening, and I would suspect sin wave controllers paired with direct drive hub motors smooth these factors out.
My guess is the bike which Ann M.’s shop had in for service either 1) Had improperly torqued axle nuts or 2) Had the washers in an incorrect orientation which resulted in poor clamp force, then self-loosening. This is a good tip for owners and service providers for our bikes: Check with us (
[email protected]) whenever performing service if there are questions on the correct orientation of hardware, getting replacement hardware or torque specifications. Properly setup and checked as part of normal service intervals and folks won’t have any trouble.
The RadRover, RadMini and RadCity all have a different style of axle, by design, compared to the RadWagon since they are outfitted with an aluminum frame. These models use a combination of Nyloc and serrated flange lock nuts, torque washers, flat washers (to keep the nut from scraping the aluminum frame) and torque arms for additional security in light of these being aluminum.
The feedback is definitely appreciated, and thanks again for sharing those links, your posts are some of the most value loaded on this forum.
 !
!