Kindernay VII IGH and HYSEQ Onesie shifter

Ahh, totally my mistake - sorry. I thought all those spikes where a beefy chain cog. Looking at some past pictures I can see more now.

Again, my apologies.
 
PXL_20211112_193007014.jpg

Wheel is assembled - waiting for the wheel truing stand to arrive tomorrow to finalize the process.
 
Did you get the rim ERD from the RIM spec, or measured it manually on the RIM?
The RIM on my bike has no reference, so I want to know if the manual way to measure the ERD on the RIM would be reliable :)
 
Did you get the rim ERD from the RIM spec, or measured it manually on the RIM?
I ordered same rim currently installed on the bike (which is Dutch 19) and there are published specs for it on the manufacturer web site. Luckily didn't need to measure anything.
 
Wheel is kind of ready! More than sure will need to re-adjust the spokes after first few rides after they all get it place, but this all come later. Spoke Tension Meter was quite handy for final wheel evaluation, however I don't trust it's absolute values too much - they are very dependent on the place when the measurement is done (and you can't really measure on the center due to spokes intersection). So I tried to measure as close to center as possible and kept the values close to what I see on the current wheel and what is max spoke tension for my rim (1300N is approx. 133KGF).

wheel.jpg
spokes_tension.png
 
Last edited:
Few more observations while I am preparing to put the new wheel with Kindernay VII to my Gazelle C380+:
  • since torque arm mount to the frame is implemented as an extension to the disk brake adapter, I will need to use large brake rotor (180mm vs 160mm installed). Ordered new one from Amazon, matching the one I have on the front wheel;​
  • due to the same reason (torque arm implementation), I would probably need to replace or re-work my rear rack. As I see now, I will block the disk brake adapter extension where torque arm suppose to be attached. Taking into account rack has built-in lights, it will probably not a trivial thing to replace.​
Other than these two things, I think I am good to go with new wheel installation. Right now the plan is to do this once I got all the parts and have a day or two to work on this.
 

Attachments

  • torque-arm-kindernay-vii.jpg
    torque-arm-kindernay-vii.jpg
    350.7 KB · Views: 247
If using the existing torque arm adapter proves complicated with your rack you can devise an alternate adapter.
As long as you make a way to anchor the Torque arm to the frame, you can create any system you like...
 
If using the existing torque arm adapter proves complicated with your rack you can devise an alternate adapter.
As long as you make a way to anchor the Torque arm to the frame, you can create any system you like...
This makes sense, thanks! Are there any ready-to-use parts? Or it all custom? I was thinking to utilize i.e. kickstand mount for this, but the arm looks like a bit short to reach it, so I will need some kind of "adapter" to use it. Would be great to use supplied adapter, but integrated rack might be too difficult to replace... Will think more about the options.
 
Nothing standard.
If you need help devising an alternate system, take a lot of pictures of the area from inside (without the wheel) and outside, and I can brainstorm with you.
I had to go through this exercise to devise a very custom solution for my upcoming installation, as my configuration is completely nonstandard :)
 
One more unexpected difficulty - brake rotor installation. Looks like Kindernay custom rotor can be mounted easily since the inner spacing is very large, but with standard 6-bolt rotor mount torque arm is blocking the installation. Need to find a way to take it off and didn't get anything useful in my search (also no obvious way to remove it after visual inspection). Probably will ask Kindernay guys for instructions. Any suggestions?
6-bolt-rotor.jpg
7-bolt-rotor.jpg
 
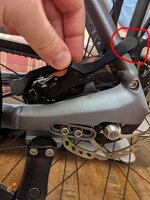
If it is like the XIV, the torque arm comes off by removing the end cap.
The end cap is pressed in, so it can either be removed by sliding a blade between the cap and the arm and cantilevering it, or by using a special pulling tool that expands inside and then pull it out.
But you can try the first method to pry the cap off the arm. I will dig up the tool they mentioned to me a while back...

I was actually thinking about that, and was wondering if the Rotor could be slid in place, but that is clearly not the case, so it seems Kindernay would be better off delivering the Hub with the arm not mounted.

I actually asked them a while back to deliver mine that way as i will be making a torque arm adapter.
 
Here is my last conversation with Kindernay for the XiV at the time.
If you can't pry the cap off, Check with them about the XIV before buying the tool.
"
Torque arm:

There is a press fit on the end cap and the torque arm. Ideally, you would use an expanding puller tool on the end cap, like this one in a 12 mm version: https://www.bearingprotools.com/collections/bearing-pullers-single/products/bearing-puller (we include that tool with our Match cap kits).

However, you can remove the end cap in a vise clamp with axle inserts, or using a knife that you gently hammer down in between the match cap and torque arm. This may damage the anodized finish slightly on the torque arm/cap but should not damage the gear hub."
 
Thanks scrambler! As usual you answers are faster and more complete than what I get from Kindernay ;)

Will try to pull the cap tomorrow and share what I got!
 
Back