Is this bicycle, a Scott Sub 20 hybrid, a good candidate for conversion to E-bike?

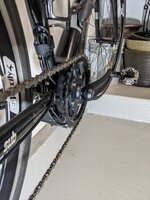
My other option is to mount the chainring on the outside of the spider and also have the chainring not mounted backwards but that may move me too far inboard.
I have never had to be concerned about chainlines or chainrings. I just basically rode my bikes so this is all kind of new to me.
I'm fine with not being able to use the lower gears.

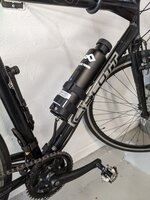
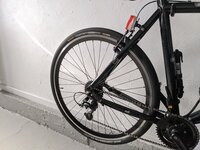
This is how the chainring is currently mounted , backwards.
 

Attachments

  • PXL_20211029_170716113.jpg
    PXL_20211029_170716113.jpg
    235.8 KB · Views: 228
Last edited:
That bike looks perfect for someone who would like to use a double chainring with the TSDZ2. I wish my 700c hybrid had that option - as it is I am running a dished 34t chainring (one of the eco-ebike solid ebike chainrings) for hill climbing but would love a double chainring on that bike but the chainline wouldn't allow it.
 
I will consider a double chainring but since I rarely use the lower gears I should be fine just getting the 3-4 highest gears working well.
How would I know which double chainring would be suitable?
 
You could use whatever tooth count flat chainrings sizes that you want that have 110mm BCD spacing. I think that I have 44/34 on my Yamaha mid drive and wish I could have the same on my hybrid bike with the tsdz2.
 
What about my current setup, chainline and having the chainring mounted backwards? Is this OK? The teeth on the chain ring don't appear to be angled in any particular direction so this should work? Right?
 
So I'm looking at chainrings to possibly replace the one that came with the TSDZ2. I noticed that many chainrings are listed as applicable to 10,11 or 12 speeds. I have an 8 speed bike, that makes one more difficult to find. What is the difference between these chainrings? Does it matter?
 
Sorry, I don't have much to add. I did replace the chainrings on my gravel bike with the Yamaha motor - that bike has a double chainring and 11 speed cassette. One of the replacement chainrings was listed as 9 speed, the other listed as 9, 10, 11. They work fine so there might not be much difference and might not matter - I really don't know. If you are staying with a singe chainring up front you might consider getting a narrow/wide version.
 
Thanks EMGX. The only thing that comes to mind is that bikes with fewer gears use wider chains and sprockets, meaning they may use a wider chainring. The difference may not really matter for most bicycles especially those using a single chainring I just need to get an acceptable chainline, which should not be too difficult. I noticed the narrow/wides and will consider them if I do replace the chainring. I will also consider a double chainring if I end up tackling larger hills with my now power assisted bike.


I'm feeling pretty good about the installation and have learned a few things about bicycles from this project. I would encourage others who are considering doing this modification to go for it.
 
Last edited:
Thanks for the encouragement. Not exactly in the wild. I'm still working on getting a more solid water bottle holder and a new saddle. I still have slipping in high gears. The chain line is now very good in those gears and gear shifts are properly adjusted. Although my chain and cassette are relatively new I believe the cassette is damaged due to gears not being properly adjusted in the past. Some of the teeth are narrow and look worn. I have a new cassette and chain on the way. I'll post photos again when I get everything dialed in.

Other than those issues I am very happy with the conversion. I'm good with coming home and not feeling exhausted from my ride.

Edit: Installed a more robust holder for the battery.

Update 11/11/21: A new 8 speed cassette fixed my chain skipping issue. Bike works great now.

1636487964847.png


Attachments

  • PXL_20211106_213716555.jpg
    PXL_20211106_213716555.jpg
    514.1 KB · Views: 311
  • PXL_20211104_194358741.jpg
    PXL_20211104_194358741.jpg
    598.9 KB · Views: 289
  • PXL_20211109_192539176.jpg
    PXL_20211109_192539176.jpg
    265.1 KB · Views: 282
  • PXL_20211109_210829915.jpg
    PXL_20211109_210829915.jpg
    821.9 KB · Views: 261
Last edited:
I replaced the 700x 32c tires with 37c. The ride is smoother and more stable. This is especially helpful as this bike does not have any suspension. Lightweight semi slick tire doesn't cut into speed very much.
 

Attachments

  • PXL_20211122_184225028.jpg
    PXL_20211122_184225028.jpg
    567.8 KB · Views: 204
I'm really enjoying the E-Bike conversion. Although today I noticed the lockring for the bottom bracket had come loose. I believe PedalUma recommended loctite red for all nuts and bolts. But it appears that Loctite red is fairly permanent and can only be removed with heat so I am very hesitant to use it. Maybe I will try Loctite Blue instead. Has anyone else had an issue with the lockring on their Tongsheng coming loose? How did you "fix" it?
 
Last edited:
I think any of these mid drives fasteners can loosen up over time, I've re-torqued my yamaha a couple of times. I do check the fasteners on the TSDZ2s once in a while. The 36v 500w currently on my Dahon Jack has never had a loose fastener, I don't use the rear chainstay anti-rotation device on that one - the motor housing is just rotated forward on the down tube. That device has been loose a couple times on my 48v 750w version, as has the bottom bracket lock ring. I think that when the chainstay device loosened up and allowed the motor to rotate forward it resulted in the bottom bracket lock ring loosening. The bottom bracket lock ring hasn't loosened as long as I have kept the chainstay device tightened - I haven't used locktite but maybe I will at some point. As you probably know, you have to remove the left pedal to be able to use the tongsheng supplied lock ring tool, so instead I have used a bottom bracket spanner tool to tighten the lock ring. It isn't a perfect fit but the one tooth part of the spanner worked fine for me to check tightness as well as tighten it up without having to remove the pedal.

View attachment 104363

EMGX, I realize you mentioned this possibly being an issue. Maybe if I just get that tool and check the lockring tightness occasionally that will be adequate.
 
EMGX, I realize you mentioned this possibly being an issue. Maybe if I just get that tool and check the lockring tightness occasionally that will be adequate.
That's what I do. Just checked the collar nut on both tsdz2 - I was able to very slightly tighten them but they weren't loose. Also tightened the anti-rotation device bolt which I could also slightly tighten on the one bike that I have that device installed on. Thanks for reminding me of it. Blue Loctite might be a good idea but I haven't used it for them.
 
That's what I do. Just checked the collar nut on both tsdz2 - I was able to very slightly tighten them but they weren't loose. Also tightened the anti-rotation device bolt which I could also slightly tighten on the one bike that I have that device installed on. Thanks for reminding me of it. Blue Loctite might be a good idea but I haven't used it for them.

I checked all the bolts and was surprised that everything was loose to varying degrees. This included the crank arm bolts. I will keep an eye on all of them and if I find that any of the bolts or the lockring continue to come loose I will probably try using the blue Loctite.
 
It is not just a matter of red Loctite on everything. Thin aluminum shims need to be cut and used around the portion that goes through the bottom bracket shell and the shell needs to be packed with grease. The grease cannot compress, sort of like hydraulic fluid. This will stabilize the motor. The amount of shim material is different for each bike. Even the same model and model year. It has got to be tight. It took me over a year to figure this out. It makes all the difference. No creaks.
I think this is what I need to do. My bottom bracket shell fits a 37mm BB, I'm converting to electric and installing the TSDZ2 33.5mm. Do you have any tips on how to do this?
 
I think this is what I need to do. My bottom bracket shell fits a 37mm BB, I'm converting to electric and installing the TSDZ2 33.5mm. Do you have any tips on how to do this?
I have not seen this thread in months. It is good to see that it is still going. I am doing an American bottom bracket bike. This shell is 51.5 and the motor fits 34.8. I am using a eccentric adaptor. In your case a headtube reducer might be the ticket. It will add 1mm in width to each side. You might also be able to fit a section of pipe or just an old bottom bracket shell from a junkyard with a couple of spot welds from the local trades school or a farmer. Here is the part that I am using.
1642284221440.jpeg
 
In part to overcome the whole chain line problem and weak chains I have one of these arriving. It is a CVT hub. The LBS has the dimensions and specifications to cut the spokes for me. I will use one of these chains. They just came to market for eBikes. Compare the side plates and the pin length to a 10-speed chain. Forces are distributed over a larger area.
1642284509825.jpeg
1642284685003.jpeg

1642284732933.jpeg
 
I only did one TSDZ2, an evaluation and review sample from the maker. It was installed on a KHS Smoothie, Townie clone, with an EM3ev battery. Being an early version there were some changes needed leading to the opportunity to do a closer look. As I completed work I employed blue Loctite as done on numerous BBSxx motors. There still were no loose fittings after significant mileage. I can only guess the total but it’s on roads, a bridge p, city streets, and paths. Definitely a bike that is ridden hard and put up wet. I just never liked how it rode. The motor that is.

@m@Robertson has another fastener product, I can’t recall..
 
Back