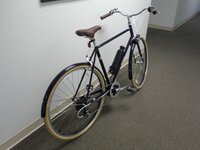
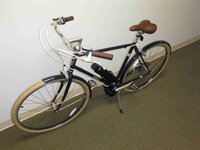
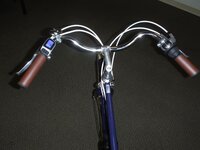
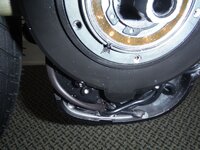
Is this bicycle, a Scott Sub 20 hybrid, a good candidate for conversion to E-bike?

Can I somehow use the two existing rear derailleur cable guides that are welded to the frame when installing a new one piece cable housing. Can I cut the housing and run the cable through the existing guides? Any ideas on how best to deal with that. I can't get a clear enough look at PedalUmas photos to see what he has done.

Edit: decided to go with these cable guides that make use of the existing guides.

Or how about just drilling out the old cable guides?
 
Last edited:
I did this one in a fast way. There are other ways to run cables that I have developed which look okay. Do not be tempted to crimp a cable or overly bend it. Curves need to be large. An overly tight housing fastener will start catching the cable inside, for example the rear shifter, causing mushy lag. It is better that a build not look tip-top than for a build to preform poorly. I used fishing reel lube inside the housings so shifts and braking are fast and crisp.
 

Attachments

  • NavyV702.JPG
    NavyV702.JPG
    224.2 KB · Views: 190
  • NavyV703.JPG
    NavyV703.JPG
    490.6 KB · Views: 190
  • NavyV704.JPG
    NavyV704.JPG
    325.1 KB · Views: 182
Installed the TSDZ2 36V 500W withVLCD6. No throttle or speed sensor. Went for my first ride today. Oh my !!! Love it . Good to feel refreshed instead of exhausted after a ride. I can easily see doing longer rides. I only need to determine what kind of range I will get with my 36V 9.6Ah battery. Nice not to have to work my butt off fighting the wind or going up the few small inclines I encounter. Mostly used level 1 and 2 assist. This bike can probably go much faster than I will ever want. Motor appears to be silent.

I will post photos next week once I am done with some finishing touches, such as dealing with excess wiring and other improvements. Overall I am very happy with the look of the bike.

I am concerned about stress on the chain. I understand being in the right gear will minimize that issue. I'm thinking of being prepared if the chain were to break. What parts/tools should I carry? I really can't hear the motor at all.

I would recommend this conversion to others as long as you have the right tools and some experience maintaining a bicycle this is totally doable. You tube videos and the members on this site are a big help also. Thanks PedalUma, EMGX and others.
 
Last edited:
Congratulations! Plan on about two hours of ride time as a starting place.
Over the years with many bikes and many riders I have had one quick link break. I that was a huge cargo bike that was being lugged uphill with two kids on the back. All it took to repair was a new quick link and two minutes.
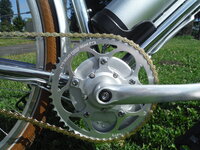
One way to get rid of extra wire is to use the hidden compartment. It is behind the chainring. The battery wire and display wire come out of it. Just remove the plastic faceplate and tuck in the extra wires. One technique I used to use is to make a figure eight of extra wire and hide that inside shrink tube. I will show two photos. The first is of the hidden compartment, the second is a bike that I did the figure eight trick on, on the down tube and painted the shrink tube silver to better match the bike.
 

Attachments

  • TS.Compartment2.JPG
    TS.Compartment2.JPG
    306.8 KB · Views: 191
  • DSCF7251.JPG
    DSCF7251.JPG
    654.3 KB · Views: 198
Thanks I'll try that with the wiring. Good to hear about the chain. One other issue, I have a large bottle battery installed in the plastic cage it came with. I also strapped the battery but I think it's still bouncing around over large bumps. Probably will try some padding.
 
Congratulations! Plan on about two hours of ride time as a starting place.
Over the years with many bikes and many riders I have had one quick link break. I that was a huge cargo bike that was being lugged uphill with two kids on the back. All it took to repair was a new quick link and two minutes.
One way to get rid of extra wire is to use the hidden compartment. It is behind the chainring. The battery wire and display wire come out of it. Just remove the plastic faceplate and tuck in the extra wires. One technique I used to use is to make a figure eight of extra wire and hide that inside shrink tube. I will show two photos. The first is of the hidden compartment, the second is a bike that I did the figure eight trick on, on the down tube and painted the shrink tube silver to better match the bike
PedalUma, the chainring needs to be removed to get at that hidden compartment? Probably why I could not find it. What do you do with the unused speed sensor? Put it in the hidden compartment also?

I'm also considering removing the chainring guard and going without it. Have you done that on any bikes?
 
Last edited:
The compartment is behind the chainring.
1) Do not use a plastic cage. Those will crack by the second ride and could cause a catastrophic Li short.
2) Chop the sensor. Peal it back and seal it so it cannot short. It can then be tucked inside the hidden compartment or left to hang as a stub.
3) Without the chainguard you will need shorter ring bolts or they will rub against the hidden compartment cover.
 
Hello everyone, new member. This appears to be a wonderful forum with great information on E-bikes. Can’t wait to learn more and start riding an E-bike.

Is this bicycle, a Scott Sub 20 hybrid, a good candidate for conversion to E-bike?
https://www.bicyclebluebook.com/value-guide/product/10302

I understand it has rim brakes and that may be a negative. My riding is mostly on flat paths/roads and I don’t typically ride in the rain. I’m not looking for high speed, just something to help me turn 15-20 mile rides into 30-40 miles.

I would change the tires to 35-38mm to give me a softer ride and better stability. I’m favoring installing a Bafang or Tongsheng mid drive motor.

Most of the new e-bikes that appeal to me go for $2.5K or above. I love riding my Scott and it fits me well so I think that conversion may be my best option. I have no issues with the mechanical or electrical requirements to perform this conversion. I’m kind of looking forward to doing it.

Guess I’m thinking of turning my Scott Sub 20 into this:
https://cyclingmagazine.ca/sections/gear-reviews/scott-e-sub-evo-running-500-watt-hours-review/

Anything I should be aware of when doing this conversion? I welcome your comments/suggestions.
Yes, I like the frame geometry & dual mounting point on the down tube for a battery. Good quality rim brakes
should be adequate for either BB or a rear hub motor ´if stays are wide enough´.
 
Thanks, john peck. So far the conversion is working well

1} Thanks PedalUma, I will get a sturdy cage ASAP because that is pretty good size bottle battery I am using.
2) Any chance I will ever need/want that sensor? I would like to get rid of it. I don't plan on ever installing a throttle, if that matters.
3) I already have the shorter ring bolts. I'm not sure if I like the look better with or without the guard.

My banging noise was coming from the rear derailleur, fixed that. One other issue that I'm having is skipping of the chain at high tension in low gears. Gear changes are fine. The chain and cassette are pretty new. But I suspect that could be an issue. Maybe there is not enough tension on the chain? Worked fine prior to the TSD installation.
Sorry for all the questions. I appreciate you sharing your knowledge.

Just came back from a 90 minute ride. I was sure glad to have some assist on the small hills towards the end of my ride.
 
You can put the sensor in the back of a hardware drawer for a few years. You will never need it. I will bet that you are getting cross chaining in low gear. That can happen on wider bikes. It is one reason I like internally geared hubs, the chain is always straight. Chains do not like going sideways. I cannot use first gear on my Specialized Chisel. That is okay because it will still climb anything that a car can ascend.
1635364515124.png
1635364559206.png
 
Yes that sure looks what is happening. I'm probably OK with not using 1st gear :(. What is the solution? A different chainring? I use the low gears of my 8 speed much more than I use the high ones. I also get noise from the chain/cassette in the middle gears if I lift the bike and pedal with no load. Did not have that before installing the motor. Adjustment of the derailleur does not seem to help. Also rates a :(

Must be plenty of others that installed this motor on an 8 speed, would they all be having these issues?
 
Last edited:
Yes that sure looks what is happening. I'm probably OK with not using 1st gear :(. What is the solution? A different chainring? I use the low gears of my 8 speed much more than I use the high ones. I also get noise from the chain/cassette in the middle gears if I lift the bike and pedal with no load. Did not have that before installing the motor. Adjustment of the derailleur does not seem to help. Also rates a :(

Must be plenty of others that installed this motor on an 8 speed, would they all be having these issues?
Never get cross chained on 5 spd, yes there still is such a thing.
 
Maybe a Scott Sub 20 hybrid is not such a good candidate for conversion to E-bike after all.
I was confused about low and high gears in my previous posts. I have chain skipping in high gears 7 & 8, that is using the smallest rear sprockets. I rarely use 1st or 2nd gear.
 
Last edited:
Thanks, john peck. So far the conversion is working well

1} Thanks PedalUma, I will get a sturdy cage ASAP because that is pretty good size bottle battery I am using.
2) Any chance I will ever need/want that sensor? I would like to get rid of it. I don't plan on ever installing a throttle, if that matters.
3) I already have the shorter ring bolts. I'm not sure if I like the look better with or without the guard.

My banging noise was coming from the rear derailleur, fixed that. One other issue that I'm having is skipping of the chain at high tension in low gears. Gear changes are fine. The chain and cassette are pretty new. But I suspect that could be an issue. Maybe there is not enough tension on the chain? Worked fine prior to the TSD installation.
Sorry for all the questions. I appreciate you sharing your knowledge.

Just came back from a 90 minute ride. I was sure glad to have some assist on the small hills towards the end of my ride.

A downside of these aftermarket mid drives is that they move the chainline outboard significantly which isn't optimal while on the largest rear cassette sprocket. Sort of like being on the largest front chainring and largest rear cassette sprocket in Pedaluma's diagram. For one 8 speed application I bought the 10mm offset "solid ebike" 42t N/W chainring from eco-ebike, the extra 5mm of offset makes a difference. That chainring is thicker aluminum alloy than the stock steel version so shorter chainring bolts weren't needed.

You might have already done this but I'd be sure to do a thorough and complete derailleur adjustment as in the Park Tool video. Apart from the chainline issues banging and skipping is typically the result of poorly adjusted derailleur.
 
Thanks EMGX. I can see that the chainline for the lower (large sprocket) gears is not good. But it should be fine/better for the higher gears. Since it's pretty flat around here I generally only use the higher gears. I'll try derailleur adjustment again as I should not have skipping with a good chainline. I think my rear derailleur is fine. I may try a new chain and cassette if I don't have any luck with adjustment.
 
The chainline on my bikes is perfect in the higher gears/smaller cassette sprockets. I've never had a derailleur wear out or be damaged (even after dropping the bike although I have had hangers bend) and unless you have huge miles on your bike it seems unlikely that you would have a cassette/chain wear or damage issue. I did recently have a non-assist bike skipping and banging badly that just needed a thorough adjustment which fixed the problem. I've done derailleur adjustments many times but still almost always watch the video to refresh my memory. Good luck.
 
I spent a few minutes adjusting the derailleur but it quickly became obvious that the chainline is the issue. This was especially noticeable once I turned the bike upside down. I then looked at my original chainring with three rings and clearly see how the largest ring (42 teeth), that I always used, is much further out from the bottom bracket than the Tongsheng chainring.

EMGX, you mention that the mid drives move the chainline outboard. In my situation the chainring is too close to the bottom bracket. It's like I am on the smallest sprocket in the front and smallest one in the rear. I need to have the chainring moved out, away from the bottom bracket. You seem to indicate that you had the opposite issue but I don't know how that is possible when the Tongsheng chainring is already very close to the bottom bracket.

I removed the chain guard and installed the chainring on the outside of the spider where the chain guard was previously mounted. This gives me a better chainline. I'm wondering if the Tongsheng chainring can be installed backwards which would give me an even better chainline to the higher gears.
 
Last edited:
That hasn't been my experience on any of the bikes that I tried the Tongsheng on so I don't have guidance on that. But with the chainline as you describe it sounds like maybe you could run a front derailleur with flat double chainrings if you wanted one on the inside of the spider (with chainring spacers if/as needed) and one on the outside. Or just use a single flat chainring on the outside of the spider if that works for your bike. I'd be interested in seeing an image of your bike's chainline as it is currently set up on both the largest and smallest rear sprockets.
 
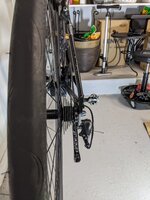
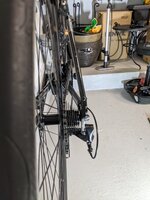
This is with the chainring on the outside of the spider and mounted backwards. This gives me a good chainline to the higher gears. I don't need the lower gears. If I mount the chainring in any other manner I have a good chainline to the lower gears but than my chainline to the higher gears is not good.

Using the TSDZ2 chainring with chainguard as was originally provided gave me a poor chainline to the higher gears and I had skipping in 7th and 8th gear.
 

Attachments

  • PXL_20211029_170915369.jpg
    PXL_20211029_170915369.jpg
    221.5 KB · Views: 225
  • PXL_20211029_170827486.jpg
    PXL_20211029_170827486.jpg
    244.6 KB · Views: 220
Back