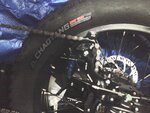
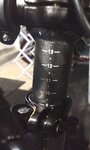
I didn't like the short thread pattern that reversing the set screw resulted in. Another poster on this forum worried about the same thing, the female threads could be wallowed out over time. I also didn't like what happened when putting the set screw in from the top, the allen wrench (hex) socket got damaged by the metal clip scraping the top of the set screw making future removal difficult or impossible (depending on the damage to the top of the hex socket). I was satisfied with the results of going to ACE hardware and buying a 95 cent M6 hardened set screw with the same "end to end length" as the factory set screw. What Lectricebike support is gunning for is a larger diameter where the spring loaded clip goes around the set screw. The machined end used by the factory results in a diameter that is too small a circumference, (it would be easier to fix this issue at the factory...) Screwing in the ACE acquired set screw by passing the allen wrench up from the bottom through the threaded hole and making sure to put locktite on the threads as they go in from the top, is a good technique. Since I "nerded out" on this project I filed flat the set screw on the solid end OPPOSITE the allen socket. Using the allen wrench to hold the ACE set screw so as not to damage the threads you'll find that just a few strokes with a small file will flatten the end of the set screw that is designed to "bite" into the shaft of a grinder or pulley this is why ACE sells "set screws". Take care to screw the set screw in with some precision partial turns at the very end of the installation, trying to keep the top sticking up as much as the machined part from the factory. You should end up with a clamp that stays closed.
If you fully understand the repair and do it correctly you should have no nasty surprise when you go riding.
WARNING: don't dissassemble the spring mechanism inside the frame lock handle, it is almost impossible to re-assemble after the bike was manufactured. Fiddling with this mechanism could cost you much time!