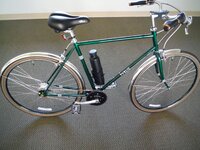
Frame lock fail

The bike was surprisingly stable even when the latch came open. If you think about it, it's really impossible for the bike to fold up with both wheels in contact with the ground while moving forward.
That being said - I'm glad the small adjustment recommended by support resolved the issue for me.

Very confident in the bike overall, amazing value at this price. Everyone who's taken it for a test drive has been very impressed and it's drawn a lot of interest out in the world.

Wrong. My frame opened up like a clamshell and both wheels went different directions , and there was a 3 inch gap inbetween the frame when I finally stopped . Enough to disconnect the battery (which was a good thing)

THESE BIKES WILL FULLY OPEN ON YOU WHILE RIDING < MAKE SURE YOU SECURE THE LATCH AND MODIFY THE SET SCREW AS DESCRIBED HERE !!

Mr.E


OK THANKS FOR YOUR OPINION Mr. E
I think you might be having some trouble with the shift button getting stuck on your keyboard.

Yes, it's obviously important to keep it latched - which is why I took the time to add the pictures of the set screw adjustment for the few of us who've had this issue.
 
hello! new to the forums and saw this thread. just got my bike and have been going over things and looking to compare notes. i took my set screw out and reversed it as suggested to see the difference. it does lock up but if i leave 4 or 5 threads out like in the picture that means there isint many threads going into the threaded portion. if i screw it down more it doesnt lock at all so i put it back the way it was. i ordered a longer set screw from ebay but i put it back the way it was and it locks fine. i havent measured the set screw on mine but being reversed i would feel uncomfortable with the amount of thread depth going into the threaded hole. with steel screws into aluminum you have to be careful with stripping. i can see they used blue loc tite. that should help with vibration and corrosion siezing the threads over time from using different metals. not sure if my set screw is shorter than the ones in the pictures but for me i wouldnt flip it around as is.
 
hello! new to the forums and saw this thread. just got my bike and have been going over things and looking to compare notes. i took my set screw out and reversed it as suggested to see the difference. it does lock up but if i leave 4 or 5 threads out like in the picture that means there isint many threads going into the threaded portion. if i screw it down more it doesnt lock at all so i put it back the way it was. i ordered a longer set screw from ebay but i put it back the way it was and it locks fine. i havent measured the set screw on mine but being reversed i would feel uncomfortable with the amount of thread depth going into the threaded hole. with steel screws into aluminum you have to be careful with stripping. i can see they used blue loc tite. that should help with vibration and corrosion siezing the threads over time from using different metals. not sure if my set screw is shorter than the ones in the pictures but for me i wouldnt flip it around as is.
My frame latch seems like it is on pretty tight. My handlebar latch not as much...
 
my handle bar latch was snug but the bars had some play. when i called the company they said to make sure the black round nut was real tight and that when you slide the handle bars into the tube it should be a very tight fit sliding in. when i did that the play went away and all is good. wondering though about the height adjustment of the handle bars. mine bottoms out with about 2 inches of space left up top with the white measurement lines sticking out. not sure if others have the same thing going on. was wondering if i need to cut some of the tube to get the bars any lower. on another subject i got tires that are from a different manufacturer. they only take 20lbs of pressure. went over all the screws,charged the batttery and slimed the tires. hope to actually try it out soon lol...
 
my handle bar latch was snug but the bars had some play. when i called the company they said to make sure the black round nut was real tight and that when you slide the handle bars into the tube it should be a very tight fit sliding in. when i did that the play went away and all is good. wondering though about the height adjustment of the handle bars. mine bottoms out with about 2 inches of space left up top with the white measurement lines sticking out. not sure if others have the same thing going on. was wondering if i need to cut some of the tube to get the bars any lower. on another subject i got tires that are from a different manufacturer. they only take 20lbs of pressure. went over all the screws,charged the batttery and slimed the tires. hope to actually try it out soon lol...

But your XP came with the stock CST tires correct?
 
heres a pic. i thought previous owners had tires that took 30psi. these say 20psi on the side
 

Attachments

  • FullSizeRender(523).jpg
    FullSizeRender(523).jpg
    858.5 KB · Views: 369
picture of my handle bar adjustments. mine doesnt go to the bottom on the measure lines. after playing with seat and handle bar height i dont think i need it lower anyway.
 

Attachments

  • FullSizeRender(524).jpg
    FullSizeRender(524).jpg
    259.4 KB · Views: 335
So, while my lock feels secure and I'm not really worried about it fully opening, mine does partially open when I'm riding it. So should I tighten the "Big Screw" with an allen wrench, so that it has less play? I've tried to forcefully pry it open and it still feels very secure, even though it's "partially open". I'd like it to be nice and tight to the frame so that I don't catch anything on it. Thanks in advance for your input.

Closed
Lectric XP Closed.jpg


Partially Open
Lectric XP Partially Open.jpg
 
No It should not be partially open. There are some pics on one of these threads that shows the proper way to tighten. It is not the big screw you adjust, its the little set screw...
 
No It should not be partially open. There are some pics on one of these threads that shows the proper way to tighten. It is not the big screw you adjust, its the little set screw...

I think that the little screw (mentioned earlier in this thread) is just to make sure that the spring loaded lock release button catches it, to prevent opening. I reversed the small screw and it works the same as before, now it's just oriented as suggested by support.

Unfortunately the big screw doesn't move, so I'm not sure what to do next besides call for support, to see how they would get rid of the play in the lock.
 
Somebody recently had the same issue and someone on this forum had the magic fix. What happens when you fiddle with the large silver screw?
 
dont know what the big silver screw does. i would check with Lectric about the openening issue though. from what i saw on my bike flipping a set screw around didnt make me feel comfortable.it locked but... there wasnt enough threads going in. my allen set screw had blue loctite and i could turn it in or out to micro adjust the latch to lock without flipping it. for the record i didnt have an issue with openeing. i had just gotten the bike and was going over all the screws and this subject got me looking at things. be safe!
 
Somebody recently had the same issue and someone on this forum had the magic fix. What happens when you fiddle with the large silver screw?

I had the partial opening issue myself. I adjusted that big silver screw out a little bit, and went for a ride. It still did it again, and I made another adjustment. That did the trick, it has been several weeks, and many miles with no problems of the latch partially opening.
 
Put another 30 miles on the bike, hasn't opened while riding since I reversed the set screw 👍

AFTER
View attachment 61913
I didn't like the short thread pattern that reversing the set screw resulted in. Another poster on this forum worried about the same thing, the female threads could be wallowed out over time. I also didn't like what happened when putting the set screw in from the top, the allen wrench (hex) socket got damaged by the metal clip scraping the top of the set screw making future removal difficult or impossible (depending on the damage to the top of the hex socket). I was satisfied with the results of going to ACE hardware and buying a 95 cent M6 hardened set screw with the same "end to end length" as the factory set screw. What Lectricebike support is gunning for is a larger diameter where the spring loaded clip goes around the set screw. The machined end used by the factory results in a diameter that is too small a circumference, (it would be easier to fix this issue at the factory...) Screwing in the ACE acquired set screw by passing the allen wrench up from the bottom through the threaded hole and making sure to put locktite on the threads as they go in from the top, is a good technique. Since I "nerded out" on this project I filed flat the set screw on the solid end OPPOSITE the allen socket. Using the allen wrench to hold the ACE set screw so as not to damage the threads you'll find that just a few strokes with a small file will flatten the end of the set screw that is designed to "bite" into the shaft of a grinder or pulley this is why ACE sells "set screws". Take care to screw the set screw in with some precision partial turns at the very end of the installation, trying to keep the top sticking up as much as the machined part from the factory. You should end up with a clamp that stays closed.
If you fully understand the repair and do it correctly you should have no nasty surprise when you go riding.
WARNING: don't dissassemble the spring mechanism inside the frame lock handle, it is almost impossible to re-assemble after the bike was manufactured. Fiddling with this mechanism could cost you much time!
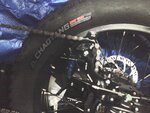
The next time I get my hands on a similar bike I will put a Velcro strap on it. I recently purchased a pack of fifty mostly for securing batteries. The British Racing Green bike in the photo has a black Velcro strap on its battery.
 

Attachments

  • V7i2101.JPG
    V7i2101.JPG
    407.3 KB · Views: 230
I didn't like the short thread pattern that reversing the set screw resulted in. Another poster on this forum worried about the same thing, the female threads could be wallowed out over time. I also didn't like what happened when putting the set screw in from the top, the allen wrench (hex) socket got damaged by the metal clip scraping the top of the set screw making future removal difficult or impossible (depending on the damage to the top of the hex socket). I was satisfied with the results of going to ACE hardware and buying a 95 cent M6 hardened set screw with the same "end to end length" as the factory set screw. What Lectricebike support is gunning for is a larger diameter where the spring loaded clip goes around the set screw. The machined end used by the factory results in a diameter that is too small a circumference, (it would be easier to fix this issue at the factory...) Screwing in the ACE acquired set screw by passing the allen wrench up from the bottom through the threaded hole and making sure to put locktite on the threads as they go in from the top, is a good technique. Since I "nerded out" on this project I filed flat the set screw on the solid end OPPOSITE the allen socket. Using the allen wrench to hold the ACE set screw so as not to damage the threads you'll find that just a few strokes with a small file will flatten the end of the set screw that is designed to "bite" into the shaft of a grinder or pulley this is why ACE sells "set screws". Take care to screw the set screw in with some precision partial turns at the very end of the installation, trying to keep the top sticking up as much as the machined part from the factory. You should end up with a clamp that stays closed.
If you fully understand the repair and do it correctly you should have no nasty surprise when you go riding.
WARNING: don't dissassemble the spring mechanism inside the frame lock handle, it is almost impossible to re-assemble after the bike was manufactured. Fiddling with this mechanism could cost you much time!
The next time I get my hands on a similar bike I will put a Velcro strap on it. I recently purchased a pack of fifty mostly for securing batteries. The British Racing Green bike in the photo has a black Velcro strap on its battery.
 
Back