Downhill e-bike first build! advice needed pls :)

TeslaBike

New Member
Hi :)

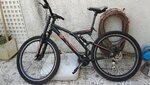
I recently got hold of this bike almost for free and I´ve been plannig to convert it to electric simply because I love the trapezium shaped frame. It rides very confortable and smooth. I think It will look pretty cool :)

It uses 22" wheels (57cm) wich seems to be a problem.... because I Cannot find any covertion kit that has a hub motor in those wheel dimentions!
Does anyone know if they even make those? Or will I have to fit myself a hub motor in my 22" wheel? ;( I can only find 20", 24", 26", 28"....

(UPDATE: The wheels are actually 26")

I want to use a 48v 1000W rear hub motor (geared with disk brake, digital panel, wrist throttel all that).

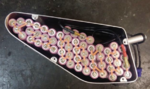
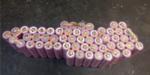
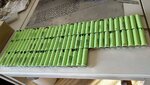
The frame will hold 84 Panasonic PF cells. I thought about a 14S 6P configuration and maybe under charge it to 54-57V to make them last longer. Can a normal 1000W controller take up to 58V? Any thoughts on this?

Hope I´ll be able to build this before the cold days arrive ahaha.

Any help is apreciated! Thanks :)
 

Attachments

  • 43004261_346038899477137_6721379623579418624_n.jpg
    43004261_346038899477137_6721379623579418624_n.jpg
    382.9 KB · Views: 454
  • 42940132_1837717452944526_5422924870134530048_n.jpg
    42940132_1837717452944526_5422924870134530048_n.jpg
    79.2 KB · Views: 375
Last edited:
I've never seen 22" hubmotor.
You could build it with 20" wheels but it might not be much fun. There doesn't seem to be room in the forks to clear 24" wheels.
You can install a 24" motor in your old wheels, but I've found that spoke calculators don't work very well. Or I don't use them very well. I had to buy 3 sets of spokes to put a Sturmey Archer S80 IGH in a 26" wheel, even though I had a complete set of measurements for the hole circle. It is a tedious process "lacing" the wheel. I did it, got the wheel to run round and straight, but I also repair automatic transmissions on my cars. Your results may vary.
One has to charge batteries fully once a quarter or so, experienced users report. Then one can charge to 90% of full charge.
The controller that came with my 1000 W power wheel took the 58.6 v of a LiFePo4 battery fine. Your results may vary.
I don't weld cells into battery packs, because if I get the weld depth wrong, the cell bursts into flame on the bench in front of me. Planning for the fire that welding often starts is part of any welder's craft skills. I don't weld inside because my workshop has a wood roof & rafters.

Hi there :) I could fit a 24" wheel but there would be no room for mountain tires. What a bummer :/
I'll have to take it to my local bicycle mechanic because I have no clue how to lace the spokes, sounds like a tedious process as you put it.

I read the same thing about that charging method, you charge it full every week or so for balancing :)
I'm more afraid of the controller burning up (maybe its possible to drill same holes and install a fan sucking the air through the chips?)

I never knew that could happen with spot welding :eek:
I order them with nikel strips so I can solder copper wires :)

Thanks for your input friend :)
 
Wheels are not measured by the outside circumference of the rim. In other words those are not 22" wheels, but 26" wheels.
 
Hi Teslabike, automotive wheels are measured by rim diameter/width but bike wheels are measured from the edges of the tires. A 26" bike wheel has a rim around 22" in diameter.

Panasonic PF cells are rated for 10A discharge at 2.9AH. Your 14S-6P would be 17.8AH and have about 1000 watt-hours. Your battery management system (BMS) card needs to support 50-60A then. Your cells look like they are used, as it looks like nickel strips on the negative ends. Are you going to spot weld it? Soldering 84 cells is tedious and also makes for a problematic battery.

Built a few hubmotor bikes, but never dealt with the 1000-1500W direct drive kits. I don't like the heavy weight and how they can resist coasting/pedaling. A 48V controller should work on a 14S battery, but on the cheap controllers, the low voltage cutoff is be hardwired for 40-41V. That's a little low for 14S. It should be around 43-44 V. Longevity for an 18650 cell is better if you keep them below 4.1 V and don't go too close to the controller's LVC.

Buy a better controller if you are going 14S, or use an external voltmeter and quit riding at 44V. In reality, your ebike will have little pep when the battery gets that low anyway.
 
A 20" would increase the torque, and with a decent geared hub motor be quite a beast. OR a mid drive. Match the hub controller to the motor, from the same vendor is the best unless you are an advanced user.
 
Wheels are not measured by the outside circumference of the rim. In other words those are not 22" wheels, but 26" wheels.

Hi Teslabike, automotive wheels are measured by rim diameter/width but bike wheels are measured from the edges of the tires. A 26" bike wheel has a rim around 22" in diameter.

Panasonic PF cells are rated for 10A discharge at 2.9AH. Your 14S-6P would be 17.8AH and have about 1000 watt-hours. Your battery management system (BMS) card needs to support 50-60A then. Your cells look like they are used, as it looks like nickel strips on the negative ends. Are you going to spot weld it? Soldering 84 cells is tedious and also makes for a problematic battery.

Built a few hubmotor bikes, but never dealt with the 1000-1500W direct drive kits. I don't like the heavy weight and how they can resist coasting/pedaling. A 48V controller should work on a 14S battery, but on the cheap controllers, the low voltage cutoff is be hardwired for 40-41V. That's a little low for 14S. It should be around 43-44 V. Longevity for an 18650 cell is better if you keep them below 4.1 V and don't go too close to the controller's LVC.

Buy a better controller if you are going 14S, or use an external voltmeter and quit riding at 44V. In reality, your ebike will have little pep when the battery gets that low anyway.

Nova and HarryS: oooh ok..... makes sense now. Had no ideia, I thought it was the same like car rims! :p

HarryS, I ordered this BMS:

(Link Removed - No Longer Exists)

This one can only take 45A, I guess I need a new one!

Regarding the cells, they`re brand new, I order them with the nickel strip because I dont have access to a spot welder. I plan to use thick copper wires and solder them toguether. If I dont leave any thin resistive point, where can it go wrong?

You mentioned a pep when the cells are running low, does that come from the controller?

I´ll folow your advice and get my self a voltmeter, Thanks :)

BTW, this will be my charger:

(Link Removed - No Longer Exists)

Is there any way I can lower the output voltage?
 
Making your own battery pack is a tough way to go. I'm not sure you can get a good solder joint, without putting too much heat into the cell. It's one thing to build a bike from a kit, but it takes a lot of experience to build everything from scratch!
 
Making your own battery pack is a tough way to go. I'm not sure you can get a good solder joint, without putting too much heat into the cell. It's one thing to build a bike from a kit, but it takes a lot of experience to build everything from scratch!
There are all kinds of resources and building groups these days. One can have a decent welder for $150, but careful work using those tabs can be very effective. endless_sphere.com and Facebook have great resources. Vruzend kits make it even easier.
 
Making your own battery pack is a tough way to go. I'm not sure you can get a good solder joint, without putting too much heat into the cell. It's one thing to build a bike from a kit, but it takes a lot of experience to build everything from scratch!


Rich C, I get what your saying but I will have to trust my experince in soldering and take that risk since I have no other options.
I had this idea of using a butane cannister to quickly chill the solder joint and suck the heat out of the battery. I might minimize the damage done by the heat! doesn´t sound that crazy to me :p

Thomas, I watched alot of videos of that guy, great teacher, I could go with the lego style juntion but the end result is a bulkier pack.
 
Last edited:

Attachments

  • Screen Shot 2018-10-06 at 12.56.22 PM.png
    Screen Shot 2018-10-06 at 12.56.22 PM.png
    810.1 KB · Views: 463
  • Screen Shot 2018-10-06 at 12.56.06 PM.png
    Screen Shot 2018-10-06 at 12.56.06 PM.png
    674.1 KB · Views: 471
If you insist on solder, this is by far the best method. Least heat to the cells. This was developed by a great engineer and longtime ebike rider/builder.
https://endless-sphere.com/forums/viewtopic.php?f=14&t=65719&hilit=Kepler+battery

Still working great after 3.5 years!

Thanks for the link, it´s always a pleasure to see other ways of building the same thing :)

Since I ordered my cells with nickel strips I´m sure it wont be hard to quickly solder them toguether... plus i´ll spray butane to cool off the poles :).

Also, I bought a simple 14S 58,8v charger off ebay, do you know how I can lower the output voltage so I can undercharge my pack by a few volts?
The only thing that comes to mind is using a Diode (like the 1N4007) in series with the output. Each diode drops 1,2 Volts if I remember correctly.
 
Each silicon diode drops 0.7 v. Except at very high currents. 1n4007 is not rated at 2.5 A anyway. Try MR856.
I opened a 58.8 v charger & tried to turn down the pot. It would only go as low as 58.0. That is a long way from 54.6 a 13 stack LI Ion battery needs @ 100%. I suspect the charger couldn't sense the battery through a diode anyway, and shut off automatically.
If you blow up the pictures on e-bay by mousing over, you can sometimes read the shutoff voltage. the chargers that stop at 54.6 v are about twice the price of the 58.8 ones. I haven't found one that stops at 53.0 v the 90% charge of Li Ion, except the $70 dual voltage lunacycle charger.
 
Most inexpensive chargers have no adjustment and they are often inaccurate.

A diode might bear some watching. The 1N4007 is about 1.0V VF at 1 amp, but drops down to .7volt at 100ma. Ninety percent on 14S is 57 volts. Two diodes in series plus whatever you need to handle 3A will get you close.

My own opinion is that time spend below 50% charge is also hard on battery life. While I do have a 80/90/100 charger for my 52V batteries, I've charge my 36V and 48V batteries to 100%, but do try to avoid storing them there. Either I will ride them later in the day (I'm retired) or take them for a short ride.
 
Each silicon diode drops 0.7 v. Except at very high currents. 1n4007 is not rated at 2.5 A anyway. Try MR856.
I opened a 58.8 v charger & tried to turn down the pot. It would only go as low as 58.0. That is a long way from 54.6 a 13 stack LI Ion battery needs @ 100%. I suspect the charger couldn't sense the battery through a diode anyway, and shut off automatically.
If you blow up the pictures on e-bay by mousing over, you can sometimes read the shutoff voltage. the chargers that stop at 54.6 v are about twice the price of the 58.8 ones. I haven't found one that stops at 53.0 v the 90% charge of Li Ion, except the $70 dual voltage lunacycle charger.


Hi, yeah a bigger diode would be needed in this case. Only one way to find out :b
If it doens work I´ll try to mess with the pot.

Can you put the link for your charger pls?
 
Most inexpensive chargers have no adjustment and they are often inaccurate.

A diode might bear some watching. The 1N4007 is about 1.0V VF at 1 amp, but drops down to .7volt at 100ma. Ninety percent on 14S is 57 volts. Two diodes in series plus whatever you need to handle 3A will get you close.

My own opinion is that time spend below 50% charge is also hard on battery life. While I do have a 80/90/100 charger for my 52V batteries, I've charge my 36V and 48V batteries to 100%, but do try to avoid storing them there. Either I will ride them later in the day (I'm retired) or take them for a short ride.

I remember a few years ago when I was in the Laser hobby, I used those diodes alot to make laser diode "dummy loads" ( used 3, 4 or 5 of them in series with a 1 ohm resistor to get a desired load). Thats why they came to mind :)

I put the link for my charger in my first post, does it seem any good?
 
The charger in your link is a 14 stack charger. Is that what you are going to build? The name is 51.2 v, that might be a 90% charge for 14 stack. When you get it there should be a cutoff voltage listed on a sticker. Compare that to a 14 stack 90% and 100% table.
I check my chargers with a meter first time. a $630 battery is worth checking a bit instead of overcharging it. My meter I calibrate with vishay B suffix zener diodes from an authorized vishay distributor. Building a 13 stack charger this week out of a 47 VAC transformer, semis & resistors since I am sick of buying stuff from *****.
Your laser diodes are probably rated for higher current than a 1n4007, if you still have some left. Regular LED is 1.6 v(red) to 2.0 v (blue), I never looked up a laser diode to see what they were.

I´m not going to build a charger, this is what I´ve ordered: (58,8V 3,5A):

(Link Removed - No Longer Exists)

Note in the description the seller says he can adjust the output if need, so maybe there is a pot inside.

Yeah most laser diodes were between 3-6V @ <1A, thats why I used the 1N0007. In the picture you see a testload that can behave like 650-635nm red lasers, 445nm blue laser and 405nm blu-ray. :)

There are insanly powerfull lasers now a days that require much bigger test loads.
 

Attachments

  • 43473282_2129928893924699_7434832025690832896_n.jpg
    43473282_2129928893924699_7434832025690832896_n.jpg
    87.3 KB · Views: 302
Back