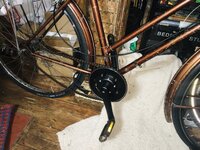
Converting old Raleigh 3 speed

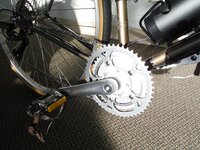
Thanks Dewey! Okay. Okay so it was a bear to remove the left crank and I tried heating and also pressing with a vice to no avail and so I had to drill the cotter out little by little with a small and then larger drill bit. Back and forth. The right side was much easier: wd 40 letting it sit and then I put a vice on it using a socket over the cotter and little by little tightening the vice over hours and I was pleasantly surprised to hear a pop and the little sucker came out halfway.

I am still trying to get the right side pedal off. The surfaces are a little rounded and the wrench or vice grips keep slipping off. I have yet to try heat but don't think it will do the trick.
Good job, removing the bottom bracket is the hardest part. Thank you for posting pictures.
 
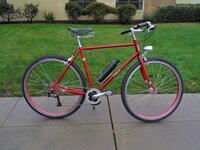
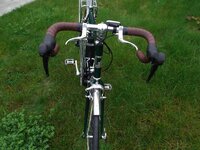
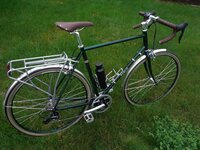
I just finished this old Raleigh 3-speed conversion this morning. It was a $150 Craigslist bike with a 3-speed.
750W, 95Nm, 48V torque sensor, no throttle. Trigger shifter to Nexus Inter-7 with internal brake.
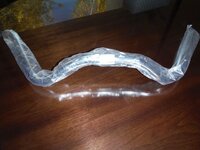
The concept was to make a touring bike for all weather that can take roads and trails while providing a comfortable upright riding position with a cockpit that allows for changes in hand positions for long rides.
Man you do good work,I had a "Raliegh" I had to give up on,I couldn't get the hub drive in the rear dropouts at all.I had a brainstorm- the Trek "Antelope" was standing there in all its dingy glory, turned it over remover rear wheel, the new hub drive wheel dropped right in. I took the wheelset from "Random bike parts"( solid tires, dynamo on front hub- I cringe now to think I gave them away) gave the Raliegh to a boy from WVa,He was going to convert it to a gas motor.
I think there is a couple of lessons here, don't be too hasty in shedding surplus parts and a "higher bike" usually converts easier.
 
This is my configuration of Tongsheng 350v mid drive motor.
Eco+ Model TSDZ2 - Torque Sensing Pedal Assist with Optional Throttle - (D#DI01CQ5)

Your Shopping Cart - Eco Cycles


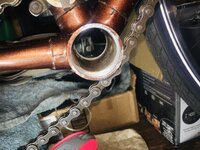
The bottom bracket was quite clean surprisingly for a forty plus year old Raleigh bike.
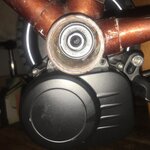
So I though, yay, now I can slide the motor in! I was excited. I slipped it in and oh no, it didn't go through.
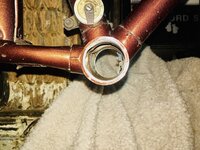
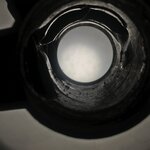
It turns out that there are two spots or dimples where the seat tube comes down and the downtube enters the bottom bracket.
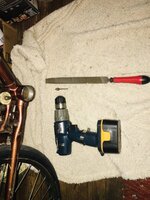
I had to file with a hand file those two spots maybe a millimeter or two down and then it was able to fit in. I am gonna spray some rust resistant paint in there before I continue. So far, so good!
Ps - any tips to get that right pedal

These photos show the two bumps, the motor hanging up on the bumps, the files I used and the finished filed down bumps.
 

Attachments

  • C76884C5-933E-4FB4-9D2B-8F06A12A1F2E.jpeg
    C76884C5-933E-4FB4-9D2B-8F06A12A1F2E.jpeg
    432.7 KB · Views: 185
  • 1C3164BB-8857-4B08-88CE-8F329F6F0EAC.jpeg
    1C3164BB-8857-4B08-88CE-8F329F6F0EAC.jpeg
    717 KB · Views: 195
  • 2CCFE9E0-134F-4A95-AA73-E0974C144644.jpeg
    2CCFE9E0-134F-4A95-AA73-E0974C144644.jpeg
    324 KB · Views: 183
  • 5AD49A33-E09C-48C2-A058-2FAA58DEC9BE.jpeg
    5AD49A33-E09C-48C2-A058-2FAA58DEC9BE.jpeg
    315.2 KB · Views: 172
  • E2E15488-A2C6-4F07-A22D-8C115C6E62D2.jpeg
    E2E15488-A2C6-4F07-A22D-8C115C6E62D2.jpeg
    200.7 KB · Views: 182
  • ACDAAC2E-0237-4074-8499-F0A5D358161C.jpeg
    ACDAAC2E-0237-4074-8499-F0A5D358161C.jpeg
    231.5 KB · Views: 179
Great job. Those bottom bracket cups can be stuck in pretty good, glad you got the stubborn right cup out. Like you I've used both rounded hand files and a rotary file to smooth off nubs in the bottom bracket - the tsdz2 is a tight fit into the bottom bracket, which is a good thing. Keep it up, the rest is a walk in the park.

FWIW I've omitted the anti-rotation fixing block on a couple installations and actually prefer it without the block. I use very dense foam between the down tube and the motor housing and just rotate the motor forward against the down tube. I think someone indicated that he/she cracked the motor housing doing that but I haven't had any problems with several hundreds of miles on mine. I did use the fixing block on one bike and it worked fine also.
 
Last edited:
any tips to get that right pedal
I suggest you ask this question on the Raleigh mega-thread on bikeforums.net, there are some expert mechanics and I've found it a bit intimidating but friendly advice, everyone on the thread wants people to keep their vintage bikes going!
 
Great job. Those bottom bracket cups can be stuck in pretty good, glad you got the stubborn right cup out. Like you I've used both rounded hand files and a rotary file to smooth off nubs in the bottom bracket - the tsdz2 is a tight fit into the bottom bracket, which is a good thing. Keep it up, the rest is a walk in the park.

FWIW I've omitted the anti-rotation fixing block on a couple installations and actually prefer it without the block. I use very dense foam between the down tube and the motor housing and just rotate the motor forward against the down tube. I think someone indicated that he/she cracked the motor housing doing that but I haven't had any problems with several hundreds of miles on mine. I did use the fixing block on one bike and it worked fine also.
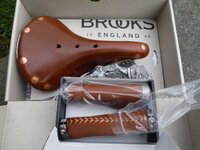
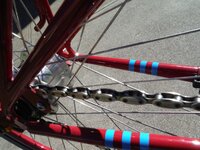
Here are some recent build ideas. One has a painted motor. Two have chainrings used as chain guards. I do recommend using the secondary motor mount on the chain stays. Using a longer, stronger M8 1.25 hex cap screw with it is a good idea. Drop the cog to 16-t and use a super strong chain.
 

Attachments

  • Brooks2.JPG
    Brooks2.JPG
    240.2 KB · Views: 181
  • Brooks1.JPG
    Brooks1.JPG
    246.1 KB · Views: 186
  • m7i11j.JPG
    m7i11j.JPG
    411 KB · Views: 180
  • V7 Red (2).JPG
    V7 Red (2).JPG
    668.1 KB · Views: 179
  • R183.JPG
    R183.JPG
    442 KB · Views: 189
  • R181.JPG
    R181.JPG
    720.8 KB · Views: 182
  • Centurian4.JPG
    Centurian4.JPG
    436.6 KB · Views: 177
  • Brunch1.JPG
    Brunch1.JPG
    252.3 KB · Views: 168
Man you do good work,I had a "Raliegh" I had to give up on,I couldn't get the hub drive in the rear dropouts at all.I had a brainstorm- the Trek "Antelope" was standing there in all its dingy glory, turned it over remover rear wheel, the new hub drive wheel dropped right in. I took the wheelset from "Random bike parts"( solid tires, dynamo on front hub- I cringe now to think I gave them away) gave the Raliegh to a boy from WVa,He was going to convert it to a gas motor.
I think there is a couple of lessons here, don't be too hasty in shedding surplus parts and a "higher bike" usually converts easier.
Thank you! I have the advantage of taking my sweet time and researching allot. I may be a little but if a perfectionist in my own nutty way I hate to say.
 
I suggest you ask this question on the Raleigh mega-thread on bikeforums.net, there are some expert mechanics and I've found it a bit intimidating but friendly advice, everyone on the thread wants people to keep their vintage bikes going!
Great job. Those bottom bracket cups can be stuck in pretty good, glad you got the stubborn right cup out. Like you I've used both rounded hand files and a rotary file to smooth off nubs in the bottom bracket - the tsdz2 is a tight fit into the bottom bracket, which is a good thing. Keep it up, the rest is a walk in the park.

FWIW I've omitted the anti-rotation fixing block on a couple installations and actually prefer it without the block. I use very dense foam between the down tube and the motor housing and just rotate the motor forward against the down tube. I think someone indicated that he/she cracked the motor housing doing that but I haven't had any problems with several hundreds of miles on mine. I did use the fixing block on one bike and it worked fine also.
I was thinking about that. I would want the motor to be up forward and high but that block wants to pull it the other rest which makes it lower is that correct?
I'm not at that stage yet.
 

Attachments

  • D9470460-9326-4550-8034-473F901D8654.jpeg
    D9470460-9326-4550-8034-473F901D8654.jpeg
    683.8 KB · Views: 174
Good job, removing the bottom bracket is the hardest part. Thank you for posting pictures.
I sprayed it with some wd and kind of an ordinary wrench and pressed against it while knocking it with a rubber mallet on the end of it. I tried using that washer trick but screw and washers were too thin and they weren't gripping the cup strong enough. Luckily it was just pretty well taken care of because it wasn't seized up.
 
I was thinking about that. I would want the motor to be up forward and high but that block wants to pull it the other rest which makes it lower is that correct?
I'm not at that stage yet.
right, if you use the fixing block the motor is directly below the bottom bracket. If you don't use the fixing block the motor rotates forward and up against the down tube. How much it rotates forward and up out of the way depends on the angle of the frame tube. I'm still waiting on one part being sent from China to convert one of my tsdz2 to a coaster brake version - then I'll install it on my 3 speed coaster brake bike. It's been almost 2 months since I ordered the part, hopefully it will arrive soon.
 
Forgive me if I've asked this question already. I'm building my Tongsheng mid motor kit on my Raleigh Sport 60/70's era three speed and I'd like to know what is the specifications of the chain because I want to buy a stronger chain to replace it and keep the old one handy in case I want to revert back. Thank you so much for your help!
Happy New Yesr and may this one get us back to the days before this crazy pandemic!
Hi and Happy New Year! You will need a Single Speed Chain. I know that you have more than one speed, but because you only have one cog on the back, the setup is the same. I recommend the KMC S1. This one is easy to install and it is relatively strong with a good price point. I am a strong rider with a more powerful bike and have big hills, so I use the half-link chain. It costs 3.5 times more and is very hard to install for most people. With your new chain you will also want a new cog given the age of the bike. This will prevent skipping.
1641240988166.png
 
I make something that helps me to measure were to cut a chain. It is a little piece of wire with hooks on each end, call it a chainhook. This one is painted green to help me find it when I need it. Otherwise it keeps getting lost at the vital moment! I used an old spoke to make it. It is also very helpful on bikes that have chain tensioners because it holds the tension so you don't have to fight it, freeing up one hand. You will want to get the length right. If you are short by one link you will not be in the dropout
1641245543047.jpeg
 
I make something that helps me to measure were to cut a chain. It is a little piece of wire with hooks on each end, call it a chainhook. This one is painted green to help me find it when I need it. Otherwise it keeps getting lost at the vital moment! I used an old spoke to make it. It is also very helpful on bikes that have chain tensioners because it holds the tension so you don't have to fight it, freeing up one hand. You will want to get the length right. If you are short by one link you will not be in the dropout
View attachment 110977
Nice little tool and great idea.
 
Hi and Happy New Year! You will need a Single Speed Chain. I know that you have more than one speed, but because you only have one cog on the back, the setup is the same. I recommend the KMC S1. This one is easy to install and it is relatively strong with a good price point. I am a strong rider with a more powerful bike and have big hills, so I use the half-link chain. It costs 3.5 times more and is very hard to install for most people. With your new chain you will also want a new cog given the age of the bike. This will prevent skipping.
View attachment 110972
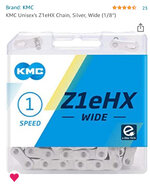
Thank you for this info! I am looking at this company and they make a mid motor specific chain for single speed bikes. It is $25 dollars instead of $12.00.
Have you heard of this one?
 
This is what I have to work with.
I'm using a different bike which is basically the same, probably 70's rather than 60's era because this fork is bent
Thank you for the photo. It is helpful. I see three placement areas for the battery. 1) the down tube - tight. 2) The top tube - ample. 3) The seat tube - higher center of gravity but ample with good weight distribution. Do you have eBay? With PayPal you will have some buyer protection. Use Topeak Versa Mounts. You will need three, so purchase two packages. Run the leads from the motor to the inside of the mounting plate cover. You will want a new chain that is strong. The half-links are nice but the pin can be tricky. Here is a 10.5Ah 36V on a seat tube with just two Versa Mounts.
beautiful bike and lovely setup! I want one of those vintage rear racks!
 
I just finished this old Raleigh 3-speed conversion this morning. It was a $150 Craigslist bike with a 3-speed.
750W, 95Nm, 48V torque sensor, no throttle. Trigger shifter to Nexus Inter-7 with internal brake.
The concept was to make a touring bike for all weather that can take roads and trails while providing a comfortable upright riding position with a cockpit that allows for changes in hand positions for long rides.
Is that rear reflector a signal indicator as well? I like one like that!
 
What company makes the chain you mentioned?
Here is that rack in British Racing Green. It comes in 10 colors, from PublicBikes.com, with free shipping. It is lightweight, holds 60 pounds, 25Kg and is stylish. Most are boxy. This is curvy, sort of Deco.
1641326903779.jpeg
 
Thank you for this info! I am looking at this company and they make a mid motor specific chain for single speed bikes. It is $25 dollars instead of $12.00.
Have you heard of this one?
I forgot to put the photo: same company
 

Attachments

  • C22C72FA-8E60-451B-AF63-A8F22B7854F6.jpeg
    C22C72FA-8E60-451B-AF63-A8F22B7854F6.jpeg
    625.3 KB · Views: 161
Back