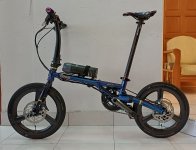
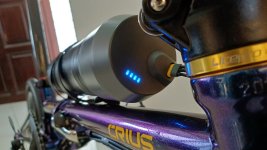
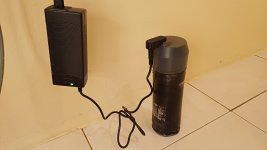
I was going to warn you to keep a close eye on the battery when charging it to see if it was heating up. If it got warm/hot anywhere that’d probably indicate cell unbalanced and could’ve been an indication of damage to a cell. It sounds like your battery’s BMS might’ve gone on the blink. Does your battery show charge level when it’s being charged? And, if so, while you were charging it, did it start at 1 bar or 0?
I don’t know anything about the QI battery itself. Good luck when you hear from the factory. It’s certainly possible that just charging it up all the way balanced it, but I would’ve been concerned about heat.
Anyway, I hope it all works out,
@3dxl ! Keep us posted about what QI tells you to do. Is it in a warranty period?
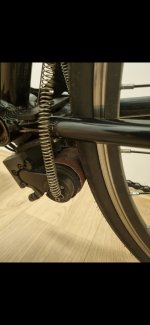


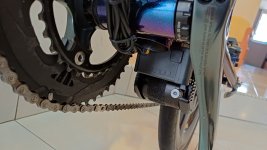
") . I build a small and simple PAS Sensor which plugs into the micro USB port. The sensor is very simple you need 2 Hall sensors with digital readout, 1 ESP32 C3 and an old micro USB Cable to harvest the male plug and the wires. The 4 pins from the USB and the Hall sensors are getting connected to the ESP and with some simple code it "presses" the buttons virtually. I mounted my PAS directly to the motor. To get the magnetic Signal I glued four small magnets on the chainring and with everything in position the ESP now reads out if I am paddling forward or backward. Forward of course means boost and backwards while driving breaking and while standing switching modes. I personally think this upgrades your experience to a new level
. I build a small and simple PAS Sensor which plugs into the micro USB port. The sensor is very simple you need 2 Hall sensors with digital readout, 1 ESP32 C3 and an old micro USB Cable to harvest the male plug and the wires. The 4 pins from the USB and the Hall sensors are getting connected to the ESP and with some simple code it "presses" the buttons virtually. I mounted my PAS directly to the motor. To get the magnetic Signal I glued four small magnets on the chainring and with everything in position the ESP now reads out if I am paddling forward or backward. Forward of course means boost and backwards while driving breaking and while standing switching modes. I personally think this upgrades your experience to a new level