Hey guys, to compliment some of the past and upcoming IZIP and Raleigh reviews, I filmed a short display panel guide while visiting the Accell Group in Southern California.
In the video below, I show how to enter the range menu, explain how walk mode would work if it was enabled, and discuss the amp control settings aka "power trim" (so you can raise or lower the motor power and create a zippier or more efficient experience). Many electric bikes that use this display panel have an optional throttle accessory (a button pad or trigger throttle) and I explain how that attaches and functions.
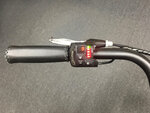
While this display is not removable or easy to swivel, the screen is very small and does not present the same glare issues as many larger screens. I really appreciate how this control pad features water-sealed buttons, a bright numeric readout, and includes a Mini-USB port on the right side. This port probably outputs 5 amps at 500 milliamps for use with portable electronics and smartphones. I did not love how you first have to activate the battery pack before turning the display on. This two-step process takes more time and could require some bending and reaching if you forget to activate the pack first before mounting the bike. I also feel that the three-color battery indicator is not nearly as precise or easy to interpret as an LCD infographic or percentage readout.
Navigation aids:
Quick tips:

In the video below, I show how to enter the range menu, explain how walk mode would work if it was enabled, and discuss the amp control settings aka "power trim" (so you can raise or lower the motor power and create a zippier or more efficient experience). Many electric bikes that use this display panel have an optional throttle accessory (a button pad or trigger throttle) and I explain how that attaches and functions.
While this display is not removable or easy to swivel, the screen is very small and does not present the same glare issues as many larger screens. I really appreciate how this control pad features water-sealed buttons, a bright numeric readout, and includes a Mini-USB port on the right side. This port probably outputs 5 amps at 500 milliamps for use with portable electronics and smartphones. I did not love how you first have to activate the battery pack before turning the display on. This two-step process takes more time and could require some bending and reaching if you forget to activate the pack first before mounting the bike. I also feel that the three-color battery indicator is not nearly as precise or easy to interpret as an LCD infographic or percentage readout.
Navigation aids:
- How to get a range estimate (relative to the selected level of assist) 0:45
- How to change units from miles to kilometers at 1:01
- How to activate walk mode and optional throttle at 1:20
- How to activate lights at 2:18
- How to adjust amp output (power trim) at 2:29
Quick tips:
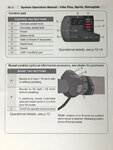
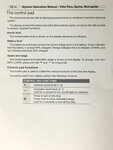
- The battery level is indicated by one of three colors: Green for full, Yellow for half-full, Red for nearly empty
- The current level of assist is indicated by four red LED bars
- The buttons on the remote button pad include: +, -, and Power but you have to power the battery pack on before the display will activate
- To change units from miles to kilometers, hold + and - simultaneously for a few seconds
- To activate walk mode, press the minus key until all four bars are empty (basically zero level of assist) and you will see a green blinking light, now hold the minus key (note that walk mode is disabled for many ebike products and may not work. If you add the optional button or trigger throttle, the bike needs to be in level zero or moving 2+ miles per hour for the throttle to function (as shown in the video at 1:59)
- Activate lights (many IZIP and Raleigh ebikes come pre-wired for lights or have them pre-installed) just hold the + button
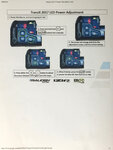
- To enter the power trim settings, hold the power button and + together for a couple of seconds and then go from 0 to 9 to lower or raise the amp output, the default is 5 which offers 15% current difference +/-


