Has anyone retrofitted an Eviolo Automatiq?

AvalancheRun

Well-Known Member
Region
USA
Seems like it’s possible. Curious if anyone has tried on a Gazelle bike.

Not sure if I’d want to give up manual control completely, but I found this to be really nice on the Specialized Vado I rode.

 
The linked article is pretty lightweight on overall info IMO (and at least one broken link to enviolo..) , but seems like Enviolo has at least started offering different levels of hubs, e.g. cargo, urban, extreme duty with different ratings. Seems like the 'base' hub is one of those, regardless of if using the 'automatiq' or manual shifting.

There have been several instances of ebikes out-torquing the Enviolo hubs, so was kind of happy to see their different hub variants (bottom of the page here: https://enviolo.com/products/ ) but also seeing the different base hubs range from max torque of 55Nm to 100Nm. Personally I bet my Luna X2 with Ludi controller at least how *I* ride it (lower pas, non Ludi mode, etc.) would do just fine, but while some non-detailed-maybe-agreement with Bafang and Enviolo was mentioned, I'm pretty sure their hubs can still be blown up by abusive riding unless they're seriously under-estimating on max torque values.

Gear ranges depending on the base hub model seem to range from 256% to 380%vs IIRC an over 500% range for Rohloff and I think most single chainring eMTB/MTB 11/12sp have in the 400-500% range. I'd need to do some math or online digging to sort upper and lower end comparisons (e.g. at max 'overdrive' ratio on the Enviolo vs SRAM 11s/12s 10-12t + chainring and impact to top speed), but personally I'd only be considering the 380%/widest range ratio unit, or wait until they catch up to Rohloff and others on wider ratios. Depending on the top and bottom 'gear' effective ratios, might not matter much to takeoff (on hills/mud/etc.) or top speed, as certainly most of us could probably make do with an 8-9s on our ebikes (narrower range in most cases).

There were some notes about not working with bikes with derailleur hangars (pretty much all ebikes, no?) but it was from the OP's link which I'm not convinced is hands-on, technically competent/complete info. What I didn't find easily was the various options for a given hub - Enviolo seems to basically position it as 'legos', e.g. pick your hub, then chain or belt, automatic or manual, controls (including for setting cadence on the Automatiq For Bosch and others without controller integration), but I haven't seen a list of all combos, dimensions, specs, etc. as of yet.

Nice to see things overall moving forward - let's see who volunteers first and shares their experience. ;)
 
Here are some other links to retrofit of an existing Enviolo with the AutomatiQ shifter from someone with a Riese & Mueller
 
I have a C380 with Enviolo transmission on order.

The Automatiq part actually seems fairly simple; it adjusts the gear ratio control based on cadence. It needs to attach to the Enviolo, utilize power from the Bosch controller, and set up cadence pref via their app or cockpit control. Would be awesome if there were manual control too, since it's digital afterall, just like paddle shifters in an automatic transmission car.

Sorry if this wasn't clear.

Kinda surprised Gazelle isn't offering this already, it seems like the perfect compliment to their company vision.
 
So yeah, looks possible and probably not too hard -- assuming the Automatiq can physically fit on the Gazelle bike. The 3-button Cadence control is pretty cool! Probably a lot easier to implement than car-style paddle shifting.
 
By the way to answer one of your previous question.
Using the Enviolo app, you can set the AutomatiQ shifter to manual mode, and simply use it as an electronic shifter. I believe you can define how many steps (virtual gears) to create inside the whole CVT range.
 
Welp, this was a big fail. The adjustment screws in the back are in the way of the Automatiq clamping to the frame.
 
I dont see the automatiq clamping to the frame.
Is the interference with the part of the automatiq that sticks out, if so, have you tried all possible rotation of the hub to see if one position clears it?
can you take a picture?
 
Last edited:
I dont see the automatiq clamping to the frame.
Is the interference with the part of the automatiq that sticks out, if so, have you tried all possible rotation of the hub to see if one position clears it?
can you take a picture?
Sure, here are a couple photos. The frame has to clamp directly to the Automatiq, but the frame adjustment screw extends inward. The electronics portion fits just fine.

With this in mind I looked at a ton of belt drive ebike frames and virtually all of them seem to be designed around the Automatiq option but the Gazelles. I would be open to modifying the frame though that screw sets the alignment of the wheel. Leaning towards trading for a different bike.
 

Attachments

  • IMG_2721.jpeg
    IMG_2721.jpeg
    335.5 KB · Views: 148
  • IMG_2722.jpeg
    IMG_2722.jpeg
    298.7 KB · Views: 134
Last edited:
I was hoping you could may have added a spacer on that side playing with the flexibility of the arm, but it looks like it is too much space to clear.
Do you have pictures of the rear side from the top to see exactly how the wheel adjustment thatis in the way is structured?
 
I was hoping you could may have added a spacer on that side playing with the flexibility of the arm, but it looks like it is too much space to clear.
Do you have pictures of the rear side from the top to see exactly how the wheel adjustment thatis in the way is structured?
That's a great idea. I'm not so sure the space exists for it to be even on both sides (fender photo shows the wheel isn't straight). I thought about having the frame adjusted but that screw is critical to the alignment. Also thought about cutting the Automatiq but the hub magnet ring corresponds to the size of the Automatiq, hence that would break it.

Open to ideas, and I appreciate the feedback!
 

Attachments

  • tempImageuMHkxl.png
    tempImageuMHkxl.png
    1.8 MB · Views: 104
  • tempImagedF7rKh.png
    tempImagedF7rKh.png
    3.8 MB · Views: 105
  • tempImagergRUrV.png
    tempImagergRUrV.png
    3.6 MB · Views: 100
  • tempImagePPQbTy.png
    tempImagePPQbTy.png
    1.6 MB · Views: 101
  • tempImageblt58x.png
    tempImageblt58x.png
    1.5 MB · Views: 101
  • tempImage5AD3a5.png
    tempImage5AD3a5.png
    3.9 MB · Views: 94
  • tempImagewJEfHc.png
    tempImagewJEfHc.png
    3.8 MB · Views: 94
  • tempImageQCoXf3.png
    tempImageQCoXf3.png
    1.1 MB · Views: 112
OK, here are my thoughts.

My understanding of what I am seeing.
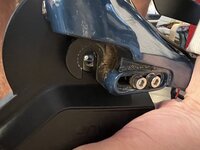
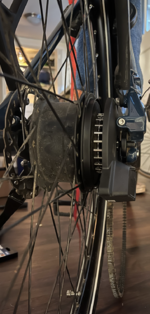
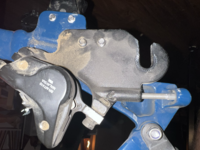
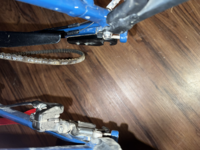
You have two interferences:
  • The bolt of the rear rack/fender on the frame
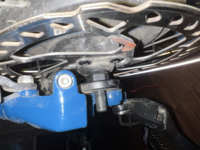
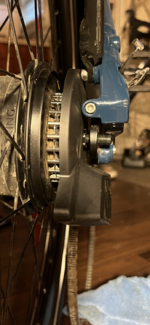
  • The right side adjustment screw of the rear wheel.
1) For the rack bolt, I see two things you could try to reduce the interference.

Instead of a screw coming in from the outside with a big bolt on the inside, use a flat head hex screw (below) passed from the inside with a bolt on the outside.
flat head bolt.jpg

fender-1.jpg


Won’t be as pretty but should save you a good amount of space.
If that ends up no being enough, you could probably adapt the rack/fender bracket so it attaches on the outside of the frame instead of the inside, still using a flat head screw as mentioned above, that would save you the thickness of the bracket.

Fender-2.jpg


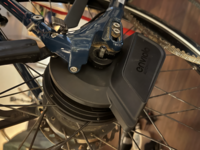
2) For the adjustment screw, my understanding of what I am seeing is that this screw does not really hold anything, but is mostly here to make the adjustment easier and more precise. Ultimately what holds the black dropout to the blue frame are the two big side screws (see below).

enviolo-2.jpg


If that premise is sound, it means you could cut almost half the protrusion (using a grinder), keeping just the screw body diameter so you can still use the screw to move the dropout precisely.

enviolo-screw.jpg


That may save you enough space so that you could add a spacer on the right side and fit the hub.

If that ended up not being enough, I think you could probably cut the whole adjustment part on the right black dropout.
It would make the wheel adjustment more difficult but not impossible. You lightly tighten the two mounting bolts , then tap the drop out lightly to move it in until the wheel is straight.
Eventually you could confirm with the manufacturer that the Adjustment screw mechanism is not needed for structural hold of the dropout onto the frame.

3) Final thoughts:
The wheel may end up off center (sideways), but that can easily be corrected by adjusting the spokes.
If you have about 5mm offset or less, you can simply loosen the spokes on the left side and tighten the spoke on the right side to shift the rim right. If you have more, you may need to re-lace the wheel asymmetrically with different size spokes on the left and right. You do it one quarter turn at a time (same on all the left spokes, same on all the right spokes, and check the position)
 
Last edited:
Back