Aurora Limited Edition Mid-Drive Review

smorgasbord

Well-Known Member
Region
USA
Post #1: Assembly

Box arrived in pretty good shape. Opened it, laid it on the floor, and dragged the bike out and up. Much easier than lifting the bike out of an upright box. It looks like this just out of the box:

IMG_5154.jpg


My first order of business was to get the battery on the charger to reduce my wait time before being able to ride. Tip: This requires digging out the keys, which are zip tied to the handlebar. Removing the battery also reduces the weight, so it's a tad easier to handle.

After removing a lot of zip ties and bubble wrap and foam, installing the seat post and mounting on my bike stand:
IMG_5173.jpg


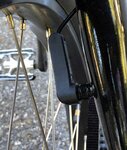
Basically, the remaining steps are to mount the front wheel, mount the front fender and light, and then mount the handlebar.

If you're assembling the bike yourself, I recommend reading the PDF since the video doesn't describe removing the brake caliper spacer or tell you what tire pressure to use.

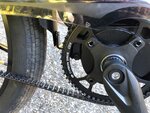
Here's pics of the front brake spacer that needs to be removed in order to install the front wheel:
IMG_5175.jpg


IMG_5176.jpg


It's nice that Evelo provides some tools, but you will need additional sizes of hex wrenches not included with the bike.
The front wheel axle is nicely marked 8-10Nm, but nothing on the stem nor handlebars. I used the typical 5Nm torque.

In that regard, note that the stem is already attached via the top bolt, which sets the headset preload. Mine was preloaded just fine, but I recommend checking it and tightening or loosing the top bolt as needed. Then align the stem with the front wheel and tighten the side bolts.

BTW, note that the tires are indeed 26 x 3.0:
IMG_5181.jpg
 
Last edited:
Post #2: First impressions.

Here she is, with the optional rear bag (and aftermarket Kinekt 2.1 seatpost and a rear mirror):

IMG_5187.jpg


She's heavy, but appears well built. Frame is labeled Made in Taiwan and Class 2:
IMG_5203.jpg


Here are some close-ups of different aspects:

The NuVinci shifter:
IMG_5197.jpg

This is the "Harmony" electronic version, which means that shifting is very very easy - the twist has no mechanical resistance at all.

What you see above in orange is the readout of what gear you're in. More bars is a lower gear - kind of counter-intuitive if you ask me. There are very soft click stops, but in practice you just rotate the shifter until the pedal pressure/cadence is what you want.
What's great about the NuVinci compared to normal external gears or even the more expensive Rohloff is that you can shift at any time - pedaling or not. It turns out that when not pedaling, the gears can only "go" so far away from where they were, but no worry - the NuVinci will shift as far as it can and then complete the rest when wheel starts moving. It's really cool.

BTW, that silver button switches the hub into an automatic pedal cadence preserving mode, supposedly like an automatic transmission. I haven't used it enough to say whether it's worthwhile or not. The display changes to blue, with bars representing a desired pedal cadence. The idea is that you choose how fast/hard (not sure which yet) you want to rotate the pedals and the hub shifts itself to maintain that automatically.

One of the hydraulic brake lever reservoirs:
IMG_5199.jpg


I'm not super-impressed with the brakes, although I did just complete the bedding in process. The levers are adjustable for reach, but not travel. Stay tuned for more on them in a later review. These are low-end hydraulic brakes with a dual, not quad, piston design. Front rotor is 180mm, rear is 160mm.

IMG_5210.jpg


One of the more differentiating features of the Aurora Limited is the carbon Gates drive:
IMG_5204.jpg

IMG_5188.jpg


With the Gates drive and continuously adjustable internally geared hub (and smooth pavement tires), the bike rides smoothly. Gear shifts are smooth like butter and very quiet - just a slight whine as the gears change inside the rear hub.

The motor is new to most of us; made by a company call Dapu. FWIW, it's rated at 750 watts. It's nicely integrated into the frame, with the wires coming out the back, not the bottom, so they're not likely to get damaged:
IMG_5207.jpg
IMG_5206.jpg


Between the motor, Gates belt, and internal hub, the drivetrain is very quiet even at high levels of assist and even when shifting.
IMG_5190.jpg


The front fork is a SunTour NCX. It's got a lock-out and adjustable pre-load. I haven't played with the adjustments much yet:
IMG_5201.jpg


FWIW, the pedals (Allgo from Wellgo) are really cheap. Just turning them in your had indicates lousy bearings, with no apparent way to grease or adjust. These are not the kind of pedals you want on a $4K bike. I have a pair of RaceFace Chesters (~$35) on order.
 

Attachments

  • IMG_5204.jpg
    IMG_5204.jpg
    165.9 KB · Views: 717
Last edited:
Post #3: Display and Functions

There's a color, non-touch, screen. It looks great, but functionality is very basic.

Here's Day Mode, which is the default when you turn it on:
IMG_5212.jpg


Note that battery SOC is a rough 5 bars. The last bar flashes when the charge is really low.

It's not documented anywhere I could find, but to get to Night mode you quickly press the Power button again:

IMG_5216.jpg


Note that you have to wait for the display to power up before going into Night mode - you can't just press the Power button twice. To turn off, press and hold the Power button.

In Night mode, the headlight and taillight illuminate. The tail light is also a brake light, and the brake light works in both Day and Night modes. There's no problem running Night mode during the day, and the overall brightness is adjustable in the Settings menu.

Notice the "STD" mode at bottom right. This is the only mode available. Instead, you get 5 active Pedal Assist modes (PAS), plus a 0, or Off, mode (see bottom left).

Since the screen isn't touch, you have to use the keypad near the left grip:
IMG_5200.jpg


Pressing "+" or "-" changes the PAS mode. The hard button sticking out at the lower left is the Thumb Throttle. Note that the Throttle doesn't operate in PAS 0, but does operate from a standstill.

You have to press and hold the "SET" button to get into settings:

IMG_5214.jpg


Note that the first setting resets the Trip Counter. This is nice functionality, as you get to control when it resets, but it is a lot of button pressing.

Five levels of brightness.

The Speed Limit comes set at 20MPH. 25MPH is the max.

Finally, note the Wheel Size. Even though the wheels are actually 26", you want to choose the 700C setting since the tires are such high profile. I would have preferred a direct circumference setting here for more accuracy.

BTW, there is a wheel rotation sensor on the rear wheel:
IMG_5209.jpg


which I assume is used to report speed.

The "Advanced Setting" menu is pretty useless:
IMG_5215.jpg


I didn't try to set a password and don't know if that would lock out usage of the bike or just the display or even anything. Manual says to ignore it.
 

Attachments

  • IMG_5209.jpg
    IMG_5209.jpg
    148.6 KB · Views: 610
Last edited:
Post #4: Initial Riding Impressions

Since gear changes are so easy, the main mode of operation for me so far is to choose an assist level and then adjust the gearing to suit. In that regard, it operates like the European torque assist bikes, such as those with a Bosch drivetrain. But so far, it doesn't feel like the PAS settings are as multi-purpose as the Bosch modes. I probably need more miles on the bike to say for certain.

I did find on high PAS levels that just turning the cranks a bit gives a lot of assist, which surprised me since I expected assist to be more of a torque multiplier. That felt more like the low-end cadence assist bikes I've ridden in the past. So, for me the jury is still out on how well the torque assist works on this bike.

The Thumb Throttle also takes a bit of getting used to. It's a soft start, so it feels like it's not engaging and then just when you think it's not working, it engages. Evelo told me the soft start will help drivetrain longevity, especially at high gears and full throttle. This may be one area where hub drives are better since it's easy for them to supply instant power without worrying about wear on the pedal drivetrain.

I did put a Kinekt 2.1 spring post on the bike, which makes a big difference on comfort. I used the long 420mm version, which works great on the Aurora since you can still lower the seat almost all the way down to the springs, but then can raise it high for long legged people. And the seat post is marked so it's easy to return to prior settings.

The tires are pavement only in my view. No nobbies at all. You might be able to get away with hardpack fire roads and such if you lower the pressure. These are "Plus" size 3" wide tires after all so at low pressures they're very compliant. But if there's loose soil or sand I'd worry. I'm thinking of getting a pair of Maxxis DHF tires (26x2.8) to enable some off - roading. I would prefer a Smart Sam tire, but they don't come near wide enough in the 26" size (about 2.3" I think).

The rack is permanent and very strong. It doesn't match any standards so you're velcroing whatever bag(s) you put on it. The Evelo bag (pictured up-thread) is pretty nice, with the side pockets holding fold-out mid-size panniers with zippers. That's cool, but it means the side pockets can't hold much unless you fold them out as panniers. The rack is pretty long (about 17") so it could take a longer bag if you could find one.

Being a step-through, flame flex was a concern. Things are pretty robust near the bottom bracket / motor, but I haven't been on enough rough roads to know how it feels and behaves.

The swept-back handlebars are very comfortable for your wrists. Combined with the high angle stem, this is a pretty upright and comfortable riding position. I did adjust the positions of the brake levers and shifter display to suit - very easy to do. The grips are OK. Not locking but also not (yet) easily movable. As you can see in the photos I stuck a mirror into the left handlebar end.

I'll add to the thread as myself (and my wife, who will be the primary rider) get more experience. If you have questions in the meantime, I'll do my best to answer. If you do decide to buy, consider PM'ing me for a discount code if these posts were helpful.
 
Last edited:
Please remove this post as it's not the same bike! Also, there is no "limited edition" for the "hub drive."

Obviously not the same bike... I think EBR members may be interested in the cheaper Hub Drive model.

BTW, nice eBike review! ;)
 
Post #4: Initial Riding Impressions
The tires are pavement only in my view. No nobbies at all. You might be able to get away with hardpack fire roads and such if you lower the pressure. These are "Plus" size 3" wide tires after all so at low pressures they're very compliant. But if there's loose soil or sand I'd worry.

The Evelo bag (pictured up-thread) is pretty nice, with the side pockets holding fold-out mid-size panniers with zippers. That's cool, but it means the side pockets can't hold much unless you fold them out as panniers.

First, thanks for the time you’ve taken to write your informative review. I look forward to future installments.

I also received a new Evelo Aurora Limited Edition (ALE) and have ridden it a bit to determine if the fit is good for me.

Regarding the tires, while riding on unpaved ground such as my driveway, which has some lose gravel, a significant amount of gravel gets picked up by the front tire and funneled between it and the fender then ejected from the other end of the fender. Have you or your wife experienced this phenomenon? Soon I will undo then reattach the front fender to maximize spacing to see if that solves or reduces the problem.

Regarding the Evelo bag pictured on your wife’s ALE, would you a) provide a photo of the bag showing the panniers fully deployed, b) share with us how the panniers are secured at the bottom, and c) show some pics of the top compartment unzipped and also the back pocket unzipped? Unfortunately, Evelo’s website does not provide enough information about this bag.

If these requests are more than you have time to fulfill, I completely understand. Thanks again for your post.
 
Regarding the tires, while riding on unpaved ground such as my driveway, which has some lose gravel, a significant amount of gravel gets picked up by the front tire and funneled between it and the fender then ejected from the other end of the fender. Have you or your wife experienced this phenomenon? Soon I will undo then reattach the front fender to maximize spacing to see if that solves or reduces the problem.

We've been on pavement mostly with some short stretches on hard pack dirt. Nothing like that yet.


Regarding the Evelo bag

Here are some pictures. The panniers just hang down and do not secure at the bottom. Each of the pockets, zippered, is about 8.5" wide by about 10.5 deep. The left side one has an additional mesh pocket. There are 4 velcro straps: two at the front, and one at each rear corner. There are a few ways to use them to attach to the Aurora Limited Edition's rack. I first had the pack all the way towards the back, where the rear corner velcros work perfectly but the front ones had to go to the sides. The way it's now mounted in these photos is with the front velcro straps attached around a cross member of the rack and the rear corners going over the fat park of the rack rear where the down supports are.

There is a tiny pocket water resistant pocket in the lid - just big enough for keys. The top elastic straps are quite long, so you could probably hold a basketball. Easy for a water bottle. There's a reflective clip in the rear for a light, and there's a separate carry handle you can clip to the metal rings to carry the pack after you've parked the bike.

I didn't show it here, but there's a zipper just under the lid which makes the bag deeper. Let me know if you want to see what that looks like.


IMG_5217.jpg


IMG_5219.jpg


IMG_5220.jpg


This is the rear:
IMG_5221.jpg


And this is the front:
IMG_5223.jpg


It's a decent enough bag if you want something with fold out panniers. If you wanted to spend more you could check out this Topeak bag: https://www.amazon.com/Topeak-Velcro-Version-Molded-Panels/dp/B004WSLT2O . Topeak also makes some other cheaper models that don't have the panniers. If you wanted big panniers, the Evelo is not the bag I'd recommend - it's kind of a middle all-around bag.
 
(Note: some of this post is on another thread, but I thought it good to include all my experiences here)

Symptom: A "skip" or "blimp" when pedaling slowly but forcefully, typically when starting up. This happened to my wife a few times (I could hear it 100' away), and then it happened to me on ride.

Cause: I was pretty sure it was the Gates belt jumping a tooth. Read the Gates manual (that came with the bike - props to Evelo!), and what it described as symptoms of too loose a belt matched. So set about increasing the belt tension.

Fix: See photo below:
adjustingscrews.jpg


The basic procedure is to loosen the 5mm hex head screws (2 on each side of the bike), then loosen the lock nut (10mm) on the red hex head screw. Then turn the red hex head screw in or out to move the dropouts to the front or rear of the bike. Here's a close-up with the wheel removed:
LeftDropOut-CU.jpg


Problem: The paint job on the frame is pretty decent, but the paint thickness in the open oval prevents the dropouts from moving. What I actually had to do was to remove the blue screws completely and then file/sand the paint away from the open oval:
AreaToCleanUp.jpg


I don't have a photo, but the adjustable drop-outs are aluminum and have a protrusion that rides in the oval. With the paint this was an interference fit. After sanding away the paint, the dropouts were able to slide in the oval. I still left them a tight fit.

Anyway, I re-installed the wheel (here's a photo of the axle in the proper location in the drop-out):
LeftDropOutWithAxle.jpg


tightened the axle nuts (15mm) to a torque of about 45Nm, and then was able to use the red screw to slide the drop-outs to get the right belt tension and to keep the wheel centered in the frame.

I used "feel" on the belt tension, and then found the Gates phone app, which basically uses the phone microphone to measure the harmonic frequency of the belt when you pluck it like a guitar string. I used the Gates manual to determine the acceptable tension and I was close enough to not mess with it anymore.

With the Gates belt, too little tension results in the skipping we had. Too much tension wears other components out. The tension recommendations for an IGH (Internally Geared Hub) like the enviolo are lower than for analog mountain bikes, so you don't have to worry about the belt itself having too much tension. I ended up at the upper range of tension.

One thing that will be interesting is if I have to change out a tube in the field. The 15mm axle nut is not a large size, and I expect to carry a box wrench for it. The question is whether when replacing the wheel whether I can still get the axle all way into the drop-out, since that means the belt has some tension on it. I think that once the axle is mostly in place that sitting on the bike would apply enough force to re-tension the belt (it's actually not that tight, but it is tighter than any chain which only has a derailleur spring for tension).
 
Last edited:
Update: 125+ miles on the bike now and still sorting out belt/drivetrain issues. Latest news is that a noise I was hearing that thought might be the motor turned out to be a loose chainring. Scary! Got that tightened up and the belt re-tensioned (even spent $18 on a Krikit tension gauge), and now it's skipping again, even though my tension reading is at or above the recommended high. Going to take it out on another ride tomorrow and will report back afterwards.

New purchasers need to go through EVERY bolt and make sure it's as tight as it should be. The factory folks in Taiwan (assuming that's where assembly is since that's where the frame is made) just aren't on their game - at least not yet.
 
Agree with your 10/26/19 warning to double/triple check the factory assembly.

I've now got 100+ miles since the Evelo Seattle Service office completed re-tune/check while replacing a factory damaged power cable. Bike is riding very nice indeed now.

Have had one belt jump since the service. It happened with Power Assist at 5, NuVinic in lowwww, and myself pedaling really hard to climb a short but very steep" bike path on ramp" from a dead stop. Feel this belt jump has more to do with Human Operator and less to do with overall bike systems integration.

While I have no earlier e-Bike experience for comparison.
Do have several years on a Human Power NuVinic with Belt Drive.
And I could/can make the belt jump under the right (
wrong) conditions.
 
To the OP...Very thorough write-up and great pictures. I am seriously considering the bike. Would you say it would be a good fit for a larger male rider? 6'2", 300lbs.
 
Not the OP, but I own this bike, as well. I am male, 5'-10" and currently weigh 270lbs. I would say "Yes!" -- it was one of the reasons I purchased this (it handles more weight). Plus, the features I wanted are all included - racks, step-thru, fenders, hidden cables for direct-powered lights (not batteries), more upright seating position, Gates drive, etc. You may wish to call Evelo for final reassurance. They really did their research on this one, in my opinion.
 
Not the OP, but I own this bike, as well. I am male, 5'-10" and currently weigh 270lbs. I would say "Yes!" -- it was one of the reasons I purchased this (it handles more weight). Plus, the features I wanted are all included - racks, step-thru, fenders, hidden cables for direct-powered lights (not batteries), more upright seating position, Gates drive, etc. You may wish to call Evelo for final reassurance. They really did their research on this one, in my opinion.
Thanks. What about the 26" wheels? Have you ridden anything with larger hoops? I've been told that can make a difference for taller riders.
 
I have not. Sorry. That's why I would call them to ask specific questions about your situation. Their guys are very knowledgeable. They advised me to wait for this model when I was looking - based on my stated desired features. I never got the sense they were being misleading.
 
To the OP...Would you say it would be a good fit for a larger male rider? 6'2", 300lbs.
What about the 26" wheels? Have you ridden anything with larger hoops? I've been told that can make a difference for taller riders.

You are just within the specs Evelo publishes for the bike.

Bigger wheels can help a bike frame feel better for bigger riders, but I think the main advantage is off-road where the larger wheels roll over irregularities better. The 26" x 3" (or 2.8) tire size isn't very common, so you're somewhat restricted as to replacements options.

What kind of riding do you do? Despite the fattish tires, this bike has an upright position with 45 degree comfort handlebars on a high-rise stem with a sturdy rear rack.
 
Just received this bike and put 20 miles on it. Love it! I have the bar end mirror to add but the grip is incredibly thick and so not sure I should cut it. Might have to just drill a hole to get a razor knife to work. Just making sure this is the right thing to do. Drill a hole to get started and then cut out the end of the grip and install the mirror. We bought a Galaxy the same day and that one had a plug and took 2 minutes. Thanks!
 
I have the bar end mirror to add but the grip is incredibly thick and so not sure I should cut it.

If you look at the second picture in this thread, you'll see that we just had a plug to remove. Maybe Evelo changed the grips? At any rate, I wouldn't cut them, I'd just buy another set of grips. They're pretty cheap. I put these on other bikes: https://www.amazon.com/gp/product/B00K08NGAI
 
Back