Mikes Bikes was quoting late November a few months ago. Try calling them.Yes if I had the fortunate situation of getting to place the buttons I think I would put them about the end of my middle finger on the curve of the bar if the buttons are exposed and not too hard to press. No, BikeInn just says cannot ship outside the US for that part. Mike’s Bikes does not list this part on their website. Found another site that would only ship within Australia.
You are using an out of date browser. It may not display this or other websites correctly.
You should upgrade or use an alternative browser.
You should upgrade or use an alternative browser.
2021 Creo Road Remote?
- Thread starter sapidus
- Start date


My Mikes in Petaluma says the computer system says they're coming end of Nov. Since more E is happening in Europe and the bike was designed in Europe, Europe is getting these parts first. They're coming. The only negative I have to say about the bike is the fiddly buttons on the TCU.Mikes Bikes was quoting late November a few months ago. Try calling them.
Prairie Dog
Well-Known Member
- Region
- Canada
- City
- Red Deer
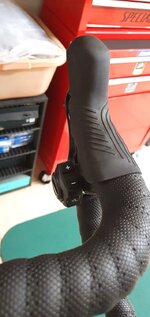
I have just completed a mock up of what my final road remote setup would likely look like before the bars are re-wrapped. For all intents and purposes, I’ve temporarily positioned the buttons in their current position but will move them slightly further down the bend and leave them exposed.
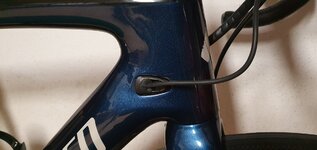
I've also decided to route the remote cables through the drive side port since it isn’t being used which is recommended in the instructions that came with the kit. The only caveat is that since my Creo is a 2020 model, the replacement ICR port was not included at the time when I purchased the bike. This won’t be an issue if you have an EVO as the required port is already in place for the dropper post cable. I’ve reached out to my Specialized dealer for more details and they didn’t think it would be an issue. My only other option would be to route all wires (rear brake, Di2, and both remote cables) to the non-drive port which might be a bit tight. Otherwise the install looks pretty straightforward. One would simply decide where to place the remote buttons and that will be based soley on personal preference. To make it look a bit cleaner, I'll use heat shrink tubing wherever it can be accommodated. There is plenty of cable to locate the buttons on virtually any region of the bars.
Note: The arrows connecting the junction box and the TCU must be lined up in order for the system to work.
Last edited:
kattanm
Active Member
This is awesome. Thanks for sharing. I just called Mike’s Bikes in San Fran and Sausalito and both said they hope to get them in February. You are lucky!! No hope of getting these anytime soon in US.I have just completed a mock up of what my final road remote setup would likely look like before the bars are re-wrapped. For all intents and purposes, I’ve temporarily positioned the buttons in their current position but will move them slightly further down the bend and leave them exposed.
I've also decided to route the remote cables through the drive side port since it isn’t being used which is recommended in the instructions that came with the kit. The only caveat is that since my Creo is a 2020 model, the replacement ICR port was not included at the time when I purchased the bike. This won’t be an issue if you have an EVO as the required port is already in place for the dropper post cable. I’ve reached out to my Specialized dealer for more details and they didn’t think it would be an issue. My only other option would be to route all wires (rear brake, Di2, and both remote cables) to the non-drive port which might be a bit tight. Otherwise the install looks pretty straightforward. One would simply decide where to place the remote buttons and that will be based soley on personal preference. To make it look a bit cleaner, I'll use heat shrink tubing wherever it can be accommodated. There is plenty of cable to locate the buttons on virtually any region of the bars.
Note: The arrows connecting the junction box and the TCU must be lined up in order for the system to work.
View attachment 72963View attachment 72964View attachment 72965View attachment 72967


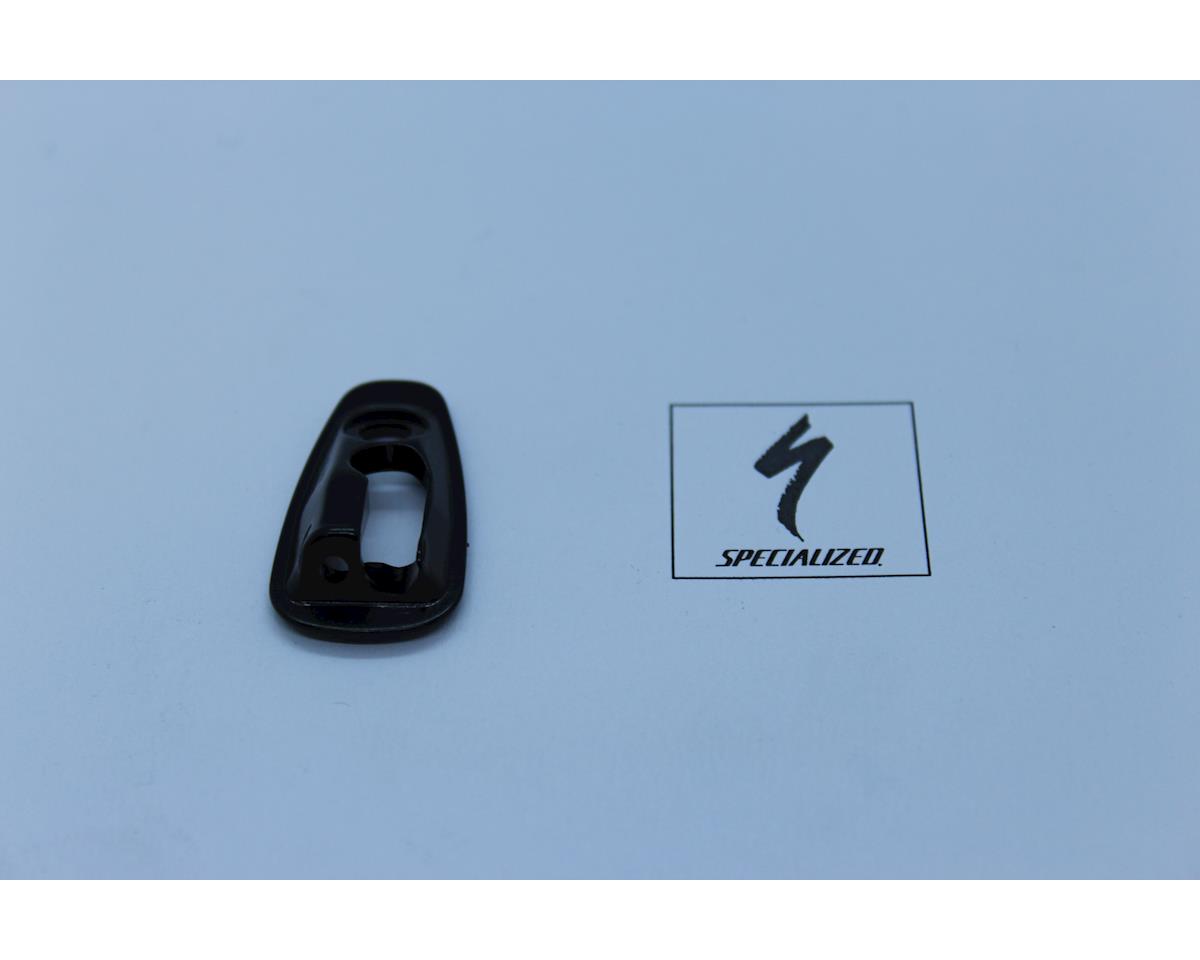
Hi, Can you maybe taker a photo of the instruction?I took delivery of a pair of remotes today for the bikes. Since our Creos are not EVOs (sans dropper posts), I may have to modify the drive side port if I opted to route one or both remote cables on that side. There is mention of a supplied port to replace the existing blank version but I could find no details on that part.
View attachment 72307
Does this end cable after junction box plugs into a TCU on the top, like with Turbo Levo?
Thanks
Prairie Dog
Well-Known Member
- Region
- Canada
- City
- Red Deer
It shouldn't be any different from the Levo remote. The TCU will have a vacant female plug and it's simply a matter of plugging in the junction box/remote connector. Just make sure that you have the +/- buttons on the corresponding bar locations where you want them placed as the cable themselves have no visible markings to indicate this. ie + button increases support, - button decreases support. The connectors to the junction box need to be seated all the way in until you can hear a distinct click. If they are not fully inserted the remotes won't work. There is plenty of excess cable along with the junction box and connectors all which require care when it comes to storing them inside the frame.Hi, Can you maybe taker a photo of the instruction?
Does this end cable after junction box plugs into a TCU on the top, like with Turbo Levo?
Thanks
If you own an EVO you are already a step ahead of those of us who have non-EVO versions as the appropriate ICR port is already in place. From what I understand, new MY Creos will come shipped with a parts box supplied with a replacement port. It's plausible to think that some shops have simply gone ahead and routed all cables through to the non-drive side since early models would have been shipped with just blank versions of the ports. I'm not even aware if they are available yet so it's prudent to check with your own Specialized dealer. Part # for the replacement ICR port is S196500006.

Last edited:
Much appreciate for this explanation.It shouldn't be any different from the Levo remote. The TCU will have a vacant female plug and it's simply a matter of plugging in the junction box/remote connector. Just make sure that you have the +/- buttons on the corresponding bar locations where you want them placed as the cable themselves have no visible markings to indicate this. ie + button increases support, - button decreases support. The connectors to the junction box need to be seated all the way in until you can hear a distinct click. If they are not fully inserted the remotes won't work. There is plenty of excess cable along with the junction box and connectors all which require care when it comes to storing them inside the frame.
If you own an EVO you are already a step ahead of those of us who have non-EVO versions as the appropriate ICR port is already in place. From what I understand, new MY Creos will come shipped with a parts box supplied with a replacement port. It's plausible to think that some shops have simply gone ahead and routed all cables through to the non-drive side since early models would have been shipped with just blank versions of the ports. I'm not even aware if they are available yet so it's prudent to check with your own Specialized dealer. Part # for the replacement ICR port is S196500006.
View attachment 73133
I was afraid, that you will have to connect it down at the motor. This is simple now. I already have Levos control, that works 100%, will get this instead...
I modified the right cover, could easily take additional cable as I don't use Dropper post.
Thanks
Attachments
Last edited:
Prairie Dog
Well-Known Member
- Region
- Canada
- City
- Red Deer
I see and here I thought that the connection for the Levo remote wasn't any different than the road remote for the Creo. How did you modify the blank port on the drive side? I was thinking of putting my drill press into action and boring a hole through the aluminum blank but I might hold off until the part becomes available. So I assume you won't have any issue with obtaining the remote based on your location.Much appreciate for this explanation.
I was afraid, that you will have to connect it down at the motor. This is simple now. I already have Levos control, that works 100%, will get this instead...
I modified the right cover, could easily take additional cable as I don't use Dropper post.
Thanks
I got normal opened cover and drilled it a little bit and put some rubber grommet and it holds perfect. If you have blank port, just drill the hole and use some di2 or similar rubber grommets to hold the cables, so you don't get water inside. Only thing the aluminium part is kinda soft and can bend easily.I see and here I thought that the connection for the Levo remote wasn't any different than the road remote for the Creo. How did you modify the blank port on the drive side? I was thinking of putting my drill press into action and boring a hole through the aluminum blank but I might hold off until the part becomes available. So I assume you won't have any issue with obtaining the remote based on your location.
My friend already have them in shop for other client. But I really don't need them right now, will get them next year no problem, as my setup works great. Position is perfect, right at my fingers and don't upstruct the position on the hoods or the drops. Only looks kinda bodge ....

Prairie Dog
Well-Known Member
- Region
- Canada
- City
- Red Deer
Thanks. I might give it a try using the drill press. The road remotes are ultra convenient as they can be placed virtually anywhere on the bars either discreetly hidden under wrap or exposed. Glad to hear that Levo version is working well for you.
Prairie Dog
Well-Known Member
- Region
- Canada
- City
- Red Deer
It's been a couple of weeks since I completed the install of the Turbo road remote so I thought that I would post the obligatory follow up. All went according to plan and, after the bars were re-wrapped, the decision to place the remote buttons at the bends turned out to be the right one for me.


As for having the buttons exposed, I find no delay or hesitation in movement when activating them with my hands resting either on the hoods or in the drop zone. I also used the Kush wrap to better disguise and give the buttons a more integrated presence. A couple of strips of electrician’s tape helps hold them in place and provides solid footing prior to applying the new bar wrap.

Both sides of the cables were treated with heat shrink tube or self-fusing silicone tape to create a cleaner look. My LBS didn't have any luck locating a replacement cable entry drive-side port but happened to have other versions in his parts bin that were from an older Specialized Epic that fit perfectly.


As for having the buttons exposed, I find no delay or hesitation in movement when activating them with my hands resting either on the hoods or in the drop zone. I also used the Kush wrap to better disguise and give the buttons a more integrated presence. A couple of strips of electrician’s tape helps hold them in place and provides solid footing prior to applying the new bar wrap.
Both sides of the cables were treated with heat shrink tube or self-fusing silicone tape to create a cleaner look. My LBS didn't have any luck locating a replacement cable entry drive-side port but happened to have other versions in his parts bin that were from an older Specialized Epic that fit perfectly.
Last edited:
It looks great. Just got mine today, will install them tomorrow. I am little concerned how will you be able to push the button when on the hoods, more like when riding?
Better test if it would feel awkward and would need some hand adjustment just to press the bottom properly. I found that with my old one, that only some positions were ok. Will see.
Better test if it would feel awkward and would need some hand adjustment just to press the bottom properly. I found that with my old one, that only some positions were ok. Will see.
Prairie Dog
Well-Known Member
- Region
- Canada
- City
- Red Deer
Thanks, Tomyboy. I figure that I spend 75%-90% of my time riding on the hoods so finding the ideal sweet spot was a key factor in my choice. My middle/ring fingers fall naturally onto the buttons with hands at rest on the hoods while in the drops the task would go to my index fingers. You could also move the buttons further up or down the bends depending on the length and positioning of your digits. There are numerical markings along the bar bends that I used as reference points when it came to adhering the buttons to the bars. I found it to be a foolproof method ensuring that both buttons were lined up correctly on either side of the bars.
A location on the inside of the bars in close proximity or underneath the rubber hoods was ruled out as it would have necessitated repositioning my hands to activate the buttons. I would definitely recommend taking the time to place the remotes at various spots before making a final decision.
A location on the inside of the bars in close proximity or underneath the rubber hoods was ruled out as it would have necessitated repositioning my hands to activate the buttons. I would definitely recommend taking the time to place the remotes at various spots before making a final decision.
Mikes Bikes in Petaluma, CA emailed me and said my remote button order is now in stock.Thanks, Tomyboy. I figure that I spend 75%-90% of my time riding on the hoods so finding the ideal sweet spot was a key factor in my choice. My middle/ring fingers fall naturally onto the buttons with hands at rest on the hoods while in the drops the task would go to my index fingers. You could also move the buttons further up or down the bends depending on the length and positioning of your digits. There are numerical markings along the bar bends that I used as reference points when it came to adhering the buttons to the bars. I found it to be a foolproof method ensuring that both buttons were lined up correctly on either side of the bars.
A location on the inside of the bars in close proximity or underneath the rubber hoods was ruled out as it would have necessitated repositioning my hands to activate the buttons. I would definitely recommend taking the time to place the remotes at various spots before making a final decision.
Wondering about how your wrapped the tape? It looks like you may have put a hole in the tape so the button would show through but still be really secure surrounded by the bar tape. Details pleae.It's been a couple of weeks since I completed the install of the Turbo road remote so I thought that I would post the obligatory follow up. All went according to plan and, after the bars were re-wrapped, the decision to place the remote buttons at the bends turned out to be the right one for me.
View attachment 74473
View attachment 74474
As for having the buttons exposed, I find no delay or hesitation in movement when activating them with my hands resting either on the hoods or in the drop zone. I also used the Kush wrap to better disguise and give the buttons a more integrated presence. A couple of strips of electrician’s tape helps hold them in place and provides solid footing prior to applying the new bar wrap.
View attachment 74475
Both sides of the cables were treated with heat shrink tube or self-fusing silicone tape to create a cleaner look. My LBS didn't have any luck locating a replacement cable entry drive-side port but happened to have other versions in his parts bin that were from an older Specialized Epic that fit perfectly.
View attachment 74476
View attachment 74477
View attachment 74478
Prairie Dog
Well-Known Member
- Region
- Canada
- City
- Red Deer
That was a concern that I wanted to address before applying the new bar tape. My goal was to try and make them look inconspicuous enough but slightly exposed so that I could easily find them. To begin, I wrapped some electrical tape (sticky side out) around the area of the bar where I wanted to place the remote buttons. I then attached them to the specific spot and proceeded to tape down both the bottom and top ends of the buttons using electrical tape virtually locking them securely into place. The sticky-side out tape assists in holding down the buttons as the self-adhesive strips that come with them are not that great to begin with.Wondering about how your wrapped the tape? It looks like you may have put a hole in the tape so the button would show through but still be really secure surrounded by the bar tape. Details pleae.
Knowing that I would likely have spare wrap, I cut a couple of 3"-3 ½" strips off of the main rolls and wrapped each one around the bar and up the sides of each button. (See 1st attached image) Once again, the reversed electrical tape helped to hold that extra strip in place until I was able to rewrap the section in question. I also used a couple of similar strips around the base of each brake clamp that would also cover any areas of the bar that would remain exposed. After that, it's just a matter of wrapping in a methodical fashion making sure that everything is tucked properly into place. You can see in the second image how the wrap overlaps the small horizontal strip that was previously laid down. Go slow inspecting your work along the way and you should expect good results.
I'm hoping that the super grippy Kush wrap will hold up over time and will wait and see how if fares after next season’s rides.


I installed my set of Creo remote buttons today. I am not trying to be a downer but I think they are nearly as small and fiddly as the ones on the top tube TCU. And the install was some kind of hassle too. On my Creo Expert Evo I have removed the dropper post so the drive side port was vacant. I thought a no-brainer to run the two remote cables through it. But that port has one small and one larger hole. You can get squeeze one plugged cable end through the bigger hole but then there is not enough space to get the other wire with plug end through the port. I drilled it out just enough to get both wires through the port and up to the TCU. Getting your hands on a port cover with a big hole would be very helpful.That was a concern that I wanted to address before applying the new bar tape. My goal was to try and make them look inconspicuous enough but slightly exposed so that I could easily find them. To begin, I wrapped some electrical tape (sticky side out) around the area of the bar where I wanted to place the remote buttons. I then attached them to the specific spot and proceeded to tape down both the bottom and top ends of the buttons using electrical tape virtually locking them securely into place. The sticky-side out tape assists in holding down the buttons as the self-adhesive strips that come with them are not that great to begin with.
Knowing that I would likely have spare wrap, I cut a couple of 3"-3 ½" strips off of the main rolls and wrapped each one around the bar and up the sides of each button. (See 1st attached image) Once again, the reversed electrical tape helped to hold that extra strip in place until I was able to rewrap the section in question. I also used a couple of similar strips around the base of each brake clamp that would also cover any areas of the bar that would remain exposed. After that, it's just a matter of wrapping in a methodical fashion making sure that everything is tucked properly into place. You can see in the second image how the wrap overlaps the small horizontal strip that was previously laid down. Go slow inspecting your work along the way and you should expect good results.
I'm hoping that the super grippy Kush wrap will hold up over time and will wait and see how if fares after next season’s rides.
View attachment 74817View attachment 74818
The sticky stuff on the back of the buttons just barely holds them in place on the bar so does require electrical tape to keep them in place prior to rewrapping with bar tape. Make sure you are comfortable with your placement before retaping things up as the remote buttons are still kinda small and you should ensure your fingies will be able to easily find them.
I almost for sure would prefer the bar mounted big button mountain bike unit with the single wire to the TCU. Unfortunately that unit has an even bigger connector to the TCU and would require a port with an even larger hole.
I think something like this might make things easier:
Specialized 2018 Diverge Left Side Internal Routing Port For Shift & Brake (Black)
This is the Cbg My18 Diverge Left Side Icr Port For Shift And BrakeThis is compatible with the following bikes: Specialized Diverge Men Specialized... S176500009
Last edited:
Prairie Dog
Well-Known Member
- Region
- Canada
- City
- Red Deer
I see some valid points in your post but I certainly don't feel that the remotes are fiddly and definitely prefer them over constantly glancing down at the TCU to change the power settings and having to remove either hand from the bar.I installed my set of Creo remote buttons today. I am not trying to be a downer but I think they are nearly as small and fiddly as the ones on the top tube TCU. And the install was some kind of hassle too. On my Creo Expert Evo I have removed the dropper post so the drive side port was vacant. I thought a no-brainer to run the two remote cables through it. But that port has one small and one larger hole. You can get squeeze one plugged cable end through the bigger hole but then there is not enough space to get the other wire with plug end through the port. I drilled it out just enough to get both wires through the port and up to the TCU. Getting your hands on a port cover with a big hole would be very helpful.
The sticky stuff on the back of the buttons just barely holds them in place on the bar so does require electrical tape to keep them in place prior to rewrapping with bar tape. Make sure you are comfortable with your placement before retaping things up as the remote buttons are still kinda small and you should ensure your fingies will be able to easily find them.
I almost for sure would prefer the bar mounted big button mountain bike unit with the single wire to the TCU. Unfortunately that unit has an even bigger connector to the TCU and would require a port with an even larger hole.
I think something like this might make things easier:
Specialized 2018 Diverge Left Side Internal Routing Port For Shift & Brake (Black)
This is the Cbg My18 Diverge Left Side Icr Port For Shift And BrakeThis is compatible with the following bikes: Specialized Diverge Men Specialized... S176500009www.amaincycling.com
As for the drive side port, I didn't really encounter any issue with squeezing the plug ends through the holes. Yes, one hole is 5mm and the other is 4mm but I pulled each one individually through the larger hole and never had to drill out and enlarge the smaller hole. If both holes were 4mm then it likely would have required some drilling. It would be nice to know what replacement ports Specialized is including in the parts package with new bikes. Perhaps someone in the know can enlighten us. Part # for it is mentioned in the instructions that came with the remotes.
That being said, I could see the buttons being difficult to locate if they were buried under bar wrap but having them exposed is certainly not a problem for me and represents a much safer method over manually pushing the button on the TCU.
I think that there is going to be compromise in any scenario whether it be the Creo or the Levo remote.
I could get one plug end through the big hole but when it was in there its wire took up space in the hole which made it seem impossible to squeeze the other plug through the hole. And the small hole was definitely too small. No big deal since it all worked out. If you are going to use heat shrink tubing to route the two wires from the port to near the handlebars then those two plug ends also have to be able to slide through the tubing before shrinking. I tried 1/4 tubing first but that was a no go. 5/16 tubing worked fine. Not a super tight shrink but enough shrink to nicely wrap the wire and look professional.I see some valid points in your post but I certainly don't feel that the remotes are fiddly and definitely prefer them over constantly glancing down at the TCU to change the power settings and having to remove either hand from the bar.
As for the drive side port, I didn't really encounter any issue with squeezing the plug ends through the holes. Yes, one hole is 5mm and the other is 4mm but I pulled each one individually through the larger hole and never had to drill out and enlarge the smaller hole. If both holes were 4mm then it likely would have required some drilling. It would be nice to know what replacement ports Specialized is including in the parts package with new bikes. Perhaps someone in the know can enlighten us. Part # for it is mentioned in the instructions that came with the remotes.
That being said, I could see the buttons being difficult to locate if they were buried under bar wrap but having them exposed is certainly not a problem for me and represents a much safer method over manually pushing the button on the TCU.
I think that there is going to be compromise in any scenario whether it be the Creo or the Levo remote.
Prairie Dog
Well-Known Member
- Region
- Canada
- City
- Red Deer
I could get one plug end through the big hole but when it was in there its wire took up space in the hole which made it seem impossible to squeeze the other plug through the hole. And the small hole was definitely too small. No big deal since it all worked out. If you are going to use heat shrink tubing to route the two wires from the port to near the handlebars then those two plug ends also have to be able to slide through the tubing before shrinking. I tried 1/4 tubing first but that was a no go. 5/16 tubing worked fine. Not a super tight shrink but enough shrink to nicely wrap the wire and look professional.
Glad to hear that. I used 3/8" tubing and it also worked fine. It would have been nice to treat the other side with the same but it would have meant pulling out and re-routing the brake cable. Instead, I used a roll of self-fusing silicone tape that I had laying around. I also didn't find any need to wrap the cable/connectors with anything before stuffing them below the TCU. There isn't much room below there once the remote is installed. I did use a small zip tie to bundle the remote cables just to make them a bit more compact. My wife is still undecided where she wants the buttons placed on her Comp Carbon but it appears that she might be more inclined to have them up on top of the bars on either side of the stem.
Similar threads
- Replies
- 1
- Views
- 2K
- Replies
- 0
- Views
- 2K
- Replies
- 12
- Views
- 10K