Removing Chainring? 2019 Explore E+1

Mtl_Biker

Active Member
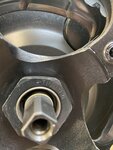
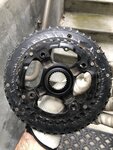
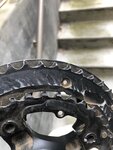
I'm trying to remove the chainring on my 2019 Explore E+1 GTS and ran into an unexpected nut. I've got the crank arms off on both sides but there's a really large nut holding the chainring in place. And it's recessed enough that I can't use a wrench or vice-grips to open it. Looks like I need a super large socket. It's somewhere around 1 3/8" as far as I can tell.

i-MZ5sM9q.jpg


I have an Imperial measure tape measure and obviously this bike uses metric measure. I can't really get the tape measure close enough to the nut to get an accurate size.

Does anyone know what size this is? Or if there's a special Giant tool to remove this? Gonna be tough finding a metric socket large enough, especially since I can't take the bike into a hardware store to check the size.

Thanks for any help.
 
I’ll tell you a secret. I had the same problem with my Haibike. I didn’t have the wrench to get that off. It was a long shipping delivery for the tool and I needed to get the chainrings off. So I took them off without removing the spider. The trick to get the new chainrings back on: scotch tape the 4 small bolts at the back of the innermost chainring then reassemble the chainrings. Also tie the chainrings together with string if necessary as you put them back on. This will prevent the bolts from falling out because the successive plates are falling all over the place. I have a bash guard + 2 chainrings and spacers. Make sure you use long pieces of thick tape that you can later pull off easily.
If you go this route you’ll probably be cursing me, but you’ll eventually get all the plates back on.

The tool for the Haibike Yamaha to get off the spider is a 36mm hex wrench. It’s probably the same for Giant but I couldn’t be sure 100%
Thank you!

I'm going to take a chance on it being 36mm. I'm at work now and found a tape with both Imperial and metric measures, and the estimate of 1 3/8" I made yesterday is real darn close to 36mm. I don't think I want to fuss with disassembling the spider if I don't have to.

I'm bummed that I didn't have the right tool to open this yesterday because it was a nice day and I was off work. I could have finished my little modification and still gotten out on the road to try it. The roads were pretty much clear for the first time in 10 days. There's rain in the forecast for the next day or so, then followed by much colder temps and uh, snow. I'm hoping I'll be able to try what I want before the roads are covered again.
 
Have you ever come across something like a shop manual for these bikes? It would be real nice to have the torque values for things like the chainring nut, crank bolts, etc.

I'm a bit concerned about putting the crank arms back on... they were really tightly on and very difficult to remove even with a crank puller. I don't know how they will fit back on correctly. Maybe I'll try tapping them into place with a rubber mallet first, and then tightening the crank bolt. But the crank bolts were not very tight at all.
 
The Yamaha PW service manual has some of the torque values for the Yamaha-branded drives. Not sure about Giant though.
Thanks. I'll have to see if I can get one. But since Yamaha bikes are not sold in Canada, it might be a bit tough. Do you have one? Does it list torque values for things that are not really part of the PW drive, like chainring nut torque, crank pedal torque, etc. Or only the motor itself torque values?
 
Use grease or anti-seize on those taper interfaces - I've had to cut cranks off before that were dry assembled (cranks had poor self-extraction threads to be fair, which stripped out pretty quick).
Absolutely no need to take the spider off as Jayvee noted; the chainring is easily replaced with the spider on the bike. If you do manage to get it off, you'll have a hard job "re-torqueing" it...
 
Hi, I'm trying to get more teeth on my chainring for my giant explore gts 2019. Do anyone knows the bcd of this bike ?
 
I have a Haibike SDURO Trekking 6.0 2018 (Yamaha PW motor). I am trying to remove those chainring bolts using the Park Tool CNW-2C Chainring Nut Wrench, but they are on so tight that I am just stripping the nuts. I bought a 36mm socket head that fits the spider nut, but I don't have a 1" wrench to connect to the socket. Also I imagine that it's torqued so tight that I'd never get it off anyways.

I'm going to hit up a bike shop or two and see if they can help.
 
should be torqued at 30Nm. Mine came of pretty easy with a simple wrench and a conventional 36mm socket yesterday. Bike is 1 week old ...
 
I have a Haibike SDURO Trekking 6.0 2018 (Yamaha PW motor). I am trying to remove those chainring bolts using the Park Tool CNW-2C Chainring Nut Wrench, but they are on so tight that I am just stripping the nuts. I bought a 36mm socket head that fits the spider nut, but I don't have a 1" wrench to connect to the socket. Also I imagine that it's torqued so tight that I'd never get it off anyways.

I'm going to hit up a bike shop or two and see if they can help.
You have a 36mm socket which needs a 1" driver????? I have a hard time believing that. If so it would mean the walls of the socket are unusually thin, plus I've never seen a 1" drive (I'm sure they must exist though). Common driver sizes are 1/4", 3/8" and 1/2", with the 1/2" most likely being what you need.

What's the reason you want/need to remove the chainring bolts?

No, my bad it is 1/2". Just ordered a breaker bar for it. I'm thinking it's going to take a foot and full body weight to shift.

I have tried to remove the chainring bolts, but they are also over torqued and the nuts are stripping.

I have a replacement large chainring in the mail as mine has worn after almost 3000 miles.
I'm having a senior moment here probably, but are you turning it in the right direction? I'm surprised it's so tight.
 
Turn clockwise to loosen it (wich I found strange). but that’s what the bolt says.
 

Attachments

  • 0A186484-DCBF-456B-A4AB-0E5A671DA0E3.jpeg
    0A186484-DCBF-456B-A4AB-0E5A671DA0E3.jpeg
    260.6 KB · Views: 939
Turn clockwise to loosen it (wich I found strange). but that’s what the bolt says.

Yeah appreciate the reminder, and I did know that it's reverse threaded.

I'm going to reassemble the motor onto the bike, hold the rear brake down, and try it using an electric drill in the forwards direction.
 
Yeah appreciate the reminder, and I did know that it's reverse threaded.

I'm going to reassemble the motor onto the bike, hold the rear brake down, and try it using an electric drill in the forwards direction.
I doubt that an electric drill would have enough torque to loosen the bolt. Have you tried putting your wrench and socket on the bolt and then hitting the end of the wrench (or pry bar, whatever you're using) with a rubber mallet? I think that's what I did back when I was opening mine.
 
I doubt that an electric drill would have enough torque to loosen the bolt. Have you tried putting your wrench and socket on the bolt and then hitting the end of the wrench (or pry bar, whatever you're using) with a rubber mallet? I think that's what I did back when I was opening mine.

Yeah the drill couldn't face up to the task either, but putting the motor back onto the bike, and attaching the chain gave me the leverage required - success!

You guys reckon this large chainring is ready to replace?

Hopefully now I'll be able to get those pesky chainring bolts off, and will replace them with something that has hex sockets on both sides (now that I know I can remove the spider to access).

Incidentally, in case it's helpful for anyone in future, here's the tool I used on the 36mm yamaha chainring nut:


Thanks for all your responses guys!
 

Attachments

  • IMG_1920.jpg
    IMG_1920.jpg
    340.9 KB · Views: 414
  • IMG_1921.jpg
    IMG_1921.jpg
    272.5 KB · Views: 399
  • IMG_1923.jpg
    IMG_1923.jpg
    270.8 KB · Views: 391
  • IMG_1924.jpg
    IMG_1924.jpg
    359.1 KB · Views: 416
Back