I am mid project in installing a derailleur in order to allow 7 speed shifting ability. I am also working on the center stand issue. I removed it (center stand) last night, and am debating how much I must shim it to be effective. I had not even considered it interfering with the derailleur. You mention 1/16' which is about the max without having to devise some method of preventing the stand mount from "twisting" in the mount area. Do you think 1/16 is enough? I was thinking more along the lines of 1/2 to 3/4" in order to solve the center stand issue. Am I over estimating? Thanks!Also, my new 3-speed sprocket has arrived and I plan to tinker with it over the next couple of days. Since I do not yet have an upgraded motor, I am hoping (betting) that this sprocket will fit the RR1 even with the offset spacer. I believe it will because the new 3-speed sprocket is approximately the same overall width as the stock single-speed freewheel.
If it fits, then I plan to purchase a derailleur and shifter to see if I can give the RR1 at least 3 speeds, which I believe will still constitute a noticeable improvement over a single speed. The new sprocket is a 14-17-20t as compared with the stock 16t sprocket. If this works, I should see a small benefit on the low end (for climbing hills) and the high end (to help reduce so called "ghost pedaling" at higher speeds). If this doesn't work, not a big deal -- this new sprocket cost just $16 (including free shipping).
My long-term plan is to eventually perform the full RR1 makeover -- new motor, controller, display, and 7 shiftable gears. Since I cannot find either a 3-speed shifter or rear derailleur, I am going to purchase the 7-speed components, initially, and again hope that I can make them work with my 3-speed sprocket (I just need to limit the derailleur travel on the higher gears).
Also, for what it's worth, I have already installed a front suspension fork on my RR1, which I purchased directly from RPB for $150 USD -- this is the same suspension fork that RPB uses on the RR+. I mentioned my purchase to someone else in another forum, and they contacted RPB to order/purchase the same fork. However this person reported back that (for some reason??) RPB would not sell them this fork. Maybe they sold one to me only because I also own a RR+, but who knows??? At any rate, there is at least one other supplier of a similar fork -- Biketrix out of Canada, but for $250 USD (or anyhow the last time I checked).
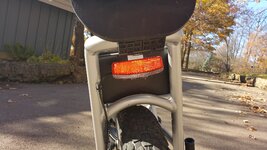
But if you can get your hands on one, mounting the front disc brake to this fork required some minor modifications. But now knowing what's required, I could probably repeat this entire installation in about 30 minutes -- everything else fits perfectly. The one side effect is that since the new fork is about 1" longer than the stock rigid fork, the new fork raises the entire front end of the RR1 by about 1" -- only barely noticeable from an aesthetic standpoint. Yet I also had to shim-down the center kickstand by about 1/16" to account for the rise. Btw, the center kickstand may also present a problem when adding a rear derailleur to the RR1 -- I've been told by RPB that this is the reason they switched to a side kickstand on the RR+ -- the center kickstand interferes with the lower-hanging derailleur cage (as compared with the stock chain tensioner on the RR1). So, in short, if you add a 7-speed derailleur to your RR1, you may be forced to switch to side kickstand (although I suspect that some short-cage derailleurs may avoid this problem).
You are using an out of date browser. It may not display this or other websites correctly.
You should upgrade or use an alternative browser.
You should upgrade or use an alternative browser.
Radrunner (chilli with peppers)
- Thread starter asiero
- Start date


cuekwe Jones
Member
I'll say more later because I am travelling at the moment. But just briefly, the 1/16" shim I mentioned was to solve the fork problem, not the derailleur problem. A long cage derailleur might force switching to a side kickstand.I am mid project in installing a derailleur in order to allow 7 speed shifting ability. I am also working on the center stand issue. I removed it (center stand) last night, and am debating how much I must shim it to be effective. I had not even considered it interfering with the derailleur. You mention 1/16' which is about the max without having to devise some method of preventing the stand mount from "twisting" in the mount area. Do you think 1/16 is enough? I was thinking more along the lines of 1/2 to 3/4" in order to solve the center stand issue. Am I over estimating? Thanks!
reed scott
Well-Known Member
Back when I was a noob of noobs I watched videos of Rad bikes. But being basically a snob about things I soon moved on. I surely needed a better sort of ebike. I mean c'mon man ... hub drive!? Puuleeease! Today I happened to be slumming on Bolton eBike's page and happened across this video of Kyle swapping out a Rad battery for one of his upgraded triangle batteries. Good informative video by the way. I may get such a battery one day. But there Kyle was behind a Rad bike. Dang! That thing looked so different from anything I had seen in any other video or advertisement. "That's a decent looking bike", I says to myself. Still a hub motor though. Pshaw. Rad may need to up their photography and promotion game. Yeah, right. Like they need my advice. Still .....

cuekwe Jones
Member
I don't think so because the male threads for the freewheel hub are integrated into the motor housing itself. If you put loose spacers over these threads, you could not attach the freewheel. This is why on the RR1 both the spacer and threaded freewheel hub are integrated in the motor housing as a single part.However, I would think it may be possible to utilize those spacers to be able to re-use the original single gear?
Btw, here is another tip: Before you install your new freewheel (if it's not too late), I would consider drilling a couple of holes in the end so that in the future you can use your pliers (or a pin spanner wrench like the one I linked to) to remove it (if necessary) without having to purchase and/or modify a special freewheel removal tool.
Last edited:


Certainly I am increasingly interested in the subject of derailleur....hopefully it works great for your guys....I will probably follow in your footsteps (most likely with the 7-speed sprocket...)
From my side, I am waiting for the controller and the display. As soon as they arrive I will install them and see what happens. If things don't improve substantially, I go for the engine that EBW sells with the 7-speed sprocket attached (which is almost certainly what I'll end up doing)....
Let´s stay informed about the progress we make ...
enjoy the day and try to make a little getaway with the bike ... I already did mine")
From my side, I am waiting for the controller and the display. As soon as they arrive I will install them and see what happens. If things don't improve substantially, I go for the engine that EBW sells with the 7-speed sprocket attached (which is almost certainly what I'll end up doing)....
Let´s stay informed about the progress we make ...
enjoy the day and try to make a little getaway with the bike ... I already did mine
I was on board with that response. I presume by the fork problem you mean that the forks being longer than stock, the center stand is no longer effective. Were you suggesting that th1t 1/16 is enough of a shim to make the center stand work again? I devised a method of lowering the center stand about 1", but don't want to have to re-do because it is too much?I'll say more later because I am travelling at the moment. But just briefly, the 1/16" shim I mentioned was to solve the fork problem, not the derailleur problem. A long cage derailleur might force switching to a side kickstand.
cuekwe Jones
Member
Right; it's the added rise of the fork that causes a slight problem -- this raises the entire bike, including the kickstand, but not by much. The consequence (based on the fork I used) is that kickstand still worked -- the bike would still stand up on its own on a flat paved surface -- but was just a bit unstable (more susceptible to tipping over).I presume by the fork problem you mean that the forks being longer than stock, the center stand is no longer effective. Were you suggesting that th1t 1/16 is enough of a shim to make the center stand work again? I devised a method of lowering the center stand about 1", but don't want to have to re-do because it is too much?
The shim I added improved stability, but is still not ideal. Before on the kickstand, one of the two tires were fully suspended in the air, meaning that the entire weight of the bike rested on the kickstand and one tire. Now when the kickstand is deployed, both tires touch the ground yet nevertheless feels to me pretty stable. Perhaps ideally one would add a 1/8-1/4" shim. But I had a piece of 1/16" sheet aluminum laying around and decided to try this first (it was easy to cut to size). I may try to add a second piece next time I have the bike apart. A potential problem here, as you probably know, is that the center kickstand mounts (from underneath) inside of a frame-welded gusset (for lack of a better term), which prevents the kickstand from twisting, adds strength, etc. And so there is a limit to how much you can shim down the kickstand before it drops out of this gusset (though I don't know the exact figure). I'd be interested to hear more about the method you devised for lowering your kickstand.
Btw, I hope you will take some photos of your build while in progress so we can see how things go together.
Last edited:
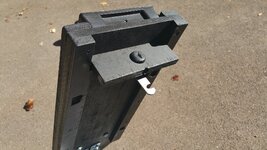
I have the EXACT same issue, and at first I thought I would use a thick washer which still allowed the center stand to fit into the "notch", but as you observed, it can only be so thick. I found a piece of this "tubing" at the hardware store. It fits perfectly into the notch on the frame, and already has a hole for the big bolt. I will drill and tap 2 holes in the tubing, and drill a hole on each "tab" of the center stand. There appears to be just enough room (all in order to keep it from twisting). Or perhaps just tack weld them together. It is the best I can come up with. I will probably grind the edges smooth and paint it so it does not stick out like a sore thumb (or rust). I'll let you know how it goes.Right; it's the added rise of the fork that causes a slight problem -- this raises the entire bike, including the kickstand, but not by much. The consequence (based on the fork I used) is that kickstand still worked -- the bike would still stand up on its own on a flat paved surface -- but was just a bit unstable (more susceptible to tipping over).
The shim I added improved stability, but is still not ideal. Before on the kickstand, one of the two tires were fully suspended in the air, meaning that the entire weight of the bike rested on the kickstand and one tire. Now when the kickstand is deployed, both tires touch the ground yet nevertheless feels to me pretty stable. Perhaps ideally one would add a 1/8-1/4" shim. But I had a piece of 1/16" sheet aluminum laying around and decided to try this first (it was easy to cut to size). I may try to add a second piece next time I have the bike apart. A potential problem here, as you probably know, is that the center kickstand mounts (from underneath) inside of a frame-welded gusset (for lack of a better term), which prevents the kickstand from twisting, adds strength, etc. And so there is a limit to how much you can shim down the kickstand before it drops out of this gusset (though I don't know the exact figure).
Btw, I hope you will take some photos of your build while in progress so we can see how things go together.
cuekwe Jones
Member
Cool, thanks for the idea!I have the EXACT same issue, and at first I thought I would use a thick washer which still allowed the center stand to fit into the "notch", but as you observed, it can only be so thick. I found a piece of this "tubing" at the hardware store. It fits perfectly into the notch on the frame, and already has a hole for the big bolt. I will drill and tap 2 holes in the tubing, and drill a hole on each "tab" of the center stand. There appears to be just enough room (all in order to keep it from twisting). Or perhaps just tack weld them together. It is the best I can come up with. I will probably grind the edges smooth and paint it so it does not stick out like a sore thumb (or rust). I'll let you know how it goes.
View attachment 70007
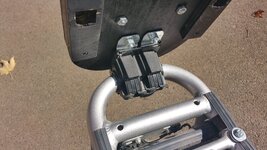
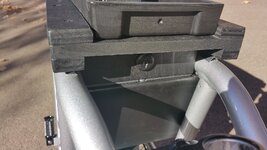
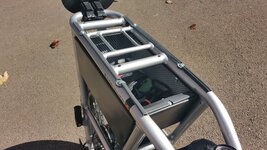
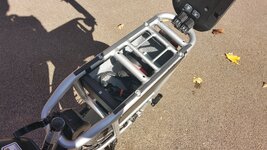
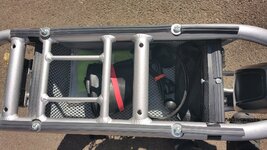
On a completely separate topic, I thought I'd share another idea for anyone who might be interested -- a lockable storage compartment that I fabricated from 1/16" aluminum stock (see attached photos). I made one of these for both of my RadRunners, and love it -- great place to stow emergency roadside tools, pump, spare tube, etc.
Attachments
cuekwe Jones
Member
Well, my 3-speed sprocket experiment failed. While the new sprocket fits the threads of the freewheel hub on the stock RR motor, it will not screw on deep enough to clear the dropouts -- off by about 3/8" and I see no easy way to modify the new sprocket to make it fit. Alas, $16 down the drain 
EDIT: Actually, I just doubled checked on Google and now realize that I purchased the wrong style of freewheel (only had limited online photos to guestimate from). However I now see that there are others (about the same price) that will likely work. So, will be placing a new order and then waiting another several weeks for it to arrive...
EDIT: Actually, I just doubled checked on Google and now realize that I purchased the wrong style of freewheel (only had limited online photos to guestimate from). However I now see that there are others (about the same price) that will likely work. So, will be placing a new order and then waiting another several weeks for it to arrive...
Last edited:
I have found that it is best to order from Amazon, if the part is available, even if it is a buck or 2 more. Shipping is nearly always fast, and returns are SUPER simple, with most orders not even requiring return postage! Trust me I have made PLENTY of mistakes, and some times I even order 2 or 3 items, not certain which will serve me best, and return the others. By the way, last night I got my 7 speed shifter, cable, and derailleur installed. I have not yet adjusted the shifter and cable, but I can manually get the bike to shift cleanly through 6 of the 7 gears, so I have a little adjusting to do. I'll follow up...Well, my 3-speed sprocket experiment failed. While the new sprocket fits the threads of the freewheel hub on the stock RR motor, it will not screw on deep enough to clear the dropouts -- off by about 3/8" and I see no easy way to modify the new sprocket to make it fit. Alas, $16 down the drain
EDIT: Actually, I just doubled checked on Google and now realize that I purchased the wrong style of freewheel (only had limited online photos to guestimate from). However I now see that there are others (about the same price) that will likely work. So, will be placing a new order and then waiting another several weeks for it to arrive...
cuekwe Jones
Member
I agree, in general, about Amazon. In this case, however, China via eBay/AliExpress/Wish is the only source (that I can find) for these particular items.I have found that it is best to order from Amazon, if the part is available, even if it is a buck or 2 more. Shipping is nearly always fast, and returns are SUPER simple, with most orders not even requiring return postage! Trust me I have made PLENTY of mistakes, and some times I even order 2 or 3 items, not certain which will serve me best, and return the others. By the way, last night I got my 7 speed shifter, cable, and derailleur installed. I have not yet adjusted the shifter and cable, but I can manually get the bike to shift cleanly through 6 of the 7 gears, so I have a little adjusting to do. I'll follow up...
Sounds like good progress on your end -- look forward to a few photos!
Hi there, finally the stuff arrived from Bolton. Actually didn't take that long. A couple of weeks. The bad news is that customs in Italy charged me 50 euros.Regarding the controller, I bought a plastic controller box from Amazon, and was able to get the new controller to fit inside. It was necessary to cut away some of the internal ribs in the box, and I had to cut the 2 mounting tabs off of the ends of the controller to get it to fit into the plastic case. It was tight, but it worked, and I chose to seal the box to make it water proof, even though the controller is supposed to be water resistant. From there I was able to mount the controller and case where the existing one mounts, and was even able to re-use the skid plate for protection. If I recall correctly, I remounted the case with 2 long hose clamps, which I modified by putting heat shrink tubing on the "leg" of the clamp for looks and to protect the paint on the bike. Never have had an issue.
Anyway, I am now trying to mount it and as expected, it does not fit in the same place where the original is mounted. So Ccount, I read about the plastic controller box that you got from Amazon, and I´m planning to follow your steps... I just wanted to know if you took apart the new controller and put its guts into the amazon box or if you put the whole new Bolton controller into the amazon box (which should then be a bigger box than in the first case, of course). Won't you have by any chance the link to the box that you bought in amazon (no worries if not)? have a nice day
Brian Botts
New Member
Maybe not use an impact wrench on the Hub body w/security torx. If you strip them then your scr$%ed. Use the torx in a socket and do it flat and slow. As far as cassette removal, a Park Tools cassette socket needs to be cut in half then shimmed with metal. Then use a park tools chain whip to hold the cassette Mine was so tight the a needle nose technique wouldn't have worked. I have yet to see a cassette removal socket that goes over the huge plug.These bits are necessary to remove the cover on the Baffang motor. I would advise a squirt of penetrating oil, and let it sit an hour or so, and use an impact wrench if you have one, to remove the security screws. You DO NOT want to strip them!!! However, you will still need to remove the large nut in order to remove the gear. This is where the punch and hammer or my idea of 90degree needle nose pliers come in.
I have the heavy Radwagon 4 with 2 batteries (52 and 48), a Bolten controller and true Bafang 750 hubody (placed in a RW hub) and it goes 34 mph and way quicker up hills.
cuekwe Jones
Member
Maybe not use an impact wrench on the Hub body w/security torx. If you strip them then your scr$%ed. Use the torx in a socket and do it flat and slow. As far as cassette removal, a Park Tools cassette socket needs to be cut in half then shimmed with metal. Then use a park tools chain whip to hold the cassette Mine was so tight the a needle nose technique wouldn't have worked. I have yet to see a cassette removal socket that goes over the huge plug.
I have the heavy Radwagon 4 with 2 batteries (52 and 48), a Bolten controller and true Bafang 750 hubody (placed in a RW hub) and it goes 34 mph and way quicker up hills.
After putting just a couple hundred miles on my new RR+, I noticed that a tooth had broken off the lowest gear of my 7-speed sprocket. I reported this apparent defect to RPB (with corroborating photos), and they elected to send me a new sprocket under warranty along with one of those pre-split freewheel removal tools -- sweet! The price for the removal tool on the invoice was just $15 (and in my case with free shipping under warranty).
Now, I don't know that RPB will sell these tools to just anyone. But if you are desperate, you might try to contact them and ask.
CynicalZombie
Member
AND, it is only $50 for a simple socket. I think I will continue to resort to my 90 degree needle nose pliers!It's more expensive but Bolton just created a freewheel removal tool...

Area 13
boltonebikes.com
Works on both Shimano and DNP FreeWheels and it's made in the USA. Specifically designed to fit over the plug, nut, & washers.
CynicalZombie
Member
Kyle @ Bolton created it because all other options he saw were not designed to go over the plug/nut/washers. He has tried many different ones, he saw a need in the market for a better tool, he bought tooling to create it and after several prototypes came up with a final product.AND, it is only $50 for a simple socket. I think I will continue to resort to my 90 degree needle nose pliers!
The average Joe doesn't need this tool that's for sure, but to a bike mechanic or tinkerer/upgrader who wants the right tool for the job, one finally exists now.
I don't know what a 'normal' freewheel removal tool costs but I will likely be upgrading a couple more Rad bikes in the future so the $30 I paid was worth it to me. (Black Friday + Bolton Labs discounts)
Similar threads
- Replies
- 51
- Views
- 7K