In the manual for my 2020 Rad Rover step through it says to "grease bottom bracket" every 6 months or 750-1250 miles. What the manual doesn't say is what the bottom bracket is and what or where do you grease it. As far as I could tell there are no grease fittings. Anyone know what they're talking about?
You are using an out of date browser. It may not display this or other websites correctly.
You should upgrade or use an alternative browser.
You should upgrade or use an alternative browser.
Rad Rover bottom bracket greasing
- Thread starter Gordon71
- Start date
rich c
Well-Known Member
With those kind of questions I suggest you take the bike to a shop. The bottom bracket is the bearings and shaft that the cranks and pedals mount on. You'll need a crank pulling tool, and maybe even a special socket to get the shaft and bearings out. I'm not familiar with the nuts they use on the shaft to hold the bearings in place
Last edited:
Craigrnelson
New Member
The bottom bracket is a sealed bearing unit and requires no maintenance unless maybe left underwater
That's kind of what I thought but at the very bottom of the "Recommended Service Interval" 750-1250 miles it says: Grease bottom bracket.The bottom bracket is a sealed bearing unit and requires no maintenance unless maybe left underwater
If that were true I would think there would be a grease fitting but there isn't. I've emailed Rad so will see what they say. Thanks.
OK,so now I know what the bottom bracket is and I just watched a video on how to remove it which means I have to buy a tool in order to.
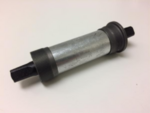
The funny thing is the guy on the video said nothing about applying any grease to it so I'm still not sure how or where to grease it. Rad responded to my email buy sending me a pic of the bottom bracket but said nothing about either how to remove it or where to grease it.
I've asked both in a follow up email.
Sierratim
Well-Known Member
- Region
- USA
- City
- Nevada City, CA & Paradise Valley, AZ
I don't know of any bike manufacturer that will provide support for routine maintenance so I'm not surprised at Rad's reluctance to wade into this with you. As you've discovered there are a lot of online resources to help do your own maintenance. Most local bike shops will do maintenance for you if you'd rather not get into it.
With that said, as Craigrnelson states most modern bikes use sealed/cartridge style bearings in the bottom bracket. These do not require service until they need replacement after many thousands of miles. Older designs, and perhaps a few modern bikes, used individual bearings in the bottom bracket (cup and cone bearings) that do need routine maintenance.
How to know which style you have? They require a different tool for disassembly. Most modern sealed bottom brackets use a spline tool to remove a cup threaded into the non-drive side of the bike and then the cartridge assembly from the drive side. An older style 'cup and cone' bottom bracket often needs a spanner or pin wrench to remove the adjustable cup. There are other versions of both styles, just to complicate matters! Most bikes also require a crank puller to get to the bottom bracket so most likely two speciality tools!
This graphic compares a cup and cone (left) to a cartridge (right) bottom bracket and the tools needed to remove them. Note that the cranks are still in place but would need to be removed before removing the bottom bracket.

Graphic from sheldonbrown.com
When in doubt it's OK to ask your LBS for some advice/help.
With that said, as Craigrnelson states most modern bikes use sealed/cartridge style bearings in the bottom bracket. These do not require service until they need replacement after many thousands of miles. Older designs, and perhaps a few modern bikes, used individual bearings in the bottom bracket (cup and cone bearings) that do need routine maintenance.
How to know which style you have? They require a different tool for disassembly. Most modern sealed bottom brackets use a spline tool to remove a cup threaded into the non-drive side of the bike and then the cartridge assembly from the drive side. An older style 'cup and cone' bottom bracket often needs a spanner or pin wrench to remove the adjustable cup. There are other versions of both styles, just to complicate matters! Most bikes also require a crank puller to get to the bottom bracket so most likely two speciality tools!
This graphic compares a cup and cone (left) to a cartridge (right) bottom bracket and the tools needed to remove them. Note that the cranks are still in place but would need to be removed before removing the bottom bracket.
Graphic from sheldonbrown.com
When in doubt it's OK to ask your LBS for some advice/help.
Thank you. The video I watched used the spline tool so I'm pretty sure I have a sealed unit. Here's a pic Rad sent me.I don't know of any bike manufacturer that will provide support for routine maintenance so I'm not surprised at Rad's reluctance to wade into this with you. As you've discovered there are a lot of online resources to help do your own maintenance. Most local bike shops will do maintenance for you if you'd rather not get into it.
With that said, as Craigrnelson states most modern bikes use sealed/cartridge style bearings in the bottom bracket. These do not require service until they need replacement after many thousands of miles. Older designs, and perhaps a few modern bikes, used individual bearings in the bottom bracket (cup and cone bearings) that do need routine maintenance.
How to know which style you have? They require a different tool for disassembly. Most modern sealed bottom brackets use a spline tool to remove a cup threaded into the non-drive side of the bike and then the cartridge assembly from the drive side. An older style 'cup and cone' bottom bracket often needs a spanner or pin wrench to remove the adjustable cup. There are other versions of both styles, just to complicate matters! Most bikes also require a crank puller to get to the bottom bracket so most likely two speciality tools!
This graphic compares a cup and cone (left) to a cartridge (right) bottom bracket and the tools needed to remove them. Note that the cranks are still in place but would need to be removed before removing the bottom bracket.
View attachment 66211
Graphic from sheldonbrown.com
When in doubt it's OK to ask your LBS for some advice/help.
Attachments
I just received a reply from Rad and this is what they said:
Strangely enough, our PAS Sensor Replacement Guide has some detailed instructions about cleaning and greasing the bottom bracket externally.
Here are the relevant bits of that guide:
Remove the bottom bracket spindle cups:
Insert the bottom bracket tool. At the left side of the bike, align the splines on the bottom bracket tool with those on the bottom bracket spindle cups and press together.
Secure the wrench and remove the spindle cup. After ensuring the tool is fully seated against the bottom bracket spindle cups, secure the wrench so the handle points toward the front of the bike and is angled slightly upward. Press down on the wrench to turn it counterclockwise to loosen the cup. Remove the cup and set it aside.
Repeat on the right side, turning the wrench clockwise.
Remove the bottom bracket spindle. Pull the spindle out of the frame, through the PAS sensor mount, and set it aside.
Clean the bottom bracket shell and threads. Use a clean paper towel to remove all grease, grit, and grime from the bottom bracket shell and threads. If needed. use a quick-evaporating solvent such as denatured alcohol, and follow the manufacturer's instructions, to clean the shell and threads. Use caution to keep any solvent from making contact with plastics on the bike, such as the PAS sensor, magnet ring, and cable housing, since solvents can damage plastics.
Wait until the bottom bracket shell and threads are completely dry. Do not use water or any water-based cleaners on the bottom bracket shell. They can require significant time to dry and can leave behind residue that can cause damage.
4. Ensure the threads and shell are completely dry, then apply bicycle grease. Once the threads and shell are completely dry, apply grease to the inside of the bottom bracket shell and all of the threads.
OK. I just ride on paved roads and groomed trails. I don't ride in the rain or through puddles or streams etc. I don't really see how that much dirt can accumulate under conditions like this nor do I see what possible damage it could do on the outside surface of the bracket anyway.
Sierratim
Well-Known Member
- Region
- USA
- City
- Nevada City, CA & Paradise Valley, AZ
Your bike does use a modern sealed/cartridge bottom bracket. I wouldn't tell you not to follow your manufacturer's recommendations, but it's not what I do. When I clean my chain I clean the rest of the drive train including dust and dirt from around the bottom bracket. The bearings are sealed so I don't see that anything else is needed, but YRMV.
Thanks. I expect I will do it but probably not before I've passed 1250 miles. When it reaches the point where I can't ride without passing cars splashing me with a nice mix of sand,salt,and slush then I'll put the bike away for a while and give it a good cleaning including that part. Did find a specific tool kit for that on Amazon for around $14 that's in my cart.
This seems pretty bizarre to me!
Considering Rads official recommendation for their bottom bracket to be cleaned and greased every 6 months, I find it odd that with all of the Rad service videos out there, I can't find one of them that mentions or covers the apparent service requirement that Rad says all of it's bike riders need to address.
Considering Rads official recommendation for their bottom bracket to be cleaned and greased every 6 months, I find it odd that with all of the Rad service videos out there, I can't find one of them that mentions or covers the apparent service requirement that Rad says all of it's bike riders need to address.
Turns out it is the video for replacing the PAS sensor that includes all the info for doing that service.This seems pretty bizarre to me!
Considering Rads official recommendation for their bottom bracket to be cleaned and greased every 6 months, I find it odd that with all of the Rad service videos out there, I can't find one of them that mentions or covers the apparent service requirement that Rad says all of it's bike riders need to address.
Yeah. Judging by the response to this thread or maybe the lack of one I'm guessing not too many rover owners bother with it. Once winter kicks in big time I expect I'll do it and maybe make it a once a year service but not every 750-1250 miles the book suggests.Thanks. That's a pretty complete video but quite the ask for a twice a year bike servicing.
fooferdoggie
Well-Known Member
thats a lot of greasing. man to have a sealed bottom bracket.Yeah. Judging by the response to this thread or maybe the lack of one I'm guessing not too many rover owners bother with it. Once winter kicks in big time I expect I'll do it and maybe make it a once a year service but not every 750-1250 miles the book suggests.
fooferdoggie
Well-Known Member
not on a rad its loose bearings.The bottom bracket is a sealed bearing unit and requires no maintenance unless maybe left underwater
That's not true. See the pic above.not on a rad its loose bearings.
Similar threads
- Replies
- 8
- Views
- 3K
- Replies
- 10
- Views
- 1K
- Replies
- 13
- Views
- 3K

