Nice Feature on a Hub Drive

I see ultra high temp fibreglass insulated wires, are they any good?

If you want to see potting gone wrong and dismantling even wronger.
They use fiberglass insulators on the inside of the motor.
Over top of the normal insulation.

The 8GA Silicon is rated at 200C so it's plenty good. The motor shouldn't really ever go over 150C and even that could be way to hot.
My only fear of fiberglass is that over time from flexing or anything it will wear out.
Inside the motor its tied down or glued down so it cant move. So yes fiberglass is good but for the right application.
 
I guess a lot of students can get help off engineering shops, he was no trouble, and who knows , he might be working for SpaceX now, he just needed to get off his high horse and deal with the real world.

He said he had a buyer for the bike at 12 grand, which was silly money back then , it was incredible for its time and stupidly light, I think he was a bit of a trust baby, but he did make an amazing frame.

I'll be watching to see how you go, I do like a build that deals with all the issues from the start instead of bolting fixes on afterwards.
 
I'll be watching to see how you go, I do like a build that deals with all the issues from the start instead of bolting fixes on afterwards.
If I had the intention of just riding on a stock setup I'd probably vent the motor and upgrade the connectors. At least to XT-60 or XT-90 but other than that I'd leave it.

I'm sure I will push this motor until something gives so I did a ton of research to see what issues people are having. Knowing that I want to do much more than the motor is designed to do. I have designed a system that together has one goal. Just keep eliminating the weakest link in the system. Until you cant anymore. Where you end up will dictate the result. That will be the limiting factor that limits the power of the complete system to whatever it is.

I kinda got hooked on this project when I bought this Battery. The UPP. When I installed it on the bike my torque went way up. And my hi speed increased from 20MPH to 28MPH on a 750 watt geared hub. I like the hub because it's quiet and I don't have to shift gears. It is a no name hub so I expect the Bafang to be way better. And I also got the true 1000W Bafang Hub.

When I installed the battery I gained so much because I rewired heavier gauge than stock from the battery to controller. It made a whopping difference. And after I bought Heavy duty Tires The bike feels so much more solid that i'm comfortable going faster. On top of that I have to move soon and that puts me farther away from work and this is how I commute. I don't want to commute 20 miles at 20mph. 40mph I can live with.

And I know.......your gonna say..... it don't take nearly what I'm doing to hit 40. That I am pretty sure of anyway. But I know wind resistance is the killer. I might try to make a fairing. Wish your carbon fiber guy was around. I work mostly with metal. And some seriously tough grades of Stainless Steel. Anyhow with what I already have it should be reasonable enough to hit 40.

I already know if I designed the system to do 40mph, that I would accomplish that and then want more and then waste more money upgrading.
So my mentality became to put together a system powerful enough to smoke the motor. Enough power that there would never be a reason for more. So this system is designed for 250 Phase Amps continuous 300 Phase amps PEAK. Wayy Wayy more than the 1000W bafang hub can take.

Heres what JTK77 reports his setup being on the Bafang G062 hub motor.

There is no need for rewinding really. G062 with 06 windings have quite low resistance. Magnets are decent (except the gluing)and saturation current quite high.
I'm running my modified G062 at 7000w peak (60v 120A battery current, 220A phase).
Torque 200++Nm. Stock windings, magnets and axle. Liquid and and air cooling. Also 8 awg phases etc.

So I would say my system components are comparable other than I have only 48V right now. I plan to go higher but I didn't decide if I will buy another UPP or build using Molicell 21700 cells rated for 45A current each cell.

The 48V puts you in a pickle. If it was a 36V I could run 2 in series easy.
At 48V in series I would be about 20V over the Tronix 250R specs. It's only rated for 100.8V. But I have been told that they habitually purposely under rate there devices. The caps are 130V so i might get away with it. But I have to check all the components on the board that have any tie to the battery voltage and make sure they can handle 120V or else use a Buck Converter and drop each 48 down a bit then run the bucks in series to get the voltage and if the buck cant take the amps then i got to run parallel bucks as well. It quite complicates things. My main concern would be weather or not the buck converters can take the regen voltage #1 and would it pass it back to the Battery properly #2. I think #2 is a go but I would have to find converters that can output 60A each. They do make them. Just not sure about the regen part.

If it was setup that way one advantage would be consistent performance regardless of battery charge level.
From full charge to empty you would get pretty consistent performance. There would be no voltage sag. The battery voltage would always be higher than the output voltage. I think the only exception would be if the battery couldn't supply enough amperage to the bucks then you might feel that drop. I also think if a circuit were put in place between the buck and the VESC that you could add a bank of CAPS. It would help with that drop if it occurs.

My other curiosity in this concept deals with the regen. If you could take all of the regen voltage generated at any given time and dump High Amps into a Capacitor Bank for short term storage then feed it back to the battery slowly within the battery limits you could increase the amount of energy you capture / or at least protect the battery from extreme regen voltages that spike much higher than the battery voltage. And I think you could even capture and store voltages lower than the battery voltage then run that through a transformer to get it at charge voltage then back to the battery. So maybe potential to increase the amount of charging we get from regen. I think this circuit could be put between the battery and the VESC for the high voltage handling. To get the low voltage deal going the circuit would have to exist between the motor and phase outputs of the VESC. To not affect the operation of the motor we would need another switching system or build it into the current switching system.

Basically another VESC type mosfet switching device that directs the current flow. It would have to allow the Driving VESC to power the motor without interference. And then the regen VESC takes the regen current and routes it to the power bank (circuit) Caps whatever it may be. Getting even deeper maybe it could be possible to capture the voltage generated by the Floating Coil. We would have to come off the center tap where the three phases terminate. 2 Coils are energized causing the motor to rotate. As the floating coil <---(off coil) passes the magnet it generates voltage. If the 2 control devices worked in sync then the regen device can take the voltage and route it to the charge circuit. So for every time 2 coils are energized 1 Coil sends voltage back to the bank. If that could work mannn. That would add up to quite a bit I think. But I'm pretty sure if it were possible someone would be doing it. I just need to know why there not doing it.

Anyway I gottta roll. I rambled on way to much. But that's about where I'm at for all this. One thing led to another and I went all out. Monday my new computer comes. It's a pre-ordered Mircrosoft Surface Pro 11 with Snapdragon X Elite processor. Its going on my bike as my primary display. And of course it will controll all the electronics. So I guess you can say i bought a $1500 display. But it is much more than just a display. 13" is a small as it comes so its pretty big. I will be machining a mount to install it on the bike.

The main reason for that is because I want to be able to program everything on the bike from anywhere. And I plan to do a lot of research and testing so there will be a lot of data collection going on. And I guess we will find out if the AI chip really is good for anything. The AI chip is Open Source. All of my major components are open source. Meaning I can modify the software to my hearts content to do anything I want it to do. My biggest problem is that I have so many things to do to put this all together that I am limited by the amount of time I can spend each day. The components all had to be sized and matched up, I have to finish measuring all of the hub motor parts and model it. Finish modeling the bike. And build the rest of the stuff i need like the Rack. So it's not moving along super fast. It's making a little progress each day, and parts are still coming in.

My gear milling tools will be here hopefully next week. Then I can machine PEEK spur gears.
So many things on my to do list.
 
Well that's good to know. I really think I'm gonna pot my battery. I could use electrical silicon that's clear but there's better stuff with higher thermal transfer rates.

I remember that a member here posted a picture of his battery that he potted in liquid urethane.
I don't know about the thermal transfer rate, but urethane is as tough as nails.
I could pick away the potting material in my controller with my fingernail.

I bought the "proper" silicone for electronics to put my battery back together.
I noticed that the circuit board for USB port in the battery end cap, was only glued on one end and the board could bounce around, so I added more silicone for better support.


20240614_074246.jpg


On a related note while I was deciding whether or not to pot my new controller, I found out that regular Silicone 1 gives off acetic acid while it cures and that can damage sensitive electronics, but Silicone 2 doesn't give off any dangerous VOC's and is relatively safe for electronics.

And,.. I was considering coating my circuit board with silicone modified conformal gel to seal the board to make it waterproof, but it was posted here on the forum that it has a relatively low ignition point and can easily add fuel to a battery fire, so I decided against it.


20230107_152830.jpg


This is my collection of fuses and thermal fuses with various temperature ratings, a roll of thermally conductive tape, a tube of thermally conductive RTV silicone, 4 little tubes of thermally conductive paste, a plunger of black thermally conductive paste, and a bunch of little aluminum heat sinks.

Interestingly, I found out that you can "thin out" regular Silicone with Naphtha (camp fuel) to make it pourable or spread it with a paint brush or roller.

I don't know about using it as homemade potting material (talk about adding fuel to the fire. 😂), but the Naphtha completely evaporates out of the silicone.
The silicone ends up shrinking as it "cures" so I would have to do a few layers to prevent a full on shrinkage which could pull parts of a circuit board.

I ended up using it to waterproof my tent.
You can buy silicone spray bombs for tents, but it's expensive and you have to do it every year.
My coating should last a lifetime. My tent is thicker and heavier now, but it won't leak. 😂

When I bought my battery the LG was the best I could find. I would have bought Samsung.

Really the best is the Molicell 21700. They can run 45A per cell. So you could push more than we could ever use. But the only way I know to get that is to build your own.

It's probably safe to say that you have quality cells that will last A LONG Time, and you shouldn't have any one or two cells that will crap out before the others.

Crappy batteries are known to go out of balance where a single cell or two never fully charge, and end up shutting down the battery.
But if you have quality cells, AND a balancing BMS, any undercharged cells will be topped up before the battery is fully charged.

If you get Really carried away with purchasing a new battery, the manufacturer tests every individual cell to check its capacity to make sure all the cells used are within 1% tolerance of each other before they are assembled as a pack.


Another thing that I can think of is that heat has a huge effect on a battery. Warmer cells have more capacity than cooler cells, and the cells in the middle of the pack are being heated by the cells around it as well as generating it's own heat.
The cells on the outside of the pack, especially the corners, have the metal case right beside them to conduct away the heat.
Then the heat goes into the metal frame where it is mounted and conducted into the frame, so there is more heat transfer at the touching points between the case and the frame.
Parts of the battery may be exposed to more wind, providing cooling, and parts of the frame can be warmer if it's close to the controllers heat.

All that adds up to a battery heating up different cells more than others especially under a Huge power output, and some cells may be stressed more than others.
 
Good points about the cell Temps. I know what you saying about hot and cold effects. Seems like it would be best to put the thermistor in the middle of the pack. Where ever the hottest spot you can get to.

I'm not too much worried about the cooler Temps. But high Temps yea. To get max amps out of the cell the cell needs to be below around 77 degrees F. So even ambient temp in summer can exceed that. I will look into the VESC and see if It is possible to set the MAX Battery Output using the Temp sensor data. If I can code in a simple function that operates on a scale of battery temp / Max output then it is possible to adjust Max Output up or down depending on the temp automatically.

I believe the VESC and BMS can .. ha ha.... C.A.N Bus communicate. I know for certain there are BMS made VESC specific and that might be necessary.

Otherwise I CAN lol..... read the data into my computer / display and run code on it to set the MAX Battery output on the VESC based on the temp reading of the BMS. The remote I got for throttle has a color display and shows motor temp, mosfet temp, and the BMS shows the battery temp.

All and all with that in mind you can run the whole system that way. Control the output power based on all 3 Temps. The VESC has some of these temp features already there.
 
I kinda got hooked on this project when I bought this Battery. The UPP,..

So I would say my system components are comparable other than I have only 48V right now. I plan to go higher but I didn't decide if I will buy another UPP or build using Molicell 21700 cells rated for 45A current each cell.

The 48V puts you in a pickle.

I think you should build your own battery.

You're building/rebuilding your battery anyway, so why not buy a bunch of LG 21700 cells and turn your 13s 5p battery into a 72 volt 20s 5p battery?
Or 21s or 22s or whatever you choose as a final voltage?

I think 72 volts is a standard, so a BMS should be available, or maybe what you already have?

KISS,.. No coils or buck converters complicating things and making heat and wasting energy.

I think it would be wise to view your battery and the rest of your e-bike as separate systems.
The battery is the most expensive and most dangerous part of an e-bike.
(Normally anyways, God knows how much you're going to spend on your ebike. 😂)

Then you can try to get your battery and e-bike to play nicely together. 😂

You could build your battery potted in urethane (if that turns out to be the optimum potting material?) with just the B+ B- and balance wires coming out, then "stick" the BMS to the outside of your pack where it is visible and accessible.

Apparently even the length and placement of the BMS wires can have an effect on the battery.
Longer hotter wires have more resistance which can give the BMS skewed readings.

Putting a thermistor inside the urethane battery block would suck if it fails, then you may not be able to replace it, but the information from it could maybe just be ignored?

I'm thinking a thermal fuse inside the pack is a bad idea, but a bunch of them stuck to the side of the battery block might be a good idea.

And/or you could buy a bunch of Molicell 21700 cells rated for 45A current each cell and build a battery.

45A at 72V would really Kick Some ASS !!!

Cells are a lot cheaper when purchased in bulk and not already assembled into a battery with a potentially inadequate build quality and a questionable BMS.
 
Last edited:
Yep all good stuff. I don't have the resources to build the battery yet. I want to build one but I have to buy everything for it. I need to build / put together a good spot welder. Then I'm ready. Probably use the molicell. I have 2 450 watt dc power supply / meanwell drivers.

And a bunch of 150 watt drivers.

The 450 watt will run 114 to 229V on constant current. I think I need constant voltage and they can be wired either way.

I'm pretty sure there are programmable RC chargers that only need a power supply. I can use the meanwell drivers for the power supply and charge up to 900 watts of power. I could hit 7A at least from the power supply.

So I can definitely set up a good charger.
The meanwell drivers are potted. I did wanna see what's in there but these were expensive.

20240614_120237.jpg
20240614_120225.jpg
20240614_120303.jpg


I'm sure I will build a battery in the next couple months. I need to finish other work before I'm ready for that
 
Yea the hlg480 would be able to charge batteries but not in parallel by itself.

I can set the voltage between 0 an 10.
Then it outputs that constant up to 480 watts.

I could use constant current mode and output to a RC Charging station and charge the pack as a whole. Up to 108 volts.

Here's the specs on the meanwell. What do you think

 
Well did a little more research on the meanwell. And you can parallel connect them. The 2 480H drivers will work. So that's good. I don't have to worry about a charger and it's way faster. I'll just run it through the primary B leads to the bms so it's like regen. Then I can set the bms to turn off when it hits the voltage I want. There about $150 each so I just found a $300 charger I had collecting dust. Sweet.

Here's some info about it.

 
Here's the specs on the meanwell. What do you think


You can't go wrong with MeanWell.
They're bulletproof.

This is the one I have my eye on,..

Screenshot_20240417-170643_DuckDuckGo.jpg
Screenshot_20240417-163015_Acrobat for Samsung.jpg


I don't want to charge at over 4 amps and this best bang for my buck.
I think this one has the CV CC potentiometers on the bottom though, and the IP specs aren't quite as good.

I'm using this to charge my batteries now,..

Screenshot_20240201-181620_DuckDuckGo.jpg
Screenshot_20240201-181628_DuckDuckGo.jpg
Screenshot_20240201-181634_DuckDuckGo.jpg


I can keep really close track of my battery and charge it to any voltage I want at any current.
(Including 60V at 5 amps if I wanna blow up my battery. 😂)


I don't turn my power supply up past half because it's Chinese, but you can strap a MeanWell to your ebike then bounce it off rocks and take it swimming and it will just keep going. 😂
 
Well did a little more research on the meanwell.
I don't have to worry about a charger and it's way faster.

MeanWell makes an actual battery charger too.

Screenshot_20240614-125855_DuckDuckGo.jpg


You can buy a charger on AliExpress for twenty bucks, but it ain't a MeanWell.

The MeanWell only seems to come with one type of battery connector so you might need an adapter or splice on your own plug.
 
,.. I think when im done i will machine my own aluminum case for it and pot the whole pack in the case.

Another thing to consider is that all cells have a vent port on the end.
It's supposed to bleed off gas pressure if the cell starts to overheat and I don't know what effect sealing the cells in potting material would have?

From what I understand, the vent ports aren't very effective, and by the time they actually start to vent, the vents can't keep up and the cell explodes anyway.
Something to look into though.

Perhaps potting the battery helps to prevent any single cell from overheating reducing the need for venting?

I dunno?

Perhaps potting the entire battery and leaving the vents open to vent if they have to?
I figure that the main purpose of potting is to prevent any movement that could break a weld and to make the pack more impact resistant. It could also reduce the chance of any hot spots created by a bad cell by conducting the heat away through the potting material?
 
Last edited:
The main reasons for potting are to 100% waterproof.
And thermal transfer. They have potting material with high thermal transfer rates to pull the heat out to the case.
It also does like you say. It stabilizes the temperature of the circuit board or Battery. It helps to make all the components a more uniform temperature.

I honestly feel like potting a battery the size of ours is not a good idea. Like you also said the batteries are supposed to vent but will explode either way. So a sealed aluminum box with a battery like ours in it could turn into a bomb. I already was thinking about it. My box is going to be aluminum. at least 1/8" thick plate. I was going to seal it to be completely waterproof. There is not a large amount of volume inside the box so batteries exploding can create a lot of pressure in there. If it exceeded the yeild strength of the aluminum then boom. I just honestly don't know how much pressure a gassing off battery can produce.

Here is the data on the normal gassing of our batteries. They create pressure even under normal conditions.

I'm not finding anything about explosion psi.
But i remember when i was a kid. We would take 1/8" diameter copper tubing, pack it with flash powder and make firecrackers. Those things were like a half stick going off and way smaller than a battery cell. I don't think that a few cells could create enough pressure to blow out the box instantly. But multiple cells exploding and each time build pressure and getiing hotter and hotter.
As the aluminum gets hotter it gets softer until finally it lets loose at wherever the weakest point it. Some Electrical / IE (METAL BURNING FIRES) can melt through thick steel plate. Yes metal can burn and when it does watch out.

There is almost no stopping it. Unless you have a special fire extinguisher. Lithium is a metal that will burn just by being exposed to oxygen. It reminds me of machining titanium. You have to be careful with titanium. Even machining the titanium under a stream of (coolant) Water....if the tool wears down it generates a lot of heat. Like enough heat to weld steel together. I've done it unfortunately. With titanium the combination of heat created by friction of dull tool rubbing and the thin chips what happens is the chips ignite. This is off the charts temperature once the titanium starts to burn. It then ignites the thicker chips and so on, It gets so hot it has been known to burn through the bottom of the machine.

Long story short sealing the battery in aluminum could cause a way hotter fire and the pressure will keep building until the box pops. My Ideas is to run a Piece of stainless tubing out the bottom of the box. Have it pointed at the ground where if anything happens at least it won't spray at anyone. The pipe will direct the gas flow. Depending on how hot the fire inside the box gets it may still melt the aluminum but there would be no pop. I imagine this may give enough time to get the bike to a safe area where nothing else will burn. For sure it will take a lot longer to melt aluminum than the usual plastic.

So do not weld a metal battery box sealed shut.
Do not machine one using O-rings for sealing.
Unless you vent it somewhere. 1/8" or 4mm tubing would be plenty to get the pressure out. Just remember where its pointing cause it could turn into a torch.

So here is my plan. I am going to take a couple sheets of this plastic or similar and make cell holders. Nice Heavy duty trays.

Similar to the nicer batteries that have the plastic trays on the outside of the inner pack.
But thick. Almost covering the whole battery / maybe cover the whole battery. It will be a holder / insulator cause it will insulate between the cells and also the ends. So then you make the pack in the holder and you put the nickel on. Then you add another plastic side plate on each side covering the nickel and cell ends. It can be thin...even 1/16". It's just a insulator. These can screw together creating a rigid solid pack that has virtually no way to short unless the plastic is damaged. Basically you will end up with a solid plastic box containing the cells tight so not a thing can move. Then put that plastic pack inside the aluminum box.

The only concern is what to do about heat.
#1 the plastic material used has to be reasonable temp rating but fire retardant.
At least fire resistant but fire retardant would mean even if the battery started to burn inside the box the plastic cannot burn. If it melts but don't burn that's good because the melting plastic that cannot burn will smother the fire by restricting the oxygen. The more it melts the more it seals out the oxygen. A perfect material would be like this.
Unfortunately its expensive so we couldn't make it as thick as the length of the battery but we could make end caps / The locating trays and one plate down the center to locate and stiffen and then a plate on each end to seal it all up (except the vent).


It would add probably about $200. to the cost of the battery but isn't it worth it.
Thats why no one is doing it now. It cost money.

Now if your building your own battery and you do this like that. When the battery dies or needs repair it would be very feasible to tear down the pack completely and just throw in new cells. So you only gotta buy it once. I'm gonna go that route. I want the battery to be as safe as possible and encapsulating the cells in that material or similar material will produce the safest battery out there. Especially if there is a small tube to direct the gases and flames coming out of the box.
So if there ever is a fire inside my battery the rest of my bike will be un-touched. I've got over $5000 into my build so a extra 200 to potentially save my 5000 bike is worth it to me.

So between cells and materials and all the odds and ends its probably gonna be a 600 to 700 battery pack my cost not counting labor.
I also need a better welder and i refuse to buy the little battery operated deals so thats gonna run me about $300. So i need $1000 to build it and the time to machine parts.
It will be a couple months before i get there. At this point im going to focus on getting as much stuff on the bike for now as i can. It's doing me no good on my living room table.
 
Last edited:
Yea I'm sold other than the price. But mann I really want these.
  • Rated Capacity:40Ah
  • Nominal Voltage:2.3V
  • Internal Impedance:≤1.0mΩ
  • Working Voltage:1.5-2.9V
  • Max Continuous Charge Current:240A
  • Max Pulse Discharge Current:400A
  • Weight:1240.0g per cell

I would love to build even a 48V with these. but you could buy them 12V at a time and just add another group when you can afford to.
But lets look at the cost to build the pack.

For 48 V we would need 4 sets of these.
$349 a set. = $1396 for 48 volt pack 40AH. then +349 = 60V +349=72 + 349=84 $2443 for 84V 40AH <<<<-----you would never need more than this.
On my 24 AH 48V I get about 40 to 50 miles range. The 84V even at higher loads would draw wayy less amps compared to the 48V so i would expect a great range.

Not bad really considering if i built out of 21700 its gonna cost me $1000 for less than 40AH.

The power is off the charts. I never plan to go over 120A pull from the battery so that hardly touches this battery. It'll be like REALLY.....thats all you got.... Lol.
Also you do not need to weld these together. You use BUS Bars.

They are a a bit large.

DIMS.png


So in inches 2.5987 diameter by 8" long across the thread and 6-3/8 body length. so you could probably get rid of half the length of the thread depending on how thick the bus bars are.

for 48V we need 24 cells.
for 60V we need 30 cells.
for 72V we need 36 cells.
for 84V we need 42 cells.

Alright so for a 48V battery pack with 3 rows of batteries high (circle facing you), the battery would be roughly 8" Tall x 8" Wide x 23" long.
It's doable and won't look bad. It will go on my rear rack.

To get to the 84V I am going to put the batteries on each side of the top tube in the front of the bike. This will get some weight closer to my front tire in case i throw a motor on there. Sure I will eventually. I laid it out to see the size of the packs and it will fit pretty nice. Nothing will interfere with my legs or pedal areas. And I can make the Boxes any 3D shape i can come up with so I can make it look really sweet. It will balance nice and the weight distribution should be really good.

Here's my sketch.

layout.png


Now i'm happy. I know this is what I want to do for the battery without a doubt. I was struggling with that a little. They are very dangerous. These batteries are much safer than the 21700. From a cost standpoint the best thing is I only need to buy 6 cells at a time. They can be added to the battery 1 at a time. There is no welding involved so less to go wrong there. And actually this battery is waayyy wayyyy more cost effective over the long run.

The life is incredible. There advertising 30 years of use. So its $500 for a 1000 cycle UPP battery vs $1400 for this pack.
So that's roughly 3000 cycles equivalent cost in UPP Batteries.
I'm just gonna put the specs here.

  • High Safety: With spinel structure and zero strain material, No fire or explosion even after steel needle penetration, passed sea water submerging, cutting or burning test, etc.
  • Long Circle Life: 80% capacity after 25,000 times life for 100% DOD charging/discharging.
  • High Power: Large power similar to supercapacitor. Have great advantages on grid peak load and frequency regulation.
  • Fast Charging/Discharging: 10 times capacity charging, 6 minutes charging time for a single cell, 10~20 minutes charging time for electric vehicles packs.
  • Wide Temperature Range: Stable and reliable performance covering the wide temperature range from -50 ℃ to 60 ℃. Work in a super cold climate that no others can compete with.
So its a no brainer....do the math. 25000 / 1000 = 25 it takes 25 UPP batteries to cover the life of this pack.
25 x 500 = $12,500 means cost savings of 12500-1400= $11,100 over the life of this one pack.
So its 3X the cost up front but 25 times the life.

Nuff Said.
Decision Made.
Now I just need some more money dammit. Or a sponser.....or you guys can start buying custom ebike parts from me. Ahhhhhhhhh.....IDK I'll find a way.


Only bad thing is the b=84V battery weighs about 115 LBS. the 48 Weighs. 64.8 LBS.

So im gonna say it now. This battery would'nt make a lot of sense on a stock bike.
You only need 30 amps for the stock setup. You can use this but it's just the weight consideration.
If your not running a higher power motor and controller your gonna loose speed and power.
Secondly I mentioned running a second motor. In this case it's best to do that for the simple fact that if one motor breaks the other gets you home. Pedaling this bike would be like pedaling with someone riding on your seat while you stand and pedal. I always run throttle and rarely pedal to be honest. This is my transportation not my exercise so its a different scenario for me.

The typical 72V 40 ah I think weighs under 25lbs.

If it weren't for the fact that i'm going to have way more power than I need motor wise and controller wise due to the weight I wouldn't recommend using this. I mean the good thing is because there 10C even a 36V battery can output way more than enough to power thousands of watts. But this is where motor winding starts to come into play for us. But it could work out we have a 400A discharge MAX but lets call it 200A Discharge. But then even my high power controller can only pull 120A so 120A is my limiting factor. 120A * 36V = 4320 so even at that with a 36V battery and 120A capable controller you can push an impressive 4320 watts. I think most people are only running maybe 1500W max.

So lets figure this out. There is a trade off.

And this is just a quick few calculations so to really know what result we will get we need to use the Grin Calculator. It has the data for a lot of the motor windings and I think to get accuracy here it needs simulated.
In this scenario we have 2 ways to drive the motor and get the performance we want. If we want more torque we run lower V and High A. So get higher speed we run higher V and lower torque. This is the way we normally deal with it.
Now we are actually reversing the situation. We want to run lower V and Higher A to reduce the number of battery cells and lower the weight for lower power setups. The problem is that I believe the higher A will generate a lot more heat. Well we can say for sure that Lower voltages and higher amperages are going to generate more heat than a higher voltage and lower amperage. By how much is what we have to figure out. And we also have to figure out how much more amps we need to draw to hit our desired speed. It's not super bad cause there is a relationship between Volts Amps and Watts and it is linear. But the issue is we are stuck with certain windings else we could adjust for this and have an equivalent motor by adjusting the winding for the lower voltage.
Ok it's gonna get a little deep.
#1 Lower KV Rating = Higher Torque
#2 Higher KV Rating = Higher Speed
(MOTOR TORQUE CONSTANT) KT=1/KV (if in RPM KT=9.54/KV)
(TORQUE GENERATED) T=KT*CURRENT
When you throw in ohms law you get.
Torque = KT * V/R V=Voltage R=Resistance
=9.54 / KV Winding * 36 / Winding Resistance
So we need the resistance of the motor. The Mfg might give it lets see what we can find.
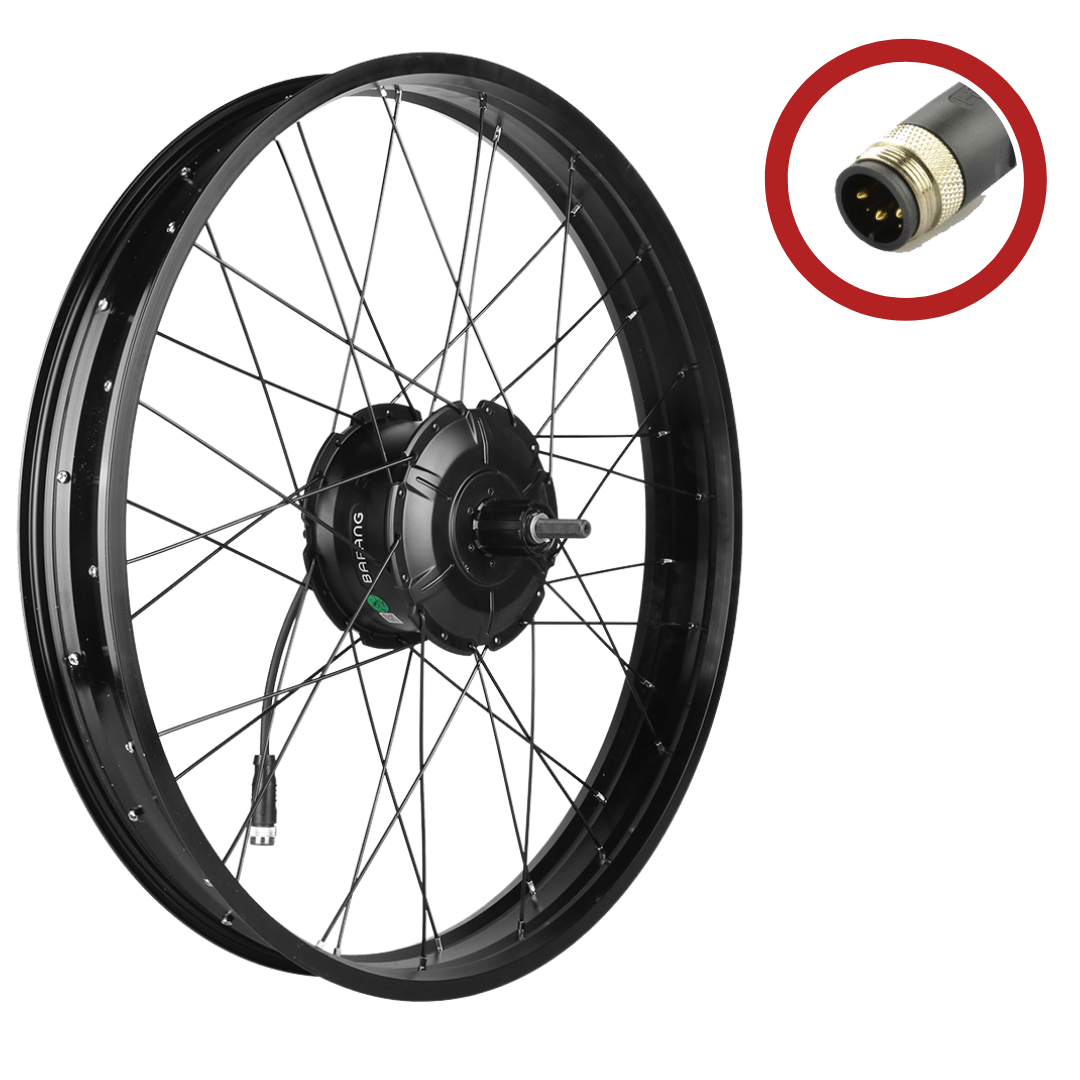
Bafang G062 1000W 48V motor, left side outlet, cassette, fat tire bike motor.
Number of magnets (pulses/period) 6
Reduction ratio 1:5
Number of motor poles (2P) 20
Rated voltage (DCV) 48
No-load speed (Rpm) 400
Rated power (W) 750 /1000
Load speed (Rpm) 350
Maximum torque 85 N.m
Efficiency (%) ≥ 80
Weight (kg) 4.9
Noise (dB) < 55
Operating temperature -20 - 45°C

This is the 750w model I have 1000W . No good data here other than It has 2 part numbers. #1 RM G06A2.1000.D and #2 H550

Lets see if we can find any H550 Data sheets.
 
Last edited:
If it melts but don't burn that's good because the melting plastic that cannot burn will smother the fire by restricting the oxygen. The more it melts the more it seals out the oxygen.

Keep in mind that lithium batteries burn without oxygen.
You can't smother a lithium fire.
The ONLY Way to stop a lithium fire is to remove the heat, but they can even burn under water.

Any melting plastic will still probably add to the fire.
 
They are a a bit large.

View attachment 177547


It's too bad that they are a cylindrical shape.
That ends up being a lot of volume to store on/in the ebike.

Perhaps there is a slightly smaller version, then you could stash them inside round aluminum tubing that is used to make your frame?

Maybe there's a 20Ah version that would be easier to deal with?
They would pack tighter, with less wasted volume between the cells.
 
I wish. It seems they only have that size. They do have the rectangular packs. But i haven't researched them.
I'm trying to see if I can get away with keeping at lower voltages. The torque will be amazing but top speed might get hurt. Possibly not though cause the added torque will more easily overcome wind resistance.

The other options are a faster winding or a modification to the gear ratio to compensate.
I have to think about how I can change the gear ratio. If I could make 2 of the 3 gears it wouldn't be a problem. I can easily make the clutch gears whatever will fit to adjust the ratio. But then the center driving gear of the motor needs changed too. The diameters of the gears change with the tooth count so I would have to figure out what pairs of gears can go together to land me at the proper outside diameter to link up with the ring gear in the hub. To make it work I got to change the shaft, the driving gear, and the clutch gears.

Anyway we might not need to change anything. I have to calculate it and see if it's even close. Basically what i'm saying is if we can drive say 1000W motor with a 24V battery then you only need 12 cells total.

Instead of cranking up battery Volts I will be adjusting my Amperage up to get the motor spinning faster for top speed. There will be no issue with low end power or hill climbing at all. It's just a matter of how the top speed is affected. If you ran 12 cells that would only be about 30Lbs. For example here.
My stock bike is 20Amps x 48V = 960 watts. Likewise 960 watts / 24V = 40A. Both setups output the same power. If I dropped down to 24 Volts I can get similar motor performance to the stock 48V setup but require 40A to do it. It's safe to assume that the higher amps is gonna create more heat. But how much heat. Thats what i gotta see here. If it really is not to drastic then most of the stock ebikes could run a 24V series of these cells and all you would need is a higher amp control.

For the life span and capability of these batteries Id use them unless you pedal a lot without motor.

I have decided to use these like I said. They can be recharged in less than 30 minutes .... the whole pack. You could ride a long way stop charge up for 20 min then go another long way. Its like 6 hours to charge my current battery.

They fit ok for me. And I'm not worried about 100 lbs when I'm going from 1000W to like 10,000W capability of the system it isn't a problem. Not only that but if I use this Battery I can add the second 1000W Hub motor in the front wheel and run both motors off of the 1 battery and still be able to max out the controllers. Each motor will have the Tronix 250R VESC controller. at 120A each that's a total of 240A maximum. That gives me a 20,000 Watt maximum Output capacity @ 84 Volts.

Can you say YEEEEEEhhhhaaaawwww.

This means 3 things
I can put up to 2 10,000w motors on the system if I wanted to. The battery and controller could output that much. So I will never be limited by the battery. I don't think I will ever run over 5000W. But you never know.
I should never have to buy another battery, it should last the rest of my lifetime.

If it is possible to get 25MPH @ 24V with the combination of this battery and the controller I have I will test it that way to start. So then I only have to buy 12 cells to get started. Then I can buy them 6 at a time and add them in 6 at a time. Or 1 at a time if you can find somewhere to buy them that way.

Im not 100% sure that it can work that way. The motor might have to pull the load in order for the control to output it but I think that the ERPM setting gives the VESC the ability to do this.
 
Last edited:
There is an answer to this problem. A real simple one too. It will allow to do exactly what I said.
We just need 1 or 2 of these depending on how many amps you want to run.


Now I would use at least 12 cells in series and one of the Boost converters. So that would give us a 24V 40AH battery pack. We can output up to 100V which allows us to adjust the voltage to match what you want as a top speed. With 1 converter we can put out 30 amps. So that would get you up to 1800 watts. 2 converters in parallel will get you 3600 watts. You simply need to dial in the voltage setting for your riding preference. Increase voltage higher top speed. Lower voltage increase torque output. The battery still has the ability to push out more amps than the controller can pull so there is no limitation there. The only limiting factor is range. Cause now you can pull a lot of power faster so the smaller battery will not last as long. It's the usual situation there. The lower the watts you run the longer the range. I think we will still have good range even with the smaller pack. A 12V pack will have 480 WH a 24V pack will have 960WH and so on and so on. So the 24V pack is roughly the equivalent to my UPP 48V 24AH Battery.

I get about 50 miles full throttle on it but that's at 20 amps.
So as the amps go up that range goes down.
But who cares. We can fully re-charge in 20 minutes.
And it's not really dropping miles on a 1 to 1 ratio. Your traveling faster so you cover more miles in a given time at more amps.
Or your traveling slower and cover less miles in a given time but at less amps. So it's the total run time of the motor that is really the range.
Other than throwing in wind resistance and all the other losses.

This will work for sure. No doubt in my mind. You might not be able to run regen though with the converter. To a 48V pack without a converter no problem. I don't think you can run current through that power supply but you might be able to.

Anyway this is a good solution to get a high amp battery that is way safer than anything on the market now.
And damm it will last for years and years and years. A worthwhile investment for me.

No regen.
 
Last edited:
This actually is not a good solution.
If the converters worked correctly it would be one thing. But i guess they can't handle it even though they are rated to.
I'm investigating in making my own but the cost is probably high. Im better off spending my money on the batteries to get to 48V. That's probably plenty of power in reality. Any additional set after that is a bonus. So its a matter of weather you want to add the weight. Other than that you can't beat this battery. It could be smaller but if it was it wouldnt be so powerful.

If you really wanted to you could use a 24 volt battery and this to output 48 volts but im sure its not cheap. It probably cost as much as a set of batteries. So you myeswell buy the batteries and then you only need one more set to get 48V.

 
Last edited:
Back