Help understanding my controller connections.

Mikeybike

New Member
Region
USA
Ok so I bought this bike and it’s a revi bike/ civi bike “runabout” cargo. It’s rebranded as a glare wheel. Now this is my first ebike and out of the box I’ve had some issues that I’m thinking of returning it. I bought it from the Army and Airfoce exchange and the price for specs are pretty good. But I have some concerns.
Reasons for thinking of returning:
1. The bike came with the brakes reversed (not that big a deal as I can swap).
2. There’s something wrong with the back brake as I can’t get it aligned. I got the front aligned perfectly. But the back calipers will not get parallel to the rotor on one pad. It sits at an angle and the corner touches the rotor. I take it off and both pads are parallel and stay parallel as I adjust them off the bike. Rotor seems straight as I spin the wheel. So I haven’t even rode this thing yet in the week I had it.
3. Multiple dings and scratches on paint and some gouges in metal on handle bars and front basket.
I have a lectric lite coming Tuesday and am thinking of just sending it back to the exchange and ordering a lectric xpremium.
4. I’m concerned about support and being able to purchase parts after market. As I’m good with electronics and I can solder and I work on a lot of computers. Custom built. Make my own psu cables. I’m not shy around this stuff but I am total noob to ebikes.
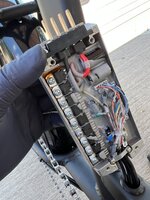
So I’m worried that this controller is not like any other controller I see when browsing online. Mine is mounted behind the battery pack holder and has 4 prongs that the battery slides directly into. 2 neg, 2 positive. It has three thick cable coming out that terminate in Juliet type connections I can’t find a replacement controller like this anywhere and I’ve googled the model number and anything I can to describe it. I’m worried if the controller goes and I have to buy a new one I can’t find one like this with spades that directly connect to battery.


****Here’s my question: if I have to replace my controller with a controller like you see everywhere (an enclosed box with leads coming from it like spaghetti) how would I connect that to my battery without also replacing the battery? Also how am I supposed to splice in a battery in parallel to this controller? It’s so different from what I see everywhere. Thanks. Sorry about the lack of concise info. Overwhelmed and have been looking into learning all I can the last month
 

Attachments

  • 6ADB2331-8550-4415-A55F-DD250474F1E4.jpeg
    6ADB2331-8550-4415-A55F-DD250474F1E4.jpeg
    337.8 KB · Views: 297
  • C3AFF766-9045-4D83-8DB4-55FD794796DA.jpeg
    C3AFF766-9045-4D83-8DB4-55FD794796DA.jpeg
    424.8 KB · Views: 296
In the case of that 4 pin connector, you would scrap it and install your own on a short pigtail. You would open the battery case and install short leads to the opposite side connector there. That should take care of that 4 pin issue pretty easily (eliminate it!).

The rest isn't a lot more. 99.9% of the e-bike that are similar to this one will be using a controller with inputs for a PAS (hall) sensor, a throttle (another hall sensor), kill switch wiring leading to the brake levers, the display (must match the new controller) and the wires leading to the motor (3 phase wires, 3 sensor wires, a positive, and a negative). Taken as a complete package, there appears to be a lot going on. In fact, when broken down, it's not nearly as complex as it first seems.

KT controllers are popular on the aftermarket, have some great displays, and they aren't expensive. I would suggest you try what you have for a bit, knowing full well it can be replaced without a lot of trouble. If you go KT, there will likely be a performance increase for your trouble.....
 
2. There’s something wrong with the back brake as I can’t get it aligned. I got the front aligned perfectly. But the back calipers will not get parallel to the rotor on one pad. It sits at an angle and the corner touches the rotor. I take it off and both pads are parallel and stay parallel as I adjust them off the bike. Rotor seems straight as I spin the wheel. So I haven’t even rode this thing yet in the week I had it.


****Here’s my question: if I have to replace my controller with a controller like you see everywhere (an enclosed box with leads coming from it like spaghetti) how would I connect that to my battery without also replacing the battery? Also how am I supposed to splice in a battery in parallel to this controller? It’s so different from what I see everywhere. Thanks.
These are caliper on disk brakes? Are they cable pull?
I've had to thin out my caliper back with a file to fit a thick Mac motor. Then when the controller to that burnt out in the rain, the bafang 500 w motor was a lot thinner. So I had to stand the caliper out on longer screws, and put washers between the mount and the caliper back to gain some thickness. You can do a lot with washers. I bought some washers from mcmaster.com; they were very thin so I had a lot of adjustment options. You can use more or less on top or bottom to line the back of the caliper up to the rotor.
If you can't get the two pads of the caliper parallel, another caliper is <$10 from ebay. Depends on how much you want to argue on the phone with the bike warrenty guy, or fix your problem and start riding.
If you ever have to replace the controller, you will never find another one with the same display. Controllers have to be bought with a display that matches. There is getting to be some standard these days around the juli connector that bafang uses. This may ease matching up of contoller to sensors. The battery input, that is easy to match up. The red input (plus) goes to the + of the mains caps (usually 470 uf 63 v) the black input goes to the minus. I find XT90 battery connectors somewhat unreliable the ones I make, as if I get the wire hot enough to attach, the connector body melts. Also mine fell off the wire 30 miles from home. I cut the XT90 off the battery (luna) and now use insulated .250" flag crimp terminals from dorman (auto supplies) for battery + and -. Use a ideal or klein crimp tool for best results. Some people like andersn connectors, which with screws over the wires seem reliable enough, but my only supplier parts-express.com dropped them. Dorman crimp terminals are available at oreillys & napa & other supplies, and are abolutely reliable at 26 amps this controller will draw. (the imitation terminals from ***** will melt out at 30 amps). Don't buy the dorman assortment box, those terminals are the same **** from ***** that Radio Shack used to sell (before bankruptcy).
 
In the case of that 4 pin connector, you would scrap it and install your own on a short pigtail. You would open the battery case and install short leads to the opposite side connector there. That should take care of that 4 pin issue pretty easily (eliminate it!).

The rest isn't a lot more. 99.9% of the e-bike that are similar to this one will be using a controller with inputs for a PAS (hall) sensor, a throttle (another hall sensor), kill switch wiring leading to the brake levers, the display (must match the new controller) and the wires leading to the motor (3 phase wires, 3 sensor wires, a positive, and a negative). Taken as a complete package, there appears to be a lot going on. In fact, when broken down, it's not nearly as complex as it first seems.

KT controllers are popular on the aftermarket, have some great displays, and they aren't expensive. I would suggest you try what you have for a bit, knowing full well it can be replaced without a lot of trouble. If you go KT, there will likely be a performance increase for your trouble.....
Thank you. Yes I'm very new to ebikes and have been extensively researching and learning's much as I can and it definitely is not as intimidating as first thought. I was weary bc I see my controller is built into the mount with the two leads going to the 4 prongs where I see most bikes aftermarket or factory use some sort of quick connector. I'm just trying to make sure I am able to source parts I need in case I have to repair the bike. I don't want to be at the mercy or the vendor or manufacturer. if I know I can buy these things than its no sweat. I had no idea about the display, I appreciate that. during more research I found a similar spec controller of the same style, 48v, 22A, 9 mosfets, 4 prong. but good to know I can mount an external controller, pop open the battery and solder on some leads and crimp some sort of quick connect. I haven't thrown a mutimeter on the 4 spades of the battery. I think they are ++, --. but why are there two positive and two negative terminals if inside the controller there is on one of each lead going to two prongs each. Does that mean that there are actually 4 leads in the battery? does it split the load or something? also if for argument sake say I wanted to add a second battery to this style controller, would I need to splice into the two leads that are connected to the 4 prongs? Thank you for your helpful answer!
 
These are caliper on disk brakes? Are they cable pull?
I've had to thin out my caliper back with a file to fit a thick Mac motor. Then when the controller to that burnt out in the rain, the bafang 500 w motor was a lot thinner. So I had to stand the caliper out on longer screws, and put washers between the mount and the caliper back to gain some thickness. You can do a lot with washers. I bought some washers from mcmaster.com; they were very thin so I had a lot of adjustment options. You can use more or less on top or bottom to line the back of the caliper up to the rotor.
If you can't get the two pads of the caliper parallel, another caliper is <$10 from ebay. Depends on how much you want to argue on the phone with the bike warrenty guy, or fix your problem and start riding.
If you ever have to replace the controller, you will never find another one with the same display. Controllers have to be bought with a display that matches. There is getting to be some standard these days around the juli connector that bafang uses. This may ease matching up of contoller to sensors. The battery input, that is easy to match up. The red input (plus) goes to the + of the mains caps (usually 470 uf 63 v) the black input goes to the minus. I find XT90 battery connectors somewhat unreliable the ones I make, as if I get the wire hot enough to attach, the connector body melts. Also mine fell off the wire 30 miles from home. I cut the XT90 off the battery (luna) and now use insulated .250" flag crimp terminals from dorman (auto supplies) for battery + and -. Use a ideal or klein crimp tool for best results. Some people like andersn connectors, which with screws over the wires seem reliable enough, but my only supplier parts-express.com dropped them. Dorman crimp terminals are available at oreillys & napa & other supplies, and are abolutely reliable at 26 amps this controller will draw. (the imitation terminals from ***** will melt out at 30 amps). Don't buy the dorman assortment box, those terminals are the same **** from ***** that Radio Shack used to sell (before bankruptcy).
Thank you! Yes they are mechanical disk brakes; Tektro. What's weird is the pads are parallel. I've removed them from the frame mount and checked. I can get them on and adjusted but once tightened only one side is parallel and the other pad is cocked at an angle. the front brake I adjusted no problem in about 10 mins so I presume its not me. spinning the wheel the rotor doesn't seem bent. What I did notice is that the front fork uses an adapter and the holes are facing the rotor, but in the rear there is no adapter and the mounting holes on the frame face parallel to the rotor (like toward the front of the bike) I am guessing its correct bc both calipers are pretty much in the exact same positions relative to their rotors. I tried adding some washers and playing with that for a bit a few nights back, but all that does is move the whole caliper further off rotor if that makes sense the way I'm describing. I thought about swapping the front and rear brakes just to see if maybe its somehow the brake. I feel like its got to be the frame mounting. But I don't know I'm no bike expert, I just know it wasn't difficult at all to get the front adjusted just enough where it doesn't rub and the rotor is perfectly parallel with both pads at all times.
 
Last edited:
attery and solder on some leads and crimp some sort of quick connect. I haven't thrown a mutimeter on the 4 spades of the battery. I think they are ++, --. but why are there two positive and two negative terminals if inside the controller there is on one of each lead going to two prongs each. Does that mean that there are actually 4 leads in the battery?
Connections inside the battery are soldered or welded. Certain manufacturers have a reputation for making those connections reliably. (Others do not). The unique connector that connects the removeable battery to the harness to the controller, has been a problem in in some e-bikes. There is not extensive experience with many of these unique connectors, unique because patented connectors allow the bike manufacturer to make a profit of 40-100% on replacement batteries. Certain major manufacturers test these connectors thoroughly before sale, other smaller ones do not. Having two connections between the battery & the bike harness is a good plan to ensure at least one connects. At 30 amps, a lot of copper is required to make the connection to prevent meltouts. I have had .250 spade terminals made in ***** melt under a 30 amp load. Look how huge the contacts are on the smaller andersn connector, which is rated @ 50 amps.
 
Last edited:
Thank you. Yes I'm very new to ebikes and have been extensively researching and learning's much as I can and it definitely is not as intimidating as first thought. I was weary bc I see my controller is built into the mount with the two leads going to the 4 prongs where I see most bikes aftermarket or factory use some sort of quick connector. I'm just trying to make sure I am able to source parts I need in case I have to repair the bike. I don't want to be at the mercy or the vendor or manufacturer. if I know I can buy these things than its no sweat. I had no idea about the display, I appreciate that. during more research I found a similar spec controller of the same style, 48v, 22A, 9 mosfets, 4 prong. but good to know I can mount an external controller, pop open the battery and solder on some leads and crimp some sort of quick connect. I haven't thrown a mutimeter on the 4 spades of the battery. I think they are ++, --. but why are there two positive and two negative terminals if inside the controller there is on one of each lead going to two prongs each. Does that mean that there are actually 4 leads in the battery? does it split the load or something? also if for argument sake say I wanted to add a second battery to this style controller, would I need to splice into the two leads that are connected to the 4 prongs? Thank you for your helpful answer!
Look at your first picture. You can see that the heavy red wire is soldered to 2 pins, the black wire to the other 2. The reason they do that is that a single pin would not handle the amperage necessary, but 2 pins will.

Not into the dual battery thing, but I can tell you there is solid logic for going a couple of different ways. I'd suggest you cross that bridge when you get to it...

Put the bike together and ride it. It's going to teach you a TON. If you find it inadequate after riding it a while, you'll have a MUCH better idea of what you want in the next bike...
Thanks. Yeah I don’t really have plans to add a battery. I don’t even know what kind of range this one would give me real world. I understand splitting the connections due to not overloading the wires/ connectors but was just curious if all 4 spades were splitting the load inside the battery or if it was some sort of redundancy. Like I could have just thrown my meter on there to check, but it’s not really the top of my list. Just more of a curiosity. I really need to figure out this dang brake. That’s the big issue now. Everything else is just me trying to learn. From what I can tell the bike runs. Powers on, went through menus, tested throttle. I didn’t ride it yet as now my option is to adjust the rear brake and have a corner of the pad rub (bad idea) or overly adjust so the whole pad clears but that really makes the brake almost useless and mushy. Front brake is perfect though and must say I adjusted it pretty quickly and easily. The wheel spins freely with just enough space to not rub. Brake feels good when squeezed! Also wondering why they made the left the rear when in the US we are legally supposed to have right as rear (but I could fix that in about 5 mins really)
 
Well, as long as it's not making noise that makes you crazy, let the darn corner drag until it's broken in? Do what you can with it and move on.

If that idea makes you crazy, get a file out and dress that corner of the pad a little....
 
The rear rotor is straight, but is cockeyed relative to the calipers?

Two things you can do. I suppose you already loosed the caliper bolts and adjusted it so the pads are parallel to the rotor, but maybe there's not enough slack in the assembly? The other thing is to make sure the rotor is parallel to the frame. Sometimes the rear wheel axle isn't centered in the rear slots when it was locked down, and the wheel isn't parallel to the rear chainstays (those are the bars that support the axle. )

Yeah, you can buy those controllers for 60 bucks. I just did. There isn't a wide selection.
That’s what I’m thinking. It’s got to be the wheel or I was thinking the actually mounting point on the frame itself. I spin the wheel and the rotor is pretty dang straight. Front I got perfect with no trouble, but I was the one who put that wheel on. Yeah I didn’t try to reseat the rear wheel yet because it looks pretty straight and I don’t have an 18mm crescent. I have sockets but the motor wire is in the way. I do have every size crescent up to 17 mm. I guess I could use my adjustable spanner. By eye though the back wheel is equal distance from either side of the frame and it’s got a tabbed washer that appears to be seated all the way in the dropout. I’ll give it a shot. Why not. Thank you. Thanks to everyone for the help. I haven’t been on a bike in about 20 years (except stationary).
 
Well, as long as it's not making noise that makes you crazy, let the darn corner drag until it's broken in? Do what you can with it and move on.

If that idea makes you crazy, get a file out and dress that corner of the pad a little....
Haha. I didn’t know how detrimental it is. I’m brand new to all this. I haven’t rode bicycles since I was in high school and none had disc brakes. Mostly rode bmx single speeds
 
Haha. I didn’t know how detrimental it is.I could certainly file it or just let itself rub. It’s just a tiny corner. I’m brand new to all this. I haven’t rode bicycles since I was in high school and none had disc brakes. Mostly rode bmx single speeds. Thank you for the insight.
 
The rear rotor is straight, but is cockeyed relative to the calipers?

Two things you can do. I suppose you already loosed the caliper bolts and adjusted it so the pads are parallel to the rotor, but maybe there's not enough slack in the assembly? The other thing is to make sure the rotor is parallel to the frame. Sometimes the rear wheel axle isn't centered in the rear slots when it was locked down, and the wheel isn't parallel to the rear chainstays (those are the bars that support the axle. )

Yeah, you can buy those controllers for 60 bucks. I just did. There isn't a wide selection.
Only winds up being cockeyed to one pad. Just one small corner. I take the calipers off and the pads are perfectly aligned with each other and remain that way while adjusting. I also took the brake cable off to make sure the lever was fully relaxed and nothing. The wheel spins and the rotor is not wobbling, neither is the wheel. It’s got me dumbfounded. I know I’m new to this but I had no problem with the front caliper. It’s perfectly even and doesn’t rub at all, yet very close to the rotor and the squeeze on the handlebars feels great.
 
I just want to thank everyone who has taken the time to offer input and help. It’s been very much appreciated
 
You're going to need that 18mm wrench to fix a flat tire. Around $8 at Lowes.

Then take the wheel off and put it back on. Often the dropout slot on the gear side is not as deep as the dropout slot on the brake side, because of how the derailleur hanger is installed. Then if you let the axle bottom out in the slot on both sides, the wheel will be crooked.

I recently encountered this on a non motor wheel that used quick release skewers. Went off the pavement onto grass and when I got back on asphalt, the wheel had jarred loose, and the rotor was scraping the frame. I repositioned the wheel, and retightened the skewers, Still had to go home and get a tool to realign the calipers. Don't usually carry tools close to home.
oh yeah, no doubt. I have every intention on getting one (plus i get that 10% military at lowes and HD)!! It’s only been a little over a week and with two kids both moving up schools and one’s birthday it’s been tough. Plus i wasn’t sure if it was 18 mm or 19 mm at first. But i busted out the calipers and measured. i’ve ordered a lot in the time i’ve had the bike. 2 spare inner tubes, tire levers, two sets of stubby allen keys to reach around the hub for the caliper adjustment, bike repair stand, tons of locks, dry chain lube, torque wrench, a second pressure gauge to make sure my compressor gauge was correct, two emergency pumps with mounts, patch kit, spare brake lines, water bottle w mount, phone mount etc. Probably forgetting to list some things i ordered plus all the non bike specific tools i have already lol. i’m sure you get the idea. I do have an adjustable if i really wanted to re seat the rear wheel. I mean it definitely doesn’t look crooked, spins pretty straight too. the rotor is certainly straight, but it can’t hurt to pop it off and re seat it bc something is making this one brake pad crooked. idk. my electric lite just got here 5 mins ago. let’s hope both those brakes are as easy as the front one was on this bike. i’m really wondering if the mount on the frame is somehow messed up and causing the rear brakes to be all weird in relation to the rotor. i’m going to try reseating the rear and since i know the front is good bc i adjusted them easily i’m going to try to swap front and rear calipers just for kicks. i’ve spent hours upon hours messing with that rear brake when it first came last week.
 
oh yeah, no doubt. I have every intention on getting one (plus i get that 10% military at lowes and HD)!! It’s only been a little over a week and with two kids both moving up schools and one’s birthday it’s been tough. Plus i wasn’t sure if it was 18 mm or 19 mm at first. But i busted out the calipers and measured. i’ve ordered a lot in the time i’ve had the bike. 2 spare inner tubes, tire levers, two sets of stubby allen keys to reach around the hub for the caliper adjustment, bike repair stand, tons of locks, dry chain lube, torque wrench, a second pressure gauge to make sure my compressor gauge was correct, two emergency pumps with mounts, patch kit, spare brake lines, water bottle w mount, phone mount etc. Probably forgetting to list some things i ordered plus all the non bike specific tools i have already lol. i’m sure you get the idea. I do have an adjustable if i really wanted to re seat the rear wheel. I mean it definitely doesn’t look crooked, spins pretty straight too. the rotor is certainly straight, but it can’t hurt to pop it off and re seat it bc something is making this one brake pad crooked. idk. my electric lite just got here 5 mins ago. let’s hope both those brakes are as easy as the front one was on this bike. i’m really wondering if the mount on the frame is somehow messed up and causing the rear brakes to be all weird in relation to the rotor. i’m going to try reseating the rear and since i know the front is good bc i adjusted them easily i’m going to try to swap front and rear calipers just for kicks. i’ve spent hours upon hours messing with that rear brake when it first came last week.
oh can’t forget about headlights, tail lights and water resistance fire proof battery storage bags. still sure i’m missing stuff! Not a bad collection in 1.5 weeks and zero rides under my belt. I like to do things right when i do them. That’s why i’ve resisted riding the bike so far with the corner of the rear brake touching. it’s been hard. especially with the nice weather here in NY
 
Back