Disc Brakes and Pads

@TS25 I checked and they are SM-RT76-M front says 180. Thanks for all your help. I also ordered Park Tool Piston Press recommended by @Sierratim and you.
please let me know if anything else I need to be careful when changing the pads.
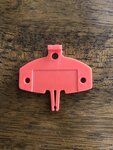
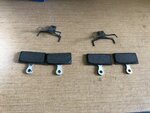
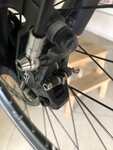
The Vado comes equipped with 180mm front and 160mm rear rotors. You may also consider a rotor truing tool like the Park DT-2, or a generic (cheaper) equivalent. Rotor warp is fairly common due to heat stress and minor bumps in bike racks, etc. It often shows up as rubbing you can't adjust out when putting in new pads due to the tighter tolerances. As you might expect Park Tool has a discussion and video for this; https://www.parktool.com/blog/repair-help/disc-brake-rotor-truing .

I do kind of like this Wolf Tooth "multi-function" truing tool:
tl001054-red.jpg

Really intended for MTBers that may need to field true a rotor, but hey, bottle opener!
 
@TS25 I checked and they are SM-RT76-M front says 180. Thanks for all your help. I also ordered Park Tool Piston Press recommended by @Sierratim and you.
please let me know if anything else I need to be careful when changing the pads.

Fine.
I do not have a piston press and use a "flat shaped tool" instead as even Shimano "allows". A strong knife or a tyre lever does the job as well.
Did you find your red pad spacer?
A look in the Shimano document page 31 f. I had linked in #27 could make you even more confident and believe that it's not rocket science.
 
Last edited:
Fine.
I do not have a piston press and use a "flat shaped tool" instead as even Shimano "allows". A strong knife or a tyre lever does the job as well.
Did you find your red pad spacer?
A look in the Shimano document page 31 f. I had linked in #27 could make you even more confident and believe that it's not rocket science.
I do have a red spacer that came with bike I think.
I did review the document in #27
thanks again @TS25
 
Fine.
I do not have a piston press and use a "flat shaped tool" instead as even Shimano "allows". A strong knife or a tyre lever does the job as well.
Did you find your red pad spacer?
A look in the Shimano document page 31 f. I had linked in #27 could make you even more confidend and believe that it's not rocket science.
Absolutley. A special piston press tool is not required, but I find it makes the job easier. When replacing pads I first remove the wheel, then with the old pads still in pace I slide the tapered end of the tool between the pads and push left then right to reset the pistons fully into the caliper. Then the old pads are removed.

I've watched my sons do this with tire levers and large flat blade screwdrivers, but it's always more of an iterative process than using a piston press.

BTW - You can also use a large adjustable wrench in place of a truing tool, but the truing tool is easier and less likely to scratch the rotor with its rounded edges.
Is this the red/orange spacer to which @TS25 referred? When do I use this?
 

Attachments

  • 4AFBAAEB-D395-4169-A484-FA44A33D33EE.jpeg
    4AFBAAEB-D395-4169-A484-FA44A33D33EE.jpeg
    408 KB · Views: 334
Is this the red/orange spacer to which @TS25 referred? When do I use this?
This spacer is intended to be inserted between the brwke pads when you remove a wheel. The idea is to keep the hydraulic pistons from over extending if the brake lever is inadvertently pulled or bumped when the wheel has been removed. You don't need this if you are going to be working on the pads, but you certainly want to use this is you're working on the wheel/tire/tube.
 
This spacer is intended to be inserted between the brwke pads when you remove a wheel. The idea is to keep the hydraulic pistons from over extending if the brake lever is inadvertently pulled or bumped when the wheel has been removed. You don't need this if you are going to be working on the pads, but you certainly want to use this is you're working on the wheel/tire/tube.
Thanks
 
How many miles do you have on your KOOL STOPs?
I would only be guessing and I cannot recall how many sets of pads I have been through. I always have a set on hand ready to go on as soon as necessary. So maybe 8-10,000km on 2 or 3 sets. I could be off by a wide margin.
 
I would only be guessing and I cannot recall how many sets of pads I have been through. I always have a set on hand ready to go on as soon as necessary. So maybe 8-10,000km on 2 or 3 sets. I could be off by a wide margin.
That's encouraging. I got just over 500 miles on the first set of Shimano G03S pads. The local terrain is quite hilly but that still seems awfully low mileage. I'll know how the KOOL STOPs do in a couple of months.
 
That's encouraging. I got just over 500 miles on the first set of Shimano G03S pads. The local terrain is quite hilly but that still seems awfully low mileage. I'll know how the KOOL STOPs do in a couple of months.
I like them for the way they respond and feel and even sound but I could not say for certain how much longer they last if any. Certainly they last at least as long and they are less expensive so enjoy!
 
This spacer is intended to be inserted between the brwke pads when you remove a wheel. The idea is to keep the hydraulic pistons from over extending if the brake lever is inadvertently pulled or bumped when the wheel has been removed. You don't need this if you are going to be working on the pads, but you certainly want to use this is you're working on the wheel/tire/tube.
@Sierratim the reason I asked this weird question was reading the document that @TS25 have included in #27 post above page 32 (see below pic) refers to placing the spacer between the break pads.....
I realize the common use of the spacer.
 

Attachments

  • 482CF42B-4320-4E8D-AF02-749624075A96.jpeg
    482CF42B-4320-4E8D-AF02-749624075A96.jpeg
    116.8 KB · Views: 348
This makes sense since these instructions have you putting the red spacer between the new pads and then squeezing the brake lever. If you did this without the spacer you'd overextend the pistons. Their next step is to remove the red spacer and mount the wheel and check for interference, i.e. rubbing between the pads and the rotor.
 
I replaced the break pads on my Vado 5 today. It wasn’t that difficult. The challenging part for me is always putting the rear wheel back. Although I am getting much better doing this.
After assembling everything, I noticed the pads were rubbing, and the wheels were not turning freely so I had to take the wheels off (😞😞), pads off, push the pistons back more, and assemble everything. Good learning. (May be time would have taken care of this).
all is working well.
the old pads had a little life left in them. The rear pads were thinner than front.
Special thank to @Sierratim and @TS25 for help and encouragement.
 

Attachments

  • 61E7FC55-CCF7-472D-9B10-5813FC4081FF.jpeg
    61E7FC55-CCF7-472D-9B10-5813FC4081FF.jpeg
    646.6 KB · Views: 352
  • D6F026FB-B44B-42A1-A667-DCC49973C1E1.jpeg
    D6F026FB-B44B-42A1-A667-DCC49973C1E1.jpeg
    192.5 KB · Views: 315
I replaced the break pads on my Vado 5 today. It wasn’t that difficult. The challenging part for me is always putting the rear wheel back. Although I am getting much better doing this.

Hooraayy.

And sorry for teasing you in #10 but hey - it worked out. :)

Another step in getting to know your bike better is done. And doesn't it feel good to have something fixed DIY you never thought you could and would do that? So if you dance around your wife now smiling she'll probably realize it's fine to let you do this. And hey - it's better than sitting in the arm chair watching Fox news - or any other TV.

P.S. You could even sell your used pads on ebay, "hardly used" 😈
You know there is a procedure of "braking (bedding) in" new disc brake pads? I refer to @Sierratim's link in #1.
 
Last edited:
Time would have fixed the rubbing pads by wearing them down. Better to have done it your way and take the wheels off than put up with the rubbing sound for the next few hundred miles!

As I understand it you didn't yet have your piston press to reset the brake pistons for this pad replacement? It can be done without the press but as you found the right tool can be a real time saver.
@Sierratim you are correct I don’t have my specific tool yet but I used another tool (flat head chisel) and thought I had pressed the pistons back. Apparently I had done so enough to insert the break pads back in but not enough to have adequate clearance for the wheel to turn freely. I thought by engaging the break levers few times the pistons reset themselves to proper location. This did not happened. I even loosened the screws in the break calipers, engaged the break levers and tightened them. This didn’t help either.
I then proceeded to take the wheels off, reset the pistons all the way and inserted the pads again. This worked well. The wheels are now turning freely and without rubbing.
now I have to perform bedding process.
never did that when the bike was new and didn’t seem to matter.
Is it something one MUST do?
 
Hooraayy.

And sorry for teasing you in #10 but hey - it worked out. :)

Another step in getting to know your bike better is done. And doesn't it feel good to have something fixed DIY you never thought you could and would do that? So if you dance around your wife now smiling she'll probably realize it's fine to let you do this. And hey - it's better than sitting in the arm chair watching Fox news - or any other TV.

P.S. You could even sell your used pads on ebay, "hardly used" 😈
You know there is a procedure of "braking (bedding) in" new disc brake pads? I refer to @Sierratim's link in #1.
Is bedding process a must or time takes care of this? I never did that when I purchased the bike. I was careful not to slam on breaks.
I did review the process and know what to do.
 
Is bedding process a must or time takes care of this? I never did that when I purchased the bike. I was careful not to slam on breaks.
I did review the process and know what to do.
Bedding new pads is recommended for all pad types. It is necessary for sinthered/metallic pads like the Specialized J04s, but becomes less necessary with lower metal content. Organic resin pads, like the Specialized J03s you're using can do without being bedded in but the braking power will be reduced for a bit while the pads surfaces wear to the rotors.
 
Bedding new pads is recommended for all pad types. It is necessary for sinthered/metallic pads like the Specialized J04s, but becomes less necessary with lower metal content. Organic resin pads, like the Specialized J03s you're using can do without being bedded in but the braking power will be reduced for a bit while the pads surfaces wear to the rotors.
OK, I got a bit sloppy. Pulled the pads to check wear, putting all the parts in a magnetic tray. Everything was fine up to the last step, installing the safety clip. It popped out of the small needle nose pliers and, predictibly, it disappeared onto the concrete shop floor. Never did find it. It's fine without the clip, until it's not. I picked up a replacement clip at the local hardware store, having to bend it 90 degrees. It's not really the right size, but for $0.19, it's working. Went by yesterday to get the right sized clip, but new 'social distancing' rules were in place. The line went out the door. Found the correct clips online for more $, but no waiting in line for almost the right part. Ordered a couple of spares, too.
 
Back