CurrieTech - How to adjust Dash rear brake??

Charly Banana

Active Member
Brian(J) originally brought up this problem of adjusting the rear brake inner pad. It is next to impossible to adjust the inner pad without creating a DIY custom tool. Since Currie designed this bike, I would like to know from Currie Tech how they intended for the bike owner to adjust the rear brake inner pad?
 
Brian(J) originally brought up this problem of adjusting the rear brake inner pad. It is next to impossible to adjust the inner pad without creating a DIY custom tool. Since Currie designed this bike, I would like to know from Currie Tech how they intended for the bike owner to adjust the rear brake inner pad?
@Charly Banana - Here is the official Shimano tech sheet on the M-375 disc brakes which include adjustment instructions. Shimano recommends a qualified technician perform the maintenance. Hope this is helpful.
 

Attachments

  • SI-8JW0A-001-ENG.pdf
    336.4 KB · Views: 1,641
Larry,
Obviously, I didn't make my question clear.
When Currie's design team put this bike together and they saw that the motor prevented easy access to the rear brake inner pad adjustment screw, did they have a solution?
Did they have a Park tool or another tool in mind that would allow rear brake inner pad adjustment?
Or did they say:
"Oh well, we will let the bike owner or bike technician figure this out"

Only letting the bike shop do the brake adjustment is an unacceptable answer!!
I can't imagine having to bring the bike into a shop every time you needed your brakes slightly adjusted as the brake pads wear.
 
Last edited:
Larry, your practice of reading these posts and keeping in touch is pretty impressive, and your customer service people's response attitude goes a long way toward offsetting the issues many of us have had with the new generation of your bikes. Thank you for that!
Charly is right, the M375 is clearly designed to be adjusted on the road by the rider, using a 5mm hex- they print an arrow on the adjustment barrel to make it easy. As a rider yourself I expect you've done it yourself, when the brake lever starts hitting the grip it's past time to rotate the adjuster a click or two. Having to drop the rear wheel off the bike just to adjust the pad shouldn't be required. Give it a try yourself and see what you think.
 
Charlie, Brian,

Thanks so much for your post and yes Charlie, your question was clear enough. I was unaware of the other string which shed more light on the real issue of initial caliper set-up and tuning.

Shimano was not thinking of hub motors when they designed the M-375, as the clearance to the inner pad adjuster is tight with a hub motor, clearly. That said, if the caliper is properly set-up during assembly (which it should be), a consumer should not have to touch that adjuster to adjust the brakes for wear. That adjustment would be done by tensioning the cable which can be achieved easily at one of the barrel adjusters on the lever or caliper.

I'll discuss with our product manager that is responsible for spec on the Dash and update if I learn anything new but thanks again for clarifying the issue.

Best regards,
-Larry
 
Hi Larry,
I wish you would commute on a Dash every day, it doesn't work like that. You very rapidly run out of adjustment on the barrel adjusters and then you need to rotate the adjuster at the brake pads. And for a couple reasons I think it is better to adjust the brake travel at the pads and not by using the cable tension.

I'm not attached to proving you wrong, I made a tool that works well and I also bought a set of AVID BB7's that I will install and fix the issue so I am good. I am just hoping to provide you with some input to make future bikes better, and like Charly have found this to be an unforeseen issue that you will never realize unless you put 500 miles on the bike in conditions that require lots of braking.

Love the bike.
 
Thanks to Brian(J) for his clever idea of how to make a tool for this brake adjustment.
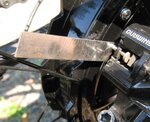
I used Brian's idea to make my own tool from a feeler gauge ruler and a cut 5mm length of 5mm allen wrench. To hold the allen in place I glued it on the back with JB Weld. And it works great for adjusting the brake.

The reason I made this post is because I wanted to know what Currie had intended for this adjustment. Did they have a tool that they intended bike technicians or owners to use?

Here are the pictures of my brake adjustment tool. Thanks Brian!

AdjustmentTool Allen.jpg AdjustmentTool JB Weld.jpg AdjustmentTool In Place.jpg
 
Brian, Charlie - This subject was the topic of our product development meeting today, so I'm pleased that you raised it. Turns out that the PM was aware that someone servicing and adjusting the fixed pad position would need to drop the wheel to make this adjustment, but did not think it was all that much of an inconvenience. With the help of what you have illustrated, I was able to make a point that we want to make it easier to service our bikes and as a result, we are exploring the possibility of changing the spec to Avid or ProMax brake that have dial adjusters and also producing a tool similar to what you have developed for bikes in the field with the Shimano caliper. Thanks again for raising my attention to this matter. We take this type of feedback very seriously in our quest to make the best bikes possible.

Best regards,
-Larry
 
Larry,
you might consider getting a set of whatever brake you consider and sending a caliper to a couple people for evaluation. For example, the AVID BB7 has a great reputation and looks to be hand adjustable on both sides of the pad so I bought a set. I will install them, although with my custom tool adjusting the M375 is easy. The problem with the AVID BB7 caliper is that the inner adjusting wheel is so stiff they put a Torx drive recess in the center of it and most people use a Torx drive screwdriver. Of course the hub motor eliminates that possibility and makes it even harder to adjust by hand, so you are right back to having to drop the wheel. My solution was to dismantle the caliper, reassemble just the click-wheel assembly, and use a Torx drive bit in a cordless drill to spin the two parts against each other to wear down the ratchet nubs. Now it's stiff but manageable. So, I would love to see the Promax to see if it solves the problem without adding a new problem.
Brian - We currently use the ProMax on the Path+ which has the same motor shell and it works fine. We are still researching other possibilities. If your interested in trying a ProMax caliper, send me an email with your information and I'll get you one to evaluate. [email protected].

Thanks!
 
Yeah, I just took the rear wheel off to adjust the inner pad with a standard allen wrech. I'm an expert on this bike by now, and it takes me about 5 minutes to drop the wheel and turn the inner pad 2 cranks. That said, the brakes do need constant adjustment.
I was thinking of making a video of replacing the BB sensor. I can do that in about 5 minutes as well.
 
Doing hundreds of brake adjustments on all models of bikes I rarely find a need to remove the rear wheel to adjust the inner pads. Sure the hub motor causes clearance issues with disk brake inner pad adjusters designed for conventional hubs but it seems people are missing the obvious here. Remove the caliper and flip up to make the inner pad adjuster easily accessible is very easily done with common tools. Leaving the mounting bolts slightly loose when reinstalling and applying the brake lever while tightening centers the caliper and allows proper clearance and orientation of the inner pad if you insert a thin shim between the rotor and inner pad while doing so you can achieve a no drag clearance although in practical use the minimal drag of not using a shim is quickly relieved by wear. After this is done adjustment of the outer pad to gain proper brake operation is easily done. Removal of the wheel is unnecessary. I have adjusted brakes in this manner very easily and quickly with customers looking on. Of course a special tool could be made by sacrificing an allen and or torque drive wrench and cutting the short leg even shorter but my method accomplishes the same goal without having to always hunt down that special tool when you need it.
 
FYI, just gave lilrich1959's suggestion a dry run - great tip, did it all in under 2 minutes, caliper returned to the expected home position, no awkward or heavy lifting. Think I will still craft a tool as illustrated. - Cheers! -S
 
Doing hundreds of brake adjustments on all models of bikes I rarely find a need to remove the rear wheel to adjust the inner pads. Sure the hub motor causes clearance issues with disk brake inner pad adjusters designed for conventional hubs but it seems people are missing the obvious here. Remove the caliper and flip up to make the inner pad adjuster easily accessible is very easily done with common tools. Leaving the mounting bolts slightly loose when reinstalling and applying the brake lever while tightening centers the caliper and allows proper clearance and orientation of the inner pad if you insert a thin shim between the rotor and inner pad while doing so you can achieve a no drag clearance although in practical use the minimal drag of not using a shim is quickly relieved by wear. After this is done adjustment of the outer pad to gain proper brake operation is easily done. Removal of the wheel is unnecessary. I have adjusted brakes in this manner very easily and quickly with customers looking on. Of course a special tool could be made by sacrificing an allen and or torque drive wrench and cutting the short leg even shorter but my method accomplishes the same goal without having to always hunt down that special tool when you need it.

Rich, you're right.
I was talking to @CurrieTech (Shawn) at the Interbike and he expressed the same. Removing the rear wheel is unnecessary.
Rich, are you able to find a hydraulic brake alternate for the Dash? I think that's what most people here are looking for...
 
The Tektro Auriga e Sub or Ecomp models should work fine I have gotten them from Long Island electric Bikes in the past and the price was right and shipped in record time. Double check your needed hose length as they come precharged and assembled to eliminate the need to bleed, if you need to have a different length hose order it assembled and pre-bled to avoid the headache, stock length worked in our case so not sure of the charge for custom hose length. They list front, back just specify (IS) for mount type on the Dash. Be aware that you will need to splice in the sensor wires as the master cylinders come with a sensor but with pigtailed leads about 4-6" long to accommodate various installations. The staff at Long Island were very helpful and I am sure they can set you up.
 
Back