Calipers That Will Not Adjust Straight

I pull the pads and the wheel when doing a bleed and insert a spacer. I do not want any oil near the rotor or pads. It is amazing how much dissolved air is in brake fluid. If it is kept in a vacuum it will bubble like a soft drink for an hour. One of Gionni's suction pumps works great for this. It is true that the Park Tool business cards work best.
View attachment 188553
When you gotta bleed a line.... You gotta bleed a line....
It's a matter of safety!
Otherwise you stand a good chance of going Slaphappy 🙃
 
Last edited:
When you gotta bleed a line.... You gotta bleed a line....
It's a matter of safety!
Otherwise you stand a good chance of going Slaphappy 🙃
Do you like to place a syringe of fresh fluid on top and to pull it through with a lower syringe? All the burnt oil comes out this way and bubbles are avoided. I have taken to filling out a build check list or tune checklist for every bike and taping the O-rings to it when they are intact. It is very important to remove the caliper adaptor bridge to check for paint on the posts and to make sure that the O-rings are removed.
 
Do you like to place a syringe of fresh fluid on top and to pull it through with a lower syringe? All the burnt oil comes out this way and bubbles are avoided.

I haven't bothered to flush any of my brake lines, partly because I rarely need to use my brakes with no hills around, and I didn't get syringes with my kit.

I'd just use the funnel and do a gravity bleed at the brake lever to replace the fluid, but I broke my funnel when I first got the bleeder kit. 😂

It is very important to remove the caliper adaptor bridge to check for paint on the posts and to make sure that the O-rings are removed.
I love those little O rings, but they're often missing. A dab of RTV makes a good substitute. It will keep stuff from sliding off the bolt but won't complicate tightening.

I'm with @PedalUma on that.
The O rings only cause problems.
You can't see if they are pinched after you torque the bolts, so you have to try and feel for it.

I just wrap a twist tie around the bolt to keep everything together when I remove the caliper,..


Screenshot_20250117-004200_Gallery.jpg


OK, I'm thinking of gluing the cloth to a chisel.

I didn't get my brakes finished yet, but I made a tool,..

Screenshot_20250117-004207_Gallery.jpg
Screenshot_20250117-004218_Gallery.jpg
 
I've never come across an O_ring so far so... n/a
The better bleed kits have brass fittings for the funnel. But you still need to be careful.
And I'm not sure I agree with the double syringe bleed method. Seems to me to be over thought, more trouble than it's worth and possibly worse as these tools are far from NASA grade.
But hey... Do what works for you.
 
I did an experiment one time, left the caliper loose, loctited the bolts. It worked, but for some reason I didn't like the results and scrapped the experiment. I think the caliper needed more support to keep it from canting or other.
 
I'm concerned about shear. Suppose you want one brake to apply 100 pounds of stopping force against the pavement. If it's a 160mm disc with a 29 inch tire, that's something like 450 pounds of shear, trying to drag the caliper along the face of the mount. If it moves, I guess that can damage bolts and mount.

At 6 Nm, each M6 x 1 bolt seems to clamp with 1300 pounds. I guess that's enough to prevent slipping.
That's exactly what I thinking!
But then I added 35 pounds for the loctite... subtracted 70 pounds for anti-seize and lastly added back 17.5 pounds for each O_ring.
YNmMV 🙃
 
I suspect that many do not see the O-rings because they often disintegrate when removing the hex cap screws into powder. But you can tell that they are there if there is any resistance when removing the screws all the way out.
 
,.. and I didn't get syringes with my kit.

I'd just use the funnel and do a gravity bleed at the brake lever to replace the fluid, but I broke my funnel when I first got the bleeder kit. 😂

It turns out that I did get a syringe with my kit, as well as adapters and a rotor straightening tool, but I didn't bother flushing my brakes.


Screenshot_20250117-152834_Gallery.jpg


It came with a strap-on, and a long reach tool too. 😂

Screenshot_20250117-152826_Gallery.jpg


I bought a few meters of hydraulic line, various ferrules, and a ferrule press cuz buying stuff is fun.
If I break my brakes, I can make brakes. 😂

Screenshot_20250117-152608_Gallery.jpg


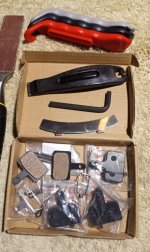
And a no-name brake pad kit with 4 sets of pads and 3 tools

Screenshot_20250118-033917_Gallery.jpg
Screenshot_20250118-035126_Amazon Shopping.jpg


The piston press works nicely,..


Screenshot_20250118-034015_Gallery.jpg


But I couldn't figure out what this end was for?

Screenshot_20250118-034052_Gallery.jpg


I think you can use it as a tire lever?
It would hook onto the spokes,..

Screenshot_20250118-034127_Gallery.jpg


So I tried my tire lever in my caliper, and it works great.
Both ends of the lever work,..

Screenshot_20250118-034225_Gallery.jpg
Screenshot_20250118-034257_Gallery.jpg


So now I've got a rotor bender tool and I don't need to buy any expensive Park Tool business cards. 😂

Screenshot_20250118-034356_Gallery.jpg


The spacer fits better than a card would.
My rotors are worn, and the spacer fits into the channel.
Business cards would get caught on the lip.

Screenshot_20250118-034547_Gallery.jpg


My rotors won't be past spec until the pads wear through and cut the lips 💋 off. 😂
I'll just keep installing new pads so I don't blow out my pistons. 😂


The better bleed kits have brass fittings for the funnel. But you still need to be careful.

I decided to buy a new funnel.
I managed to find one with a brass fitting,..

Screenshot_20250118-052210_AliExpress.jpg


It came with an adapter for some of the newer brakes,..

Screenshot_20250118-052256_AliExpress.jpg


Hopefully I'll get my ebike back together before spring ?
There's lots of things that aren't broken that need to be fixed. 😂
 

Attachments

  • Screenshot_20250118-035542_Gallery.jpg
    Screenshot_20250118-035542_Gallery.jpg
    273.2 KB · Views: 13
It turns out that I did get a syringe with my kit, as well as adapters and a rotor straightening tool, but I didn't bother flushing my brakes.


View attachment 188604

It came with a strap-on, and a long reach tool too. 😂

View attachment 188605

I bought a few meters of hydraulic line, various ferrules, and a ferrule press cuz buying stuff is fun.
If I break my brakes, I can make brakes. 😂

View attachment 188606

And a no-name brake pad kit with 4 sets of pads and 3 tools

View attachment 188611View attachment 188612


The piston press works nicely,..


View attachment 188613

But I couldn't figure out what this end was for?

View attachment 188614


I think you can use it as a tire lever?
It would hook onto the spokes,..

View attachment 188615

So I tried my tire lever in my caliper, and it works great.
Both ends of the lever work,..

View attachment 188616View attachment 188617


So now I've got a rotor bender tool and I don't need to buy any expensive Park Tool business cards. 😂

View attachment 188618

The spacer fits better than a card would.
My rotors are worn, and the spacer fits into the channel.
Business cards would get caught on the lip.

View attachment 188619

My rotors won't be past spec until the pads wear through and cut the lips 💋 off. 😂
I'll just keep installing new pads so I don't blow out my pistons. 😂


I decided to buy a new funnel.
I managed to find one with a brass fitting,..

View attachment 188621

It came with an adapter for some of the newer brakes,..

View attachment 188622


Hopefully I'll get my ebike back together before spring ?
There's lots of things that aren't broken that need to be fixed. 😂
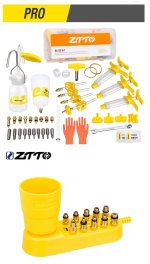
I picked up this kit for <$20...it's pretty well made and has more than I'll ever need.
Screenshot_20250118_091447_Chrome.jpg

Though I did have to send them a photo of my Park Tool business card feeler guage to prove I was a PRO before purchasing 🙃
 
Last edited:
If your discs build up an outer ridge where the pads don't touch, and makes it difficult to get pads on and off, get your grinder out and take it off with a bevel.
 
If your discs build up an outer ridge where the pads don't touch, and makes it difficult to get pads on and off,

I had no problem getting the wheels off the bike, but I was struggling to get them back in.
I was hacking up the edge of my brake pads,..

Screenshot_20250118-131610_Gallery.jpg
Screenshot_20250118-131818_Gallery.jpg


get your grinder out and take it off with a bevel.

I thought about that, but I figured that I'd make a big fricken mess, so I beveled the brake pads instead. 😂

Screenshot_20250118-132048_Gallery.jpg


I beveled the leading edge to the rotor as well. It's supposed to help stop noise and vibration.


Then I measured my disk thickness and couldn't get a very accurate reading with my $10 plastic caliper, but it's worn down by less than 0.2 mm, so it's still within spec,..

Screenshot_20250118-114636_AliExpress.jpg


Then I spent another twenty bucks and bought a new rotor anyway. 😂

Screenshot_20250118-120251_AliExpress.jpg


It's the fancy new TR-52 series rotor !!
Way better than my old LZ-24 rotor. 😂


Screenshot_20250118-061925_Gallery.jpg
 
I had no problem getting the wheels off the bike, but I was struggling to get them back in.
I was hacking up the edge of my brake pads,..
I've sometimes been frustrated getting the disk between the pads. I've also worried about what to do if I accidentally pulled a brake lever with the wheel off. To experiment I used a pair of big screwdrivers to pry the pads apart until the plates were against the frame of the caliper. It seems most of the resistance was from the viscosity of the fluid, and that meant I didn't have to pry hard if I was patient.

Next I removed the pads. I couldn't see any damage. Removing the pads entailed removing the caliper. If I put the wheel on and aligned the caliper by applying the brake, one piston could move farther than the other, and the frame of the caliper would be off center. The gap was a little more than twice the thickness of a playing card greater than the thickness of the disc. So I put a playing card on each side of the disc, applied the brake, tightened the bolts, and removed the cards.

if the pistons aren't stuck, it shouldn't take much force to widen the gap for easier wheel mounting. If you haven't loosened the caliper bolts, the brake should be self-adjusting.

I haven't had air in my lines, but I wonder if patiently prying the pads apart could get air out of the lines.
 
I had no problem getting the wheels off the bike, but I was struggling to get them back in.
I was hacking up the edge of my brake pads,..

View attachment 188626View attachment 188627


I thought about that, but I figured that I'd make a big fricken mess, so I beveled the brake pads instead. 😂

View attachment 188628

I beveled the leading edge to the rotor as well. It's supposed to help stop noise and vibration.


Then I measured my disk thickness and couldn't get a very accurate reading with my $10 plastic caliper, but it's worn down by less than 0.2 mm, so it's still within spec,..

View attachment 188629

Then I spent another twenty bucks and bought a new rotor anyway. 😂

View attachment 188630


It's the fancy new TR-52 series rotor !!
Way better than my old LZ-24 rotor. 😂


View attachment 188632
If your developing a lip on the edge of the rotor you need to add/replace with the correct spacer so that it doesn't.
If you're having a hard time putting the wheel back on you can try....
... pushing the pads further apart with a plastic lever or a thin plastic spacer before trying to install the wheel
... Install the pads and/or caliper after the wheel is in place.
If these don't work I would install O_rings with loktite, anti-seize and silicone grease 🙃
In any case I don't recommend hacking the rotor or the pads.
ymmv
 
If your developing a lip on the edge of the rotor you need to add/replace with the correct spacer so that it doesn't.

Well, for shitsakes,..

I thought the lip was normal.
My other ebike has the lip too,..


Screenshot_20250118-192345_Gallery.jpg


But not on the rear,..


Screenshot_20250118-200135_Gallery.jpg


The rear has what is probably a proprietary spacer/bracket ?,..

Screenshot_20250118-200249_Gallery.jpg


The rotor has the lip on the other edge, so there is a solid bead of metal connecting the spokes,..

Screenshot_20250118-200209_Gallery.jpg


My new ebike is going to cut the spokes clean off and has the lip instead,..

Screenshot_20250118-200326_Gallery.jpg


So I bought more stuff to go with my new rotor, so I don't get a lip,..


Screenshot_20250118-214215_AliExpress.jpg
Screenshot_20250118-214110_AliExpress.jpg


So, I'm going to put a washer or two here between the frame and spacer to raise the pads and eliminate the lip.

Screenshot_20250118-215804_Gallery.jpg


It's your standard issue spacer for a 180 mm rotor.
It should get everything to line up properly ??


Screenshot_20250118-215750_Gallery.jpg
 
Quality control is the issue.
Something is off, most likely the mount but it could also be the spacer, the caliper... Or perhaps a micron on each.
Park Tool has a tool to cut and square poor mounts... but that doesn't help in this situation as you need the assembly to be longer.
If you can't readily buy what you need and you can figure out the thickness you can fabricate a spacer out of some aluminum bar.. this way one piece mounts with both bolts
 
Well, for shitsakes,..

I thought the lip was normal.
My other ebike has the lip too,..
Lipping is normal. A disc with wear will have lipping. On a car, if specs show that lipping is excessive, it can be ground off.

After removing a caliper, I realized I didn't know which way the spacer went. The brake was bedded in but showed no wear. I mounted it with the spacer one way, painted a sector of the disc with a red felt marker, and took a ride. I reversed the spacer, repainted the disc, and took another ride. The pad didn't cover the whole "braking band" with the spacer either way. That means lipping is inevitable. If I feel it one day, I'll take it as a warning that my disc has worn too thin.
 
Back