Gionnirocket
Well-Known Member
- Region
- USA
- City
- Y. O.
I've been experimenting with an easier way to achieve a 70% - 90% charge or a storage charge for my battery other than just timing it and I came across an inexpensive solar charge controller that I thought I might be able to adapt. In the end I am able to achieve my goal, but it didn't end up exactly as planned.
The skinny on how it works is that you wire this in between the charger and the battery and it will disconnect the two when a certain voltage is reached and/or amount of time has elapsed.
In my particular case an issue that arose was that my charger is somewhat intelligent and it varies voltage on start up as it reads battery voltage and will cycle on/off until a constant voltage is read for a few seconds. This in turn would cause the controller to cycle as well and open its contacts.
The solution I came up with was to reverse the input and output of the controller so that I connected the constant voltage of the battery to the input. Since the controller works as a simple on/off switch, this is not a problem. The downside being that there is an extra step plugging it in.
So how it works....
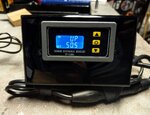
I plug the battery into the the controller and turn on the battery to power it up. I set my battery's Bottom End Voltage as a reference point. I used 34.5V.
I then set the Shut-off Voltage to my desired voltage... say 80% _ 50.5v
Once set these remain in memory even after unplugging and ready for future charges. The controller is easily adjusted in .1v increments from 6V to 60V
I then set the Timed Forced Off on the controller to 2 - 4 hours depending how far I ran the battery down. Then set the Delayed Restart between charges to its maximum 999 seconds ( about 16 minutes) These are also set once and are saved for future use and/or easily changed if need be.
Then I plug the charger in to electrical outlet and give it a few seconds to read battery V and start.
Once it starts I turn OFF the power switch on the battery. If not it will short cycle at the end of the charge always trying to add .1v after the 999 seconds times out and up to the Timed Forced Off.
While charging it will display either the percentage of charge it is currently at, 100% being the Shut-off Voltage set, or you can toggle to a countdown of the Forced Timed Off set. If you do not set a Forced Time Off it will display an elapsed Charge Time.
Now those with a more basic charger... you should be able to do this without swapping the input/output.
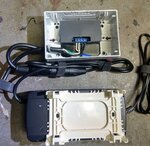
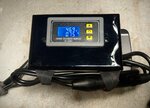
I mounted the controller in a plastic single gang electrical box and nano taped it to the top of my charger. I didn't want to hack up my charger output cable to put the controller in the line so I made an extension cable out of an old 16 gauge PC power cord and some solder XLR connectors. This also makes it easy to take the controller out of the line if need be. Careful purchasing an XLR cable for this use as in general these are used for audio signals and the conductors can be quite small.
So once set up it's a few extra seconds added to plugging things in than the charger alone and I have to say that it has been working quite well.
I will add that sometimes it is off by a tenth of a volt or two, but that's really hard to quantify as the battery voltage can fluctuate by that amount on its own. Since I usually burn through 1V or less on a typical 20 mile daily ride, only charging to 80% is not a hassle for me.
For someone with only one battery, this is a hell of a lot cheaper than the ready made alternatives while utilizing the charger you already have.
The skinny on how it works is that you wire this in between the charger and the battery and it will disconnect the two when a certain voltage is reached and/or amount of time has elapsed.
In my particular case an issue that arose was that my charger is somewhat intelligent and it varies voltage on start up as it reads battery voltage and will cycle on/off until a constant voltage is read for a few seconds. This in turn would cause the controller to cycle as well and open its contacts.
The solution I came up with was to reverse the input and output of the controller so that I connected the constant voltage of the battery to the input. Since the controller works as a simple on/off switch, this is not a problem. The downside being that there is an extra step plugging it in.
So how it works....
I plug the battery into the the controller and turn on the battery to power it up. I set my battery's Bottom End Voltage as a reference point. I used 34.5V.
I then set the Shut-off Voltage to my desired voltage... say 80% _ 50.5v
Once set these remain in memory even after unplugging and ready for future charges. The controller is easily adjusted in .1v increments from 6V to 60V
I then set the Timed Forced Off on the controller to 2 - 4 hours depending how far I ran the battery down. Then set the Delayed Restart between charges to its maximum 999 seconds ( about 16 minutes) These are also set once and are saved for future use and/or easily changed if need be.
Then I plug the charger in to electrical outlet and give it a few seconds to read battery V and start.
Once it starts I turn OFF the power switch on the battery. If not it will short cycle at the end of the charge always trying to add .1v after the 999 seconds times out and up to the Timed Forced Off.
While charging it will display either the percentage of charge it is currently at, 100% being the Shut-off Voltage set, or you can toggle to a countdown of the Forced Timed Off set. If you do not set a Forced Time Off it will display an elapsed Charge Time.
Now those with a more basic charger... you should be able to do this without swapping the input/output.
I mounted the controller in a plastic single gang electrical box and nano taped it to the top of my charger. I didn't want to hack up my charger output cable to put the controller in the line so I made an extension cable out of an old 16 gauge PC power cord and some solder XLR connectors. This also makes it easy to take the controller out of the line if need be. Careful purchasing an XLR cable for this use as in general these are used for audio signals and the conductors can be quite small.
So once set up it's a few extra seconds added to plugging things in than the charger alone and I have to say that it has been working quite well.
I will add that sometimes it is off by a tenth of a volt or two, but that's really hard to quantify as the battery voltage can fluctuate by that amount on its own. Since I usually burn through 1V or less on a typical 20 mile daily ride, only charging to 80% is not a hassle for me.
For someone with only one battery, this is a hell of a lot cheaper than the ready made alternatives while utilizing the charger you already have.
Attachments
Last edited:
")


