bikeman242
Active Member
On a ride today, I got an error on my 2018 BH Rebel Lynx bike with a Yamaha PW-X motor. I am in the USA.
The error pops up with a red light, and a message to check the speed sensor magnet. The motor power then cuts out.
I can turn the motor off and on again, and it will work fine for between 30 seconds and 2 minutes, but then the error appears again and the motor cuts out.
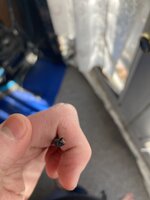
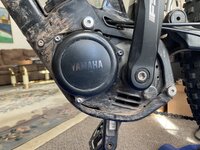
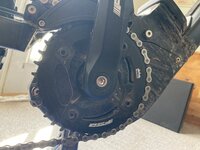
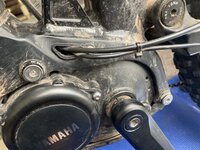
I inspected the bike and realized I have snapped a cable that runs from inside the motor housing to a little black piece of plastic that is attached to the bike frame near the rear wheel. I took this piece of plastic off the bike frame using an Allen key. I am assuming this is the cause of the issue. It looks like this bit of plastic is aligned on the frame near where the speed magnet is affixed to the wheel.
Looking for some help on what part I need to fix this, and if I can do it myself, or I need to find a bike mechanic to do it for me. Unfortunately the bike manufacturer went out of business in USA and is no help.
There aren’t exactly a lot of Yamaha ebike specialists in my area. My understanding was that the end user was not supposed to open the motor housing.
Here are some pics, thanks for the help. I dug around on google and found some feedback from european message boards, but nothing definitive or helpful. I am hoping I just need to replace this part.
@Ravi Kempaiah @Mike TowpathTraveler


The error pops up with a red light, and a message to check the speed sensor magnet. The motor power then cuts out.
I can turn the motor off and on again, and it will work fine for between 30 seconds and 2 minutes, but then the error appears again and the motor cuts out.
I inspected the bike and realized I have snapped a cable that runs from inside the motor housing to a little black piece of plastic that is attached to the bike frame near the rear wheel. I took this piece of plastic off the bike frame using an Allen key. I am assuming this is the cause of the issue. It looks like this bit of plastic is aligned on the frame near where the speed magnet is affixed to the wheel.
Looking for some help on what part I need to fix this, and if I can do it myself, or I need to find a bike mechanic to do it for me. Unfortunately the bike manufacturer went out of business in USA and is no help.
There aren’t exactly a lot of Yamaha ebike specialists in my area. My understanding was that the end user was not supposed to open the motor housing.
Here are some pics, thanks for the help. I dug around on google and found some feedback from european message boards, but nothing definitive or helpful. I am hoping I just need to replace this part.
@Ravi Kempaiah @Mike TowpathTraveler
Last edited: