Yamaha PW-X speed sensor error

bikeman242

Active Member
On a ride today, I got an error on my 2018 BH Rebel Lynx bike with a Yamaha PW-X motor. I am in the USA.

The error pops up with a red light, and a message to check the speed sensor magnet. The motor power then cuts out.

I can turn the motor off and on again, and it will work fine for between 30 seconds and 2 minutes, but then the error appears again and the motor cuts out.

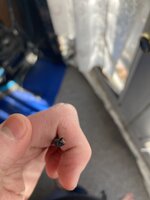
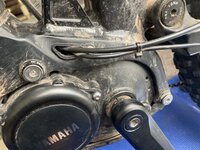
I inspected the bike and realized I have snapped a cable that runs from inside the motor housing to a little black piece of plastic that is attached to the bike frame near the rear wheel. I took this piece of plastic off the bike frame using an Allen key. I am assuming this is the cause of the issue. It looks like this bit of plastic is aligned on the frame near where the speed magnet is affixed to the wheel.

Looking for some help on what part I need to fix this, and if I can do it myself, or I need to find a bike mechanic to do it for me. Unfortunately the bike manufacturer went out of business in USA and is no help.

There aren’t exactly a lot of Yamaha ebike specialists in my area. My understanding was that the end user was not supposed to open the motor housing.

Here are some pics, thanks for the help. I dug around on google and found some feedback from european message boards, but nothing definitive or helpful. I am hoping I just need to replace this part.

@Ravi Kempaiah @Mike TowpathTraveler

ADDB2AC5-25F2-4D67-975A-085EA64D4E0C.jpeg

476EA7CE-6278-41E8-A0D9-6083CA144D6C.jpeg

D49587B6-AF2C-4791-AF9F-5973836E70EA.jpeg
 
Last edited:
a wire splice should fix it. this should work though without extra wire to work with its going to be tight.

Thanks for the suggestion, but I have no idea how to splice a wire and would really prefer just to replace the part.

I believe it is the speed sensor pickup cable that I need, though I do not know which specific cable will suit my bike, how to install it, or where to purchase it from.


Thanks for the suggestion, but I have no idea how to splice a wire and would really prefer just to replace the part.

I believe it is the speed sensor pickup cable that I need, though I do not know which specific cable will suit my bike, how to install it, or where to purchase it from.
you just strip some of the insulation off the wire ends put that piece over the two making sure they touch then heat it with a torch or lighter or such and it will solder them together. its easier then tearing it apart till you can get a replacement. anyone that can solder could do it for you its pretty easy.
 
I've heard of this happening on several brands of eMTBs, so I reinforced my wiring
1637890812375.png
 
A giant dealer should be able to help you out - most of their pwx equipped bikes use a similar sensor.
 
I'm pretty sure the speed sensor wire applies for every PW family member, be it my PW or your PWX, Bill. I found this, at the RideWill It site, in Italy. Link: https://www.ridewill.it/p/en/yamaha-3050817275-ebike-speed-sensor-from-2017/637286/ Fwiw, I have made 2 purchases from RideWill for Haibike battery decals as not a soul in the US carries them. Their service was excellent; took about a week to get them. Even at the height of covid this summer, I picked up a pair of decals with just a week wait; so nothing to worry about ordering from Europe.

You could also check any Giant dealers in our area that sells ebikes as they use the Yamaha ebike drive, they call it SyncDrive and I believe their earlier PW's and X's had the magnet spoke sensor. Worth a check.

I've enclosed a picture or two of my H-Bike's PW motor that I dropped in preparation for installing the PearTune speed sensor. Follow the wire on the right (magnet speed sensor cable) and you will see it terminates at a water tight plug, tucked above the motor. There is no splitting of the motor case with that job. It would be advised to spray a little PB Blaster on all the bolt heads and on the sprocket side, any exposed motor bolt threads before loosening up the motor mount bolts, especially if you "put the bike away, wet"......

100_4816.JPG

Haibike PW with skid plate that must be removed to drop the motor

100_4818.JPG

Skid plate dropped. Note the 3 motor mount screws/bolts. On reassembly with the new speed chip tucked in, I applied loc-tite to the screw threads and retorqued to 22 newton meters. Your PWx has 2 motor mount screws on this non-drive side and I believe one on the drive side which may involve having to take off the chain ring.....

100_4820.JPG

I simply loosened the bottom rear motor mount bolt to act as a motor pivot while I installed the speed chip. Here is the motor cleaned of dust and dirt. You can follow that sensor wire (with vinyl anti-chafe tubing attached to the wire) to the plug. You simply unplug there. But thinking about your picture, the wire terminals within the plug will have to be separated from the plug in order to snake the wire through the small opening in the die cast motor mount case. Sounds like a job for the Giant dealer....
 
Thanks guys for the feedback. I think its a strange design that a cable that is integral to the function of the motor is as easier to snap than a brake line, and replacing it is not straightforward.

I bought it from Lenny's, I'll call them on monday and hopefully they will have a solution.

@Ravi Kempaiah
 
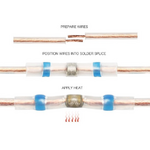
Are there only two wires, red and blue, in that cable? If so, and if you don't get a satisfactory reply you should be able to splice the wires with a low temperature solder butt splice like this.
1638030694113.png
They come in various sizes including for very fine wires and are inexpensive. I bought a box including several sizes and have used them for a few projects. There is a learning curve but good results can be had even on a first try.
Strip back the thick black covering to expose the two wires.
Strip the insulation from the two small wires - for tiny wires this is easiest by lightly melting the insulation with a lighter then pull the insulation off quickly with your fingers.
I've used a heat gun with these connectors but for tiny wires careful use of a lighter worked better. If you overheat the connector the covering can melt exposing the wires.
wrap the spliced area with self fusing silicone tape (available online or at home depot).

I didn't watch this video but it probably goes over the product well enough.
For very fine wires the white connectors usually work well. there is a range of wire gauges that work with each size.

EDIT: I watched a little of that video, he made it seem more complex than it is and he was inaccurate in some aspects. There are a lot of other videos including on Amazon by sellers.
 
Last edited:
On a ride today, I got an error on my 2018 BH Rebel Lynx bike with a Yamaha PW-X motor. I am in the USA.

The error pops up with a red light, and a message to check the speed sensor magnet. The motor power then cuts out.

I can turn the motor off and on again, and it will work fine for between 30 seconds and 2 minutes, but then the error appears again and the motor cuts out.
I inspected the bike and realized I have snapped a cable that runs from inside the motor housing to a little black piece of plastic that is attached to the bike frame near the rear wheel. I took this piece of plastic off the bike frame using an Allen key. I am assuming this is the cause of the issue. It looks like this bit of plastic is aligned on the frame near where the speed magnet is affixed to the wheel.
Here are some pics, thanks for the help. I dug around on google and found some feedback from european message boards, but nothing definitive or helpful. I am hoping I just need to replace this part.

@Ravi Kempaiah @Mike TowpathTraveler

How can I help you here?
If you have a speed sensor cable, that would be an easy fix. At this point, I do not have a sourcing link to the Yamaha OEM department but if it was Bosch, I would help you.
Once you get the speed sensor cable, it is an easy fix. With the help of some online videos, any mechanic would be able to do it.
As Mike mentioned above, you drop the motor and fix the cable, and re-torque everything back to the specs.

Thanks -

Are you aware of any online videos or manuals for dropping the motor on the PW-X? I found this forum chat and video for dropping the motor on a Haibike Sduro (which I believe is a PW-SE), but I am not sure how the process differs for the PW-X.


I would ideally prefer to do the fix myself, so I can troubleshoot the issue if I later have problems. I know dropping the motor myself voids the warranty, but given that the bike is a BH, that is irrelevant.

As far as you know, is the replacement speed sensor cable just a simple plug-in once I get the motor dropped, or is there anything more complicated about the installation of the new cable?

Mike mentioned "the wire terminals within the plug will have to be separated from the plug in order to snake the wire through the small opening in the die cast motor mount case. Sounds like a job for the Giant dealer...."

Thanks everybody for the help.
 
Are there only two wires, red and blue, in that cable? If so, and if you don't get a satisfactory reply you should be able to splice the wires with a low temperature solder butt splice like this.
View attachment 108079
They come in various sizes including for very fine wires and are inexpensive. I bought a box including several sizes and have used them for a few projects. There is a learning curve but good results can be had even on a first try.
Strip back the thick black covering to expose the two wires.
Strip the insulation from the two small wires - for tiny wires this is easiest by lightly melting the insulation with a lighter then pull the insulation off quickly with your fingers.
I've used a heat gun with these connectors but for tiny wires careful use of a lighter worked better. If you overheat the connector the covering can melt exposing the wires.
wrap the spliced area with self fusing silicone tape (available online or at home depot).

I didn't watch this video but it probably goes over the product well enough.
For very fine wires the white connectors usually work well. there is a range of wire gauges that work with each size.

EDIT: I watched a little of that video, he made it seem more complex than it is and he was inaccurate in some aspects. There are a lot of other videos including on Amazon by sellers.

It looks like there is a red, green, and blue wire.
 

Attachments

  • C80C25FC-772B-4027-99F0-70EAE0132201.jpeg
    C80C25FC-772B-4027-99F0-70EAE0132201.jpeg
    126.6 KB · Views: 330
I'm pretty sure the speed sensor wire applies for every PW family member, be it my PW or your PWX, Bill. I found this, at the RideWill It site, in Italy. Link: https://www.ridewill.it/p/en/yamaha-3050817275-ebike-speed-sensor-from-2017/637286/ Fwiw, I have made 2 purchases from RideWill for Haibike battery decals as not a soul in the US carries them. Their service was excellent; took about a week to get them. Even at the height of covid this summer, I picked up a pair of decals with just a week wait; so nothing to worry about ordering from Europe.

You could also check any Giant dealers in our area that sells ebikes as they use the Yamaha ebike drive, they call it SyncDrive and I believe their earlier PW's and X's had the magnet spoke sensor. Worth a check.

I've enclosed a picture or two of my H-Bike's PW motor that I dropped in preparation for installing the PearTune speed sensor. Follow the wire on the right (magnet speed sensor cable) and you will see it terminates at a water tight plug, tucked above the motor. There is no splitting of the motor case with that job. It would be advised to spray a little PB Blaster on all the bolt heads and on the sprocket side, any exposed motor bolt threads before loosening up the motor mount bolts, especially if you "put the bike away, wet"......

View attachment 107882
Haibike PW with skid plate that must be removed to drop the motor

View attachment 107884
Skid plate dropped. Note the 3 motor mount screws/bolts. On reassembly with the new speed chip tucked in, I applied loc-tite to the screw threads and retorqued to 22 newton meters. Your PWx has 2 motor mount screws on this non-drive side and I believe one on the drive side which may involve having to take off the chain ring.....

View attachment 107885
I simply loosened the bottom rear motor mount bolt to act as a motor pivot while I installed the speed chip. Here is the motor cleaned of dust and dirt. You can follow that sensor wire (with vinyl anti-chafe tubing attached to the wire) to the plug. You simply unplug there. But thinking about your picture, the wire terminals within the plug will have to be separated from the plug in order to snake the wire through the small opening in the die cast motor mount case. Sounds like a job for the Giant dealer....

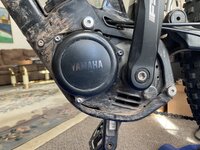
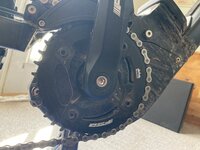
Thanks mike, it does look like there is a bolt hiding behind the chainring. I am not sure exactly what bolts are needed to be removed to drop the motor, but it looks like the chainring needs removing. Here’s a couple pics of the motor housing


I see what your saying about separating the wire terminals from the plug in order to get it through the little opening in the motor housing. I won’t know until I get the plug if it will fit without having to do this. Would your haibike have the same issue if you snapped this sensor cable?
 

Attachments

  • 2664FB5C-581B-4624-B93E-8B9F19791F06.jpeg
    2664FB5C-581B-4624-B93E-8B9F19791F06.jpeg
    547.7 KB · Views: 496
  • 0B892662-4FBD-4327-A4A3-69205E69E2C3.jpeg
    0B892662-4FBD-4327-A4A3-69205E69E2C3.jpeg
    429.6 KB · Views: 355
  • 2B47635F-8113-4E3D-8EB4-E9074CA047D9.jpeg
    2B47635F-8113-4E3D-8EB4-E9074CA047D9.jpeg
    656.3 KB · Views: 625
Bill, the good news for you: look at your third picture, the one with the wire runs coming out of the motor bracket housing. When I magnified the pic, I saw the plastic clip that's screwed onto the bracket housing is actually split. I think you might have enough clearance once that that split clip is removed, to clear the sensor wire plug right out of the bracket housing. They split these clips in order to easier remove wire runs; my H-Bike has a couple of them on the top tube for the brake and wire hose/cable runs coming off the handlebar. For this repair scenario, the motor still has to be dropped & pivoted in the down position to make the repair

Now for the possible bad news: the PW on mine has 3 larger motor mount bolts on the non-drive side as shown in the pics I displayed here. PWX has only 2, but I believe the third is on the drive side and if you cannot access it, then the crank arm will have to come off (requiring a crank arm puller) to access the chain ring & spider; then to remove the chain ring/spider assy, you will need a specific socket for the PWx spider attaching nut. To properly torque it back on you will need a torque wrench (note the torque spec in pic 3 shows 45 nm torque). All of this bad news can be disregarded if you are able to get to that drive side screw to loosen and remove it.

Not sure if I have clearance on the H-Bike with the motor pivoted down as I had shown. I could always just remove that third pivot bolt and drop the motor and removed the wire, if that need ever came up.

Being these motor mount bolts are only torqued to 22nm, you only have to break the torque to remove or loosen the bolts. I used Loctite on mine when I was done and torqued to specs using my Harbor Freight 1/4 inch drive torque wrench and had no issues of creaking or bolt loosening at all.

If you're handy splicing wires and using shrink wrap, you could do a decent job of splicing, soldering and shrink wrapping each individual wire on the current sensor wire & then wrap all three shrink wrapped wires together into one, bigger shrink wrap in order to make it semi professional looking.

Word of caution: when pivoting the motor back up, ensure that there are absolutely no motor or sensor wires pinched between the motor and the motor case. When I installed that PearTune speed chip, I saw it was very easy to make that mistake.
 
And apologies for being so long word winded here, but I want to make it clear of the things I found on my own in dropping the motor down, even when I changed out my front outer chain ring.

I want you to understand that the split plastic clip will very possibly allow you to slip the new sensor plug & wire within the clip and thru the die cast motor mount housing without having to mess with separating each individual sensor wire from that sensor terminal plug!
 
FWIW I didn't have to remove the crank arm to remove the chainrings when I changed them on my PW-SE but I recall that I did have to remove the pedal. I don't see that the spider would need removal either to get to a fastener on the crank side but I don't have the PWX. Good luck with whatever you choose but splicing the wires would seem to be the easiest fix. Maybe check to see if you have an electrical repair place that can do it for you if you don't think you can do it yourself with either a soldering iron and some solder or the all in one shrink wrap butt connectors that I mentioned.
 
FWIW I didn't have to remove the crank arm to remove the chainrings when I changed them on my PW-SE but I recall that I did have to remove the pedal. I don't see that the spider would need removal either to get to a fastener on the crank side but I don't have the PWX. Good luck with whatever you choose but splicing the wires would seem to be the easiest fix. Maybe check to see if you have an electrical repair place that can do it for you if you don't think you can do it yourself with either a soldering iron and some solder or the all in one shrink wrap butt connectors that I mentioned.
Good point about the single chain ring on the newer Yamaha's like yours and Bikeman's. The trick is getting the right tool on those slotted inner nuts that attach to the chain ring bolt as they are easy to strip or bugger up.
 
Mine does have a double chainring rather than a single. You're right the chainring bolts can be tricky sometimes. Good luck to the OP on this whatever he chooses. Out of curiosity I checked for availability of the sensor - for some reason all that I found were sourced from Europe, none from North America. Seemed expensive for what they are while generic non-Yamaha units cost less than $20 and are widely available including from Amazon.
 
Mine does have a double chainring rather than a single. You're right the chainring bolts can be tricky sometimes. Good luck to the OP on this whatever he chooses. Out of curiosity I checked for availability of the sensor - for some reason all that I found were sourced from Europe, none from North America. Seemed expensive for what they are while generic non-Yamaha units cost less than $20 and are widely available including from Amazon.
Completely agree about parts availability in our country or Canada for that matter for the Yamaha ebike drive system. It's totally unsatisfactory.

Most everything about US ebiking is making the sale of the complete ebike. But when it comes to repairing your drive system, you have to invest alot of internet time looking for that ONE dealer who might carry the particular part you need. Chances are, you won't find it cause it's just not there. And should an internal motor or battery issue pop up, the drive component becomes a static piece of a paper weight.

No battery re-celling available for this drive; no BMS replacement part, no torque sensors, no internal motor circuitry boards to be had. People in the United States should not have to go to an European online bike supply dealer for a part that should have been long, long ago stocked by US Yamaha ebike drive dealers. Rant over.
 
Back