Vado touring?

I wondered myself...
I found this on Amazon. A patch for inside the tire between tire and tube for sidewall tear emergency repair. This is not a inter tube repair patch.
don’t know why @sirretim have $1 bill for this. Unless he means something else
I purchased to put in my kit.
 

Attachments

  • 0BA389D6-4B3D-43B4-9E61-0352C2655B32.png
    0BA389D6-4B3D-43B4-9E61-0352C2655B32.png
    560.1 KB · Views: 340
I wondered myself...

A tire boot is a piece of material used to reinforce a damaged tire sidewall. Park Tool's TB-2 patch I'm sure works well but I've used dollar bills successfully. One of my sons likes to tell the story of when he had a tire slash miles from the trail head with no folding money. He took his last Cliff bar, smashed it flat and used it. Didn't have to walk out and still ate the bar at the car! A win all around!

I've used dollar bills to also save a ride or two when I got a smallish cut from some glass in the tread area of the tire. Not the intended use, but still better than walking.
Haha. Great experience and advice. I bought the above kit. Thanks again. Good to have in your kit.
 
I found this on Amazon. A patch for inside the tire between tire and tube for sidewall tear emergency repair. This is not a inter tube repair patch.
don’t know why @sirretim have $1 bill for this. Unless he means something else
I purchased to put in my kit.

Yep, that's a tire boot! I do carry a couple of tire boots made from a tough construction membrane I had in the shop but old habits die hard. I always carry some cash so I just naturally reach for a bill when I get a tire slash. The woven fabric of folding money has lasted me for a couple of years when I forgot about a repair after a weekend trip. It fell right out when i got a flat on the same tire.
 
More on tire boots:


The Canadian $5 bills are better than American singles because the bill fabric is more like a very thin sheet of plastic and seems to be stronger and more durable than the American $1. You can't use a Canadian $1 because a Loonie is a coin and coins don't work as tire boots.
 
More on tire boots:


The Canadian $5 bills are better than American singles because the bill fabric is more like a very thin sheet of plastic and seems to be stronger and more durable than the American $1. You can't use a Canadian $1 because a Loonie is a coin and coins don't work as tire boots.
Very informative. Thanks.
 
@Sierratim do you have a suspension seat post? I can't tell by looking at the pictures? if yes what kind?

No suspension seat posts on the Vados. The front forks and larger tires seem to be enough for us. We do have suspension posts on our mechanicals; Cannondale Quicks.
 
Last edited:
More on tire boots:


The Canadian $5 bills are better than American singles because the bill fabric is more like a very thin sheet of plastic and seems to be stronger and more durable than the American $1. You can't use a Canadian $1 because a Loonie is a coin and coins don't work as tire boots.

It's been some years since I've been in Canada; forgotten about the Loonie. Brings back fond memories. Thank you.

And I do agree that a five-er beats a buck every time.
 
I've been working on our repair kit for our trip. Thanks in no small part to Mr. Coffee's post at https://electricbikereview.com/forums/threads/tools-for-field-repairs.32350/ I've tried out a couple of new items. Here are my observations on an item you might want to consider:

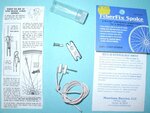
FiberFix EmergencyUniversal Spoke Replacement Kit

Manufactured by Morrison-Barrios LLC in Tucson, AZ, this very compact kit is a universal spoke replacement that has 5-star ratings just about everywhere it's sold. The FiberFix replacement spoke consists of a flexible aramid (Kevlar) cord that loops through the empty spoke hole in your hub and is then tensioned with the included hardware and tool to bring the wheel back into true. A spare spoke nipple is also included in the vial sized kit. Barring any serious abrasion where the cord passes through the hub, this kit should be reusable a number of times.

Here's a pretty good install video:
.

I had a broken spoke on my mechanical some years ago. We were maybe 15 miles from our trail head on Lake Tahoe's West Shore trail. I wrapped the broken spoke to an adjacent one thinking I could ride back. Nope. Within a mile or two the wheel was too out of true to clear the rim brake pads (yep, I still use these). Luckily there's a trolly that shuttles people along the west shore. It even has a bike rack. We found the nearest stop, loaded our bikes and were shuttled back for a few $. Better than walking, but it still cut this beautiful ride way too short. Wish I'd had this reapir spoke then! I'll always have it now.

It retails for ~$15 but can be found for less on Ebay, etc.

Cycle on. Be safe, be healthy.


fiberfix.jpg

fiberfix1.gif fiberfix2.gif
 
I've been working on our repair kit for our trip. Thanks in no small part to Mr. Coffee's post at https://electricbikereview.com/forums/threads/tools-for-field-repairs.32350/ I've tried out a couple of new items. Here are my observations on an item you might want to consider:

FiberFix EmergencyUniversal Spoke Replacement Kit

Manufactured by Morrison-Barrios LLC in Tucson, AZ, this very compact kit is a universal spoke replacement that has 5-star ratings just about everywhere it's sold. The FiberFix replacement spoke consists of a flexible aramid (Kevlar) cord that loops through the empty spoke hole in your hub and is then tensioned with the included hardware and tool to bring the wheel back into true. A spare spoke nipple is also included in the vial sized kit. Barring any serious abrasion where the cord passes through the hub, this kit should be reusable a number of times.

Here's a pretty good install video:
.

I had a broken spoke on my mechanical some years ago. We were maybe 15 miles from our trail head on Lake Tahoe's West Shore trail. I wrapped the broken spoke to an adjacent one thinking I could ride back. Nope. Within a mile or two the wheel was too out of true to clear the rim brake pads (yep, I still use these). Luckily there's a trolly that shuttles people along the west shore. It even has a bike rack. We found the nearest stop, loaded our bikes and were shuttled back for a few $. Better than walking, but it still cut this beautiful ride way too short. Wish I'd had this reapir spoke then! I'll always have it now.

It retails for ~$15 but can be found for less on Ebay, etc.

Cycle on. Be safe, be healthy.


View attachment 49236

View attachment 49237 View attachment 49238
Great suggestion. Just ordered one from Amazon. The video says get two but I am going to take a chance for now.
 
Still working on our tool kit for our trip. Again, thanks to Mr. Coffee's post at https://electricbikereview.com/forums/threads/tools-for-field-repairs.32350/ for some new ideas. Here are my observations on an item that I considered:

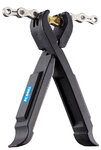
KMC Missing Link Lever (originally the Clever Tire Lever)

Manufacturer's site: http://www.kmcchain.com/onepage/missinglinklever-18mar/en/index.html

I liked the idea of this multi-tool that can add function but little to no weight or bulk to my repair kit. Here's a video that details the tool:
. See size comparison at 2:50s in video

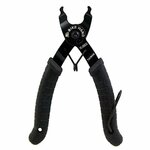
Like many tiver levers these are made from reinforced plastic. As tire levers this tool works well though I do prefer steel reinforced levers for the occasional hard to remove tire. The two levers fit together to make a master link removal tool. Once upon a time you could remove these links bare handed. No more. In my shop I use a Bike Hand removal tool pretty much like the one shown in the video at the 2:50 sec mark.

I tested the KMC tool on SRAM brand master links installed in SRAM 951 chains on our mechanicals. These chains are less than a year old with ~1,500 miles on them. They've been routinely cleaned and lubed with no visible corrosion. The bikes have been stored indoors except when being ridden or transported. To make a long story short I was not able to remove either master link for fear of breaking the tool. This issue is echoed in some reviews on Amazon; https://www.amazon.com/KMC-MISSINGLINK-LEVER-Missing-Lever/dp/B07662N436 . I was able to remove the links with my Bike Hand brand tool, but it took a bit of pressure. The longer steel handles on this tool make it doable as compared to the shorter plastic handles on the KMC tool, esp with narrowing of the plastic at the 'hinge'. This issue may be unique to the SRAM master links, but I don't want to carry a tool I can't trust completley. I returned it.

So what do I do for field repairs to a broken chain? I carry a replacement link compatible with my chain and a chain tool that's a part of my Topeak Alien II bike tool. In the Topeak tool I also have 2 replacement chain pins (clipped into their holder in the tool). The repair senarios and techniques are detailed in this Park Tool video:
.

Park offers a wide selection of repair and maintenance videos. All professional quality, all free (if you can ignore their sometimes shameless promo of their tools, but hey...free). I highly recommend them.

In all honesty I have never needed to do a field repair to one of my chains. I attribute this to routine chain and drive train cleaning, a good lube and annual chain replacement. I have had to repair chains for others on my rides so I still carry the 'stuff'.

Retails for ~$10

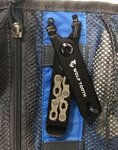
t402_x1_85f72b1087bb94a5e3052545c37118e1.jpg s-l1600.jpg
 
Wolf Tooth gear is top notch. My sons carry this tool. At ~$30 it is on the pricey side, but, like you say, peace of mind. It may still struggle with SRAM master links with the short handles. I suppose I could change out chains, but they've caused me no grief in the dozen or so years I've been using them.
 
Still working on our tool kit for our trip. Again, thanks to Mr. Coffee's post at https://electricbikereview.com/forums/threads/tools-for-field-repairs.32350/ for some new ideas. Here are my observations on an item that I considered:

KMC Missing Link Lever (originally the Clever Tire Lever)

@Sierratim Many thanks for posting details of the missing link tools. Before the Vado, I always used 9 speed systems, and it was not too difficult to separate the links by hand.

I have ordered up both tools, one to carry, and the metal pliers for the toolbox :).

Would you recommend changing the Vado chain every year, or every so many miles?
 
Last edited:
@Sierratim Many thanks for posting details of the missing link tools. Before the Vado, I always used 9 speed systems, and it was not too difficult to separate the links by hand.

I have ordered up both tools, one to carry, and the metal pliers for the toolbox :).

Would you recommend changing the Vado chain every year, or every so many miles?
I hate chain problems; stiff links, jumped chains, poor shifting, broken links, etc. Many are difficult, if not impossible, to fix in the field. And who wants to carry a spare chain? On top of all this, chain problems transfer into your other drive train components that are much more expensive and time consuming to replace.

So, with that that said, what do I do? I maintain my drive train above all else. Part of that is regular cleaning and chain replacement. I buy brand name chains, but not the most expensive, and then replace them every Spring. The chains aren't worn out nor are they dirty or corroded so I donate them to the local Bicycle Kitchen project.

I may spend a few extra $ in the short term but it saves in the long term with max life from the more expensive components. In the short term I get smooth shifting and no field problems with chains or anyother drive components, ever.

Stay safe. Be healthy. Ride on.
 
So, with that that said, what do I do? I maintain my drive train above all else. Part of that is regular cleaning and chain replacement. I buy brand name chains, but not the most expensive, and then replace them every Spring. The chains aren't worn out nor are they dirty or corroded so I donate them to the local Bicycle Kitchen project.

Many thanks for the advice and the clear reasoning behind it - with the amount of original investment, I will be doing as you suggest.

Stay safe too, and I hope the Schwalbe Marathons work out :).
 
I have every confidence in the Marathons. I've decided to save them for our trip. In the meantime I am putting 42mm thorn strips in our tires to help minimize flats with the Trigger Sport tires.
 
With California's stay at home order still in effect I find that I have too much time on my hands. The Spring weather is finally making its way up the Sierras so more riding, but I have had had time to checkout a couple more items for our touring kit. Here's one:

Planet Bike Dial Pressure Gauge

An old school pressure gauge with a quality feel. Soild and heavy for its size. Agrees well with my Topeak electronic gauge to ~1 psi. Best of all, no batteries or recharging needed, ever! Ah, the good ole days (my sons still laugh at my battery free calculator, a Post Versalog slide rule).

693d5b3f-0854-4b67-aef6-89a7a3f4603a.jpeg


Why a pressure gauge for touring? Neither my CO2 inflator nor hand pump have pressure gauges. My preferred fill for a trail side repair is CO2, it's just faster on a hot day. Tubes do lose pressure quite a bit faster with CO2 so our normal practice is to stop at a gas station and refill the tire with good ole air as the first opprotunity. I want to be sure to not over inflate so hence a gauge.

I actually get less air loss with this gauge than with my Topeak electronic. Like an electronic gauge, it holds the pressure reading until you press the reset button. Handy for readings in awkward or low light conditions. I find the white dial very easy to read. The manufacturer states that the dial has a 'crystal lens'. I can't confirm this, but it doesn't feel like plastic.

93be5965-de93-472a-8a13-ab05486d7bea.jpeg


2d621b95-edc2-4e42-a3a4-8da122263833.jpeg


It works with Schrader or Presta valves. A brass threaded adapter is included for Presta valves. The dial gauge goes to 140psi / 10bar.

All in all, a solid addition to out kit.

$18

SKU 1029

Also available as a fat tire bike gauge with a max 15psi range, SKU 1027

Again, thanks to Mr. Coffee's post at https://electricbikereview.com/forums/threads/tools-for-field-repairs.32350/ for some new ideas.
 
Back