Vado SL EQ taillight relocation

Winglovespea

New Member
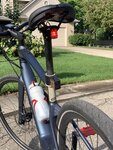
I wanted to share with you the bracket I 3D printed to move the fender mounted taillight under the saddle rails.
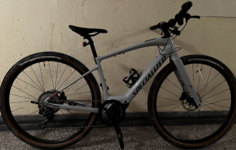
I had to remove the motor, battery, and fork to route the wires. That sounded scarier than it actually was, only hand tools needed and it was done by myself without much trouble!
 

Attachments

  • FA675BCD-9760-4486-B2E1-099BFC02B2ED.jpeg
    FA675BCD-9760-4486-B2E1-099BFC02B2ED.jpeg
    441 KB · Views: 954
  • EBED8D16-35BF-4CC8-80E0-226D32135FCB.jpeg
    EBED8D16-35BF-4CC8-80E0-226D32135FCB.jpeg
    511.5 KB · Views: 947
Nice installation, but why did you have to remove the fork? Don't the wires run straight up the seat tube and seat post?
 
Nice installation, but why did you have to remove the fork? Don't the wires run straight up the seat tube and seat post?
The connections for the lights are all at the switch on the top tube. I had to pull that switch (t10 or t15, I think) and disconnect the wires then pull them through the tubes.
The taillight was initially installed by threading from the motor cover, up the down tube, up the head tube, and into the top tube.
I pulled that and re-ran it through the hole in the seat post clamp, down the seat post and seat tube, over the motor, and then back up the down tube, head tube and top tube as before.
Removing the fork was necessary to make the jump up from the down tube to the top tube. There’s a plastic sleeve inside the head tube great protects the internal cables and wires.
I just took out one spacer/washer/bearing at a time and set them aside in order. It was easy with a helper to hold the fork up as I reset all the pieces.
I did all of the above with a handful of Allen wrenches. There is one motor bolt that is blocked by the chainring, but the chainring comes off the crank arms with more Allen bolts.
Wow - I'm impressed by the amount of work you did there. Even though I am (or at least used to be) a pretty good mechanic, I'm not sure I'd take on something like that. Is there a connector at the taillight, or are the wires hard-connected to it? Anyway I'm out of luck on that score since the Redshift seat post that I might use has no way of running a wire through it as far as I know.
 
Wow - I'm impressed by the amount of work you did there. Even though I am (or at least used to be) a pretty good mechanic, I'm not sure I'd take on something like that. Is there a connector at the taillight, or are the wires hard-connected to it? Anyway I'm out of luck on that score since the Redshift seat post that I might use has no way of running a wire through it as far as I know.
Unfortunately no, the connector on that wire is 3-4 feet away from the light itself. You could try cutting it and shrink wrap the splice.
Bummer about that seatpost, those caught my eye too.
 
I have also been looking at changing the seat post on my Vado SL 5.0. Is there any reason why I should not just drill a small hole in seat post for the power wire?
 
Absolutely do not drill through the side of the seat post. I you do, you will risk a suddenly broken post from a stress crack that will form over time starting from the hole. You can drill a small hole through the top of the post. If you look at the OP's photos you can see the wire coming out the top of the seat post where there is sufficient material to drill a hole.


Last edited:
A real showstopper could be a suspension post like the Redshift that has some of its mechanism inside the post with the adjustment knob on the bottom, leaving no place for a wire to enter at the bottom let alone exit at the top. That's the post that I'm planning on trying with my Vado 4 this Spring and would transfer to an SL if I get one.
 
A real showstopper could be a suspension post like the Redshift that has some of its mechanism inside the post with the adjustment knob on the bottom, leaving no place for a wire to enter at the bottom let alone exit at the top. That's the post that I'm planning on trying with my Vado 4 this Spring and would transfer to an SL if I get one.
Have you checked the existing post diameter and the post diameter required by SL? I think Vado 4.0 uses 30.9 mm seat-post while it is 27.2 mm for SL. Just to save you disappointment when the time for your SL comes.
 
Recently removed fenders and relocate tail light on Vado SL 4 EQ. 2 hours of work and you need some mechanical skills and all required tools
You can use some guide (brake wire) and guide the light wire above the battery without removing motor and battery. Not easy but still better than removal.

My proposal based on this experience:

- don't do it like described and choose easier way- just cut the wires.
If you plan to re-use fenders, leave the existing wire attached to fender and cut it at tail light and at exit from frame. Install some connectors for future use.
You need to remove motor plastic cover (single torx) and seat post. Get some new wire, install connectors, run it thru seatpost and connect to existing wire under motor cover.

I installed Gravelking 50mm and there is enough room in front and rear. Not tested yet but it looks comfortable.
 

Attachments

  • Screenshot 2021-12-27 at 08.09.03.png
    Screenshot 2021-12-27 at 08.09.03.png
    3.2 MB · Views: 293
  • Screenshot 2021-12-27 at 08.09.19.png
    Screenshot 2021-12-27 at 08.09.19.png
    1.6 MB · Views: 297
  • Screenshot 2021-12-27 at 08.09.27.png
    Screenshot 2021-12-27 at 08.09.27.png
    1 MB · Views: 287
Back