stompandgo's Cannondale Tesoro Neo X Speed build

stompandgo

Active Member
Region
USA
I bought my first e-bike about a month ago. It's a Cannondale Tesoro Neo X Speed in Medium. I bought it on closeout from Mike's Bikes in Colorado. It's the first bike I've bought whole in decades, as I usually build my own. Right away, I knew that there were going to be modifications required.

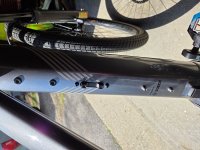
The first thing that I did was remove the aluminum fenders and Racktime rack, and install my preferred Topeak MTX 2.0 rack and trunk bag. These have panniers that unzip and fold out when needed. The top also expands. I also added my Garmin mount and fitted Crank Brothers Candy 7 pedals. For my Varia radar and Fly6 camera, I cut down an old carbon seatpost and attached it to the back of the rack. I also moved the SuperNova taillight to the rack reflector mount. It fit perfectly.

Tesoro mod1-s.jpg
 
After riding it a few times, I knew further fit changes would be needed. I started to get pain in my torn up (grade 3 AC tear, no surgery) right shoulder. This usually meant that there was too much weight on the bars. So I changed out that awful Cannondale adjustable stem that weighed a ton and used a nut adjuster, for a Ritchey road stem I had kicking around. To attach the stem, I used a modified 40mm expander plug. The top cap will be changed once I find one I like. I bought some carbon bars (700mm, stock are 760mm). On the ends, I fitted Ergon GA3S grips. My glove size is 8 so I'm right in between Small and Large. I thought I'd try the small first. I also added a Hafny mirror. I had previously set the tire (28x2.15) pressure to 50psi, but dropped them to 45psi for the checkout ride.

cockpit3-s.jpg


I rode almost 3 hours today with zero shouder pain or fatigue. I need to push the saddle back 2-3mm, as my knee alignment could be a bit straighter. I also might drop the tire pressure down to 42psi and try that next.
 
Last edited:
Another mod that I'm working on is a dual battery setup. The bike comes "dual battery ready". I found a great deal on a brand new PowerPack 500 battery. The rest has to be sourced and installed by a Cannondale dealer, as Bosch parts and diagnostics are required. My local shop had never done one, but they got the details from Cannondale and started the job. Unfortunately, Cannondale was mistaken that the battery Y-cable was in the frame, as it was not. That had to be ordered. It goes back to the shop next week (it's raining all week) to finish it up. Once completed, I'll have 1125 watt-hours of battery for the motor. It's an older System 2 Performance Line Speed, 45km/hr, 85nM.

db1-s-jpg.192977
 

Attachments

  • db1-s.jpg
    db1-s.jpg
    472.7 KB · Views: 179
The bike is a month old, but it's a 2021 leftover model. On the last couple of rides, at about 2 hours in, the motor starts to make a creaking or squealing sound that matches my pedal cadence. If I stop pedaling, it stops. It sort of sounds like a dry bearing, which would make sense as it sat in a box for four years. It gets worse as the ride gets longer. The bike has a 1 year warranty, and the motor has a 2 year warranty. I'm going to wait until it gets a lot louder in a lot less time before taking it to the shop. I don't want to deal with a wall job. In the meantime, I'll just ride it.

I've been impressed with the bike so far. For my first e-bike, I'm happy.
 
Lookin good, Chris!

I had never had ergonomic handlebar grips before I got my bike, But I really love them. I’m glad they’re working out for you.

Also, that rack connector to the rear fork looks totally cool. Is that part of the rack, or part of your bag system?

As for the motor squealing…. Hmm… I’d certainly talk to your shop about that if/when you have it in for motor work for the dual battery connection. You paid a lot of money for that bike (and all the work you’re doing to it), and Cannondale/Bosch should be able to help you out (I’d hope??).

Anyway, great stuff. I look forward to seeing the additional power/battery stuff that Bosch does. Is it custom work or is this something that’s typically done on this model of bike?
 
Lookin good, Chris!

I had never had ergonomic handlebar grips before I got my bike, But I really love them. I’m glad they’re working out for you.
Between the grips and the carbon bars, it's a lot more comfortable up front.
Also, that rack connector to the rear fork looks totally cool. Is that part of the rack, or part of your bag system?
Topeak makes a whole line of racks. This one is called the "29er" and is made for mountain bikes. The stock stainless arms are too short for a frame built like mine, so they sell a longer arm kit for this purpose. They come straight, but are designed to be bent in an arc in order to level the rack and attach to the frame rack mounts. I've done a few of them, it just takes patience to make the arcs look smooth and similar. They may look "artsy fartsy", but they are very strong and sturdy.
As for the motor squealing…. Hmm… I’d certainly talk to your shop about that if/when you have it in for motor work for the dual battery connection. You paid a lot of money for that bike (and all the work you’re doing to it), and Cannondale/Bosch should be able to help you out (I’d hope??).
They are Bosch authorized and trained, so yes. Everything has only been under warranty for a couple of months, so I have time. I want it to make noise without having to ride it for an hour first.
Anyway, great stuff. I look forward to seeing the additional power/battery stuff that Bosch does. Is it custom work or is this something that’s typically done on this model of bike?
"Dual Battery Ready" is a Bosch feature that was offered on the older System 2 bikes like mine. Bosch provides the parts and design requirements, and Cannondale designs the frame around it. Others offered this as well, like Kona, Focus, etc.
 
I did a few tweaks before my 42 mile ride today. I found a Ritchey headset top cap in the bin and got rid of that generic import blue thing. Much better. I did some work on the rack crossbar where I mount the Varia and Fly6. I added rubber stoppers in the end, and a circle washer under the bolt. Pics when it's finally all done. I also picked up a Topeak ratchet set for the trunk bag. Works great, nice and light. Finally, I set my saddle back 3mm. Much better.

Now to the noise. There must have been white smoke in the air, because I had a revelation. The noise would mostly stop when I stopped pedaling. I stood up to approach a trail intersection, and rode through it standing on the pedals. Silence. I tried it over and over again. With my butt off the seat, no noise. It had to be either my ISM Pro1.1 saddle (possible, but highly unlikely), or the POS Crappendale Parallelogram El-cheapness SR Suntour clone suspension seatpost. My money is on the latter. It's going to rain tomorrow, so I'll do a 200 mile service on the bike, and service the seatpost as well. If I find metal chips, there's my answer. At some point, I want to get rid of the thing, but the budget is tapped for a while. If this quiets the thing down, I'll deal with it.
 
I did the 200 mile service on the Tesoro before my last ride. It's basically what a dealer would do at a two week checkup.
- Pull the wheels
- Clean and lube the chain, chainring, cassette, and derailleur
- Adjust the derailleur
- Torque or tighten all important fasteners
- Clean the frame
- Clean and lube the suspension seatpost

I had noticed that the front brake was dragging a bit. I pulled and lubed the Q-Loc axle and everything lined back up again. The Deore shifter had slipped a bit so I aligned it and torqued it down. The rear 12mm thru-axle was loose, so I cleaned and lubed it, and torqued it to 11Nm. The horn had stopped working, probably due to a pulled wire. I left it that way, as I want to clean up the front of the cockpit by removing it and replacing it with a bell. Downshifts had started to become a little sloppy, so I gave the adjuster a turn, which cleaned it up a bit. I do miss Di2, though. I wish there was a way to add it. Maybe on the next bike. Finally, I dropped the tire pressure to 35psi.

The seatpost was wonderfully quiet. All I could hear was the wind in my ears, and the beautiful whine of the Bosch Performance Speed motor, which is pretty loud. This was a great experience, for about 15 miles, before the seatpost started making noise again. Sigh. Junk is junk. I'm probably going to replace it with a Cane Creek eeSilk+ and drop some weight, too. 35psi seemed a little bit high, so I'll drop to 32psi for the next ride. Handling was great. I am having issues with saddle pain now. My glutes aren't in great shape, but I have to do something about this. I'll start looking into saddles that work well for this kind of bike.

The bike goes back to the shop today for the dual battery upgrade and a few Bosch tweaks.
 
The dual battery upgrade was completed yesterday. I took it home and took a quick 30 miler on it. The bike feels a bit heavier with the added battery, but I didn't notice it much when riding in Mode 2 (Tour) for the 30 miles. I also did not notice any difference in handling. It's the same big, heavy, ridiculously fast bike.

When I picked it up, the shop owner had taken it for a ride, and said "This bike is a beast!". I've always named my race bikes, because whenever one let me down in a race, I refused to beat on it because it would be personal at that point. Weird, I know, but bike racers are weird. So even though I'm not racing anymore, I'm going to call this one The Beast.

The motor is a power hungry Bosch System 2 Performance Line Speed. Class 3, 45km/h, speed pedelec motor. It came with a PowerTube 625. I've added a PowerPack 500 frame battery, the largest supported by the System 2 dual battery system. So now I have 1125w/h of power onboard.

Since the bike is only 2 months old and under warranty, I decided to let my local Cannondale dealer do the complete upgrade. I could have sourced the parts and figured it out myself, but it still had to go to the Bosch dealer for firmware upgrades and programming. I did source a brand new PowerPack 500 battery on eBay for under $400. These are in the $750 range retail, so that saved me some coin. All in all, they shop did me a solid because they had never done one before, so it ended costing me around $1100 for everything. This included setting the headlight to "save last state" so that I can shut it off. Unfortunately, that shuts off the tail/brake light as well, but at least I now have the option.

The Kiox when powered on shows the total battery state of charge. The system switches between batteries during discharge to even things out.

kiox1-s.jpg (I don't know why the forum software rotates the images).

Switching to the Settings screen, it shows the state of charge of each battery.

kiox2-s.jpg

These are now the ranges for each Mode.

kiox3-s.jpgkiox4-s.jpgkiox5-s.jpgkiox6-s.jpg

The goal was to be able to ride 75 miles round trip without battery anxiety, using Modes 1 and 2.

If it makes sense, I can create a new thread on this upgrade for reference, including steps and part numbers.

Here is some detail of the tail section I built previously, which holds two things I never ride without, my Garmin Varia radar, and Cycliq Fly6 CE rear video camera.

tail1-s.jpgtail2-s.jpg
 
Damn, 1145Wh means you could probably ride to my house from the Cape. :)

Wonderful, Chris. What’s the rear radar for? Also, can we see a picture of the whole bike with all the power upgrades in place? Just curious.
 
Damn, 1145Wh means you could probably ride to my house from the Cape. :)

Wonderful, Chris. What’s the rear radar for? Also, can we see a picture of the whole bike with all the power upgrades in place? Just curious.
battery1-s.jpg


The OEM PowerTube 625 lives behind the black panel on the outside of the downtube. The second battery is mounted on the top of the downtube.

db1-s.jpg


This is the top of the downtube before installation. The top two round bosses hold the fastening clips for the PowerTube on the other side. The rectangular plate below comes installed the other way around, as a flat plate. To install the dual battery, this plate is flipped around into the position shown, with the threaded holes facing up. The lock cylinder will attach to this plate. The bottom two water bottle bolts are also removed for battery clearance.

battery2-s.jpg


There are certain combinations of batteries that will work with a dual battery setup. Which setups will work with your bike depends on the system type (System 2 or Smart System), and the original battery setup on your bike. My Tesoro allows a Power Pack 400 or 500 Frame battery as the second battery option.

battery3-s.jpg


The mounting system is the same that is used for any bike with the Power Pack Frame battery. The only Cannondale specific part is that rectangular plate, which comes with the bike. The new charge port is at the bottom of the frame battery mount. When plugged in, the system alternates charging each battery until they are both charged.

battery4-sd.jpg


Here is the dual battery system with the second battery removed. The lock assembly mounts to the rectangular plate. At the bottom, the OEM charge cable and cover are replaced with a Power Pack battery mount, cover, and a Power Pack Frame battery cable. Underneath the motor, stuffed up into the seat tube, is the dual battery Y-cable, which connects the PowerTube battery cable and the Power Pack battery cables together on one end, and into the motor on the other. The final piece is all software. Both batteries and the motor need to have their firmware updated to the latest, same version. Then a request has to go to Cannondale for the dual battery upgrade. If approved, Cannondale gives the tech a code which is in turn given to Bosch support as part of a service ticket. The Bosch tech then remotely logs into the bike and turns on that dual battery capability. This way, both Cannondale and Bosch have my bike's serial number registered with them as having a dual battery that is warranty supported. If it blows up, they own it.

Two things the shop missed. First, the bike came with a rubber cover for the frame battery charge port, which they misplaced. I ordered a replacement. They're $7 so no big deal. The second thing is that they could have matched the Abus key codes so that I could use one key with both locks instead of two. Again, no big deal.

The radar is a Garmin Varia. It's a rear blinky light that has a radar system built into it. It senses when there is a motor vehicle behind me. The range is about 200 meters. It emits a beep and draws an approaching dot on my Garmin 830 screen.
 
Oh, and my (last piece of) advice… Cover the charging port with electrical tape for the time being while you ride until you get the rubber cover. Where that is located, it is badly exposed (as I’m sure you already can see). Also, look over every inch of that battery to make sure there’s no components/connectors/edges exposed to the elements. Also, I hope that 5-prong battery connector at the bottom bracket seals with an o-ring or something when the battery is attached. If not, there might be some electrically neutral flat ring you can use to make sure it seals when the battery is placed in.

Fondest wishes. — C
 
looks great indeed. If you are worried on the contacts... loads of bikes here lost the rubber connector protector and still have to see a fault resulting from it.

You could also use one the 4047025643092 to cover the battery connector pins.
1747745173417.png


And just do not forget to take of the external battery when parking the bike. it tales 3 seconds and a small flat screwdriver to get a Powerpack from that system. (and yes, used that method a few times when the consumer did not send the battery keys in with the bike for the expertise center)

Just was close to the workshop

1000004616.jpg


Battery connector is rather sturdy

1000004610.jpg


One of our custom charge ports om the top tube, works like a charm

1000004612.jpg


And we tried one of the 3rd party battery locks on one of the chopshop testbuilds
 
Last edited:
Back