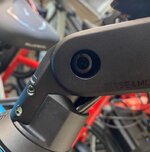
Stem & headset adjustment on a Delite?

Alanzo

Active Member
I received my Delite yesterday and hoping someone can explain the correct process for repositioning the stem. The components with the bike are different than traditional bikes I have owned and worked on in the previous years.

I am wondering if the black plastic cap on top of the stem is removed to adjust a star nut inside the fork tube or if the headset tension is adjusted by the 2 lockings below the stem. I know this not a difficult adjustment to make. Just want to be sure I do this the correct way. I welcome any feedback including suggestions for specific metric tools I may need if this involves adjusting the 2 lockings below the stem.
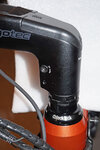
 

Attachments

  • R&M stem.jpg
    R&M stem.jpg
    102.3 KB · Views: 807
Alanzo …
As far as I can tell the Ergotec Integra BK stem is non-adjustable. Aesthetics trumps practicality.
… David
 
Last edited by a moderator:
David,
I can adjust the stem clamp by loosening the 2 bolts but I need to know how to adjust the tension in the headset and the bottom of the stem clamp so there will be no play with the fork in the headtube. Looks like the top of the black plastic cap on the stem can be removed but I do not want to guess and damage something in the process. Most traditional bikes I worked on had a star nut inside the fork tube for adjustment. I can not find any info in the owners manual and wondering how others had adjusted their Delite stems after unpacking the bike.
The Acros Block Lock is different. It's still a threadless headset though. The video shows a different stem. ** I do not own one of these, I have read about them.

 
Thanks for the video post and plastic cap image. This helps with visual reference. Tomorrow, I will talk to the person who setup the bike. I am sure this will be an easy adjustment to get the bike ready for a ride.
 
It's super easy but you need a couple of old school headset wrenches like these https://www.amazon.com/gp/product/B001VRF0TM/ref=ppx_yo_dt_b_asin_title_o02_s00?ie=UTF8&psc=1 . Look right below the stem, on the steerer. That is an adjustable height headset spacer. With the stem clamp bolts already torqued, loosen the little set screws of the adjustable height spacer and adjust the height to take up any slack. Loosen the set screw on the Block Lock too before you adjust the slack. The Block Lock is only there to control the degree to which you can turn the steerer so make sure you center it so the handlebar will turn equally to both sides after the set screw is tightened. After you set the slack/stack height, re-tighten the three set screws a bit.
 
1616523462943.png
Loosening A&B to adjust the angle as shown in the manual is ... not working. It will not budge even with taps of rubber hammer, wasn't going any further than that, will see if the dealer can do anything. Noted some rust on metal on the underside, I mean they should have painted things better than this!

R&M are not what I would term "the Rolls Royce" other than price. Don't get me wrong I love the low maintenance, but the lack of corporate support (unanswered inquires) and build could use some improvements.

They likely don't monitor this site but should.
 
@Ken S - Something not mentioned that's vital is that the nut on the opposite side of bolt "A" is keyed and needs to be oriented so that the little triangle stamped in it is perpendicular to the top face of the upper part of the stem for a safe adjustment.

Also curious - what have you found of the build quality that could use improvement outside of the aforementioned rusty rod?

(Lastly, they do monitor this site.)
 

Attachments

  • Capture.JPG
    Capture.JPG
    68.6 KB · Views: 477
Last edited:
Thank you for the feedback.

How is this end turned so that the > is up, and turned back again I assume? It's round and the hole in the middle has no (torx/spine or hex) insert....

The little things:​

  • Belt tension information.
    • Factory set.
    • email R&M no reply.
    • checked Gates app for testing tension. Doesn't work on my phone
  • Light on all the time, no option to turn off.
    • switch on Kiox display NA for the light.
  • High beam switch plastic and cracked when tightening brake lever clamp.
    • Replacement on order, asked to have this button separate as it is between hand grip and E shifting and seldom used.
  • No information as to contents of software loads updates.
    • This is a Bosch issue but R&M I am sure could obtain and publish it.
  • MOTO X tires too fat for rear lock.
    • they do go thru but something someone should taken notice of.
  • Most uses of the front carrier block the head light.
    • changing the lighting mount to front of carrier is a potential, but with the light hard wired it is not an easy task.
Admittedly some of these are picky but I think when putting out close to twice my last STEPS bike I'm not asking too much.

But NO maintenance. :) I've only had it for just over 4 weeks with over 1,000 km., so saved about 1 chain already.

Glad to hear on the "lastly".
 
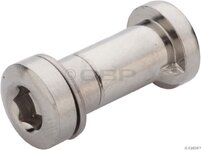
I can't pull one out right now, but it's keyed like an old seatbinder bolt (shown below)- there's a "tooth" on the nut that sits in a notch on the stem. Normally, it spins freely until that tooth finds the notch then it slots in. If it's torqued down without being slotted into that notch, it digs into the aluminum of the stem - you'll be able to get a proper torque reading, but it wont be secure. If yours isn't oriented properly, the only thing to do is remove the "A" bolt and use a wide punch to hammer the keyed nut out of the stem from the non-drive side and reinstall it.

- Using a Krikit, belt tension should be 18lbs for new belts and settle into 15lbs after the initial stretch-in period (I believe this information is in the Gates manual that came with the bike.)
- Depending on your region, lights can be toggled to be switched on/off at any Bosch certified shop with access to the Diagnostic software
- The high-beam clamp has a torque spec of 2Nm, it's a very light touch that's hard to do without a torque wrench
- Firmware update notes can be found on Bosch's website
- I've not had any issues getting the Super Moto's in and out of the frame lock - perhaps your PSI is too high?
- The headlight is an oversight, I agree. R&M has released a kit to relocate the headlight from the handlebar to the underside of the front carrier with the release of the Front Carrier Bag.

Hope that helps.
 

Attachments

  • large_55563.jpg
    large_55563.jpg
    73.4 KB · Views: 361
Last edited:
  • Light on all the time, no option to turn off.
Hi,
I was able to turn my headlight on my SD on and off following these directions available in their manual:

The newest generation of the M99 MINI PRO-25 can be set to be manually switchable
with the high beam switch. This function is intended for e-bikes like the
Specialized Turbo Levo that constantly supply the light port with power when the
bike is switched on. The following description shows how this manual mode can
be activated.
How to operate in the programming mode:
1. To enter the programming mode, hold down the high beam switch while switching
on the E-Bike. After approx. 3 seconds the low beam flashes 3 times. Now
release the high beam switch.
2. Now you can switch between the following modes by briefly pressing the high
beam switch:
Manual mode (indicated by switched off light in programming mode): In this
mode, the front light is switched on after having started the E-Bike by briefly
pressing the high beam switch. It can be switched off by holding the switch
for 2 seconds or by switching off the E-Bike.
The automatic mode is set by default (indicated by pulsating light in programming
mode): If this mode is selected, the front light switches on automatically
when voltage is applied.
3. To exit the programming mode, disconnect the front light from the power supply.
With a Specialized Turbo Levo you simply switch off the E-Bike. At the next start,
the last selected mode is activated.
Please note!
Never drive in programming mode (indicated by pulsating light), as the light is
not StVZO-compliant and you switch off the front light by pressing the high beam
switch.


Hope that helps.
Marc
 
I can't pull one out right now, but it's keyed like an old seatbinder bolt (shown below)- there's a "tooth" on the nut that sits in a notch on the stem. Normally, it spins freely until that tooth finds the notch then it slots in. If it's torqued down without being slotted into that notch, it digs into the aluminum of the stem - you'll be able to get a proper torque reading, but it wont be secure. If yours isn't oriented properly, the only thing to do is remove the "A" bolt and use a wide punch to hammer the keyed nut out of the stem from the non-drive side and reinstall it.

- Using a Krikit, belt tension should be 18lbs for new belts and settle into 15lbs after the initial stretch-in period (This information is in the Gates manual that came with the bike.)
- Depending on your region, lights can be toggled to be switched on/off at any Bosch certified shop with access to the Diagnostic software
- The high-beam clamp has a torque spec of 2Nm, it's a very light touch that's hard to do without a torque wrench
- Firmware update notes can be found on Bosch's website
- I've not had any issues getting the Super Moto's in and out of the frame lock - perhaps your PSI is too high?
- The headlight is an oversight, I agree. R&M has released a kit to relocate the headlight from the handlebar to the underside of the front carrier with the release of the Front Carrier Bag.

Hope that helps.
Helps, heck that more than helps!
It answers everything, if you don't work for R&M already, then they should hire you.

MUCH appreciated.
Hi,
I was able to turn my headlight on my SD on and off following these directions available in their manual:

The newest generation of the M99 MINI PRO-25 can be set to be manually switchable
with the high beam switch. This function is intended for e-bikes like the
Specialized Turbo Levo that constantly supply the light port with power when the
bike is switched on. The following description shows how this manual mode can
be activated.
How to operate in the programming mode:
1. To enter the programming mode, hold down the high beam switch while switching
on the E-Bike. After approx. 3 seconds the low beam flashes 3 times. Now
release the high beam switch.
2. Now you can switch between the following modes by briefly pressing the high
beam switch:
Manual mode (indicated by switched off light in programming mode): In this
mode, the front light is switched on after having started the E-Bike by briefly
pressing the high beam switch. It can be switched off by holding the switch
for 2 seconds or by switching off the E-Bike.
The automatic mode is set by default (indicated by pulsating light in programming
mode): If this mode is selected, the front light switches on automatically
when voltage is applied.
3. To exit the programming mode, disconnect the front light from the power supply.
With a Specialized Turbo Levo you simply switch off the E-Bike. At the next start,
the last selected mode is activated.
Please note!
Never drive in programming mode (indicated by pulsating light), as the light is
not StVZO-compliant and you switch off the front light by pressing the high beam
switch.


Hope that helps.
Marc
Brilliant Marc!! Works like a hot darn, I never thought of looking for programming for it. This is just what I wanted!

I know the bike industry is going though some growing pains right now with disruption in technology and manufacturing in this new normal. I hope they realize the value of users like you and forums like this. You and JV increase my satisfaction index by a huge amount.
 
Back