Nxkharra
Well-Known Member
@Sierratim please elaborate. I don’t get it.The bike weight is the biggest I have with these handlebar jacks.
@Sierratim please elaborate. I don’t get it.The bike weight is the biggest I have with these handlebar jacks.


That is one of the major reasons I asked. The thought of taking the heavy bike upside down scares me. May be I can ask for a help if I need it in the field.The Vado, with battery, weighs ~50lbs. If you're riding solo you need to rotate this heavy bike without assistance to make use of the handle bar jacks. When I was younger I used to do this with my ~25lb mechanical. I quit doing this as my back got more sensitive to the stress. At 70, I'm not sure my back could take the weight of the Vado as I rotated it.
Or, you coild leave it upright and lean it against a tree. Just sayin'...That is one of the major reasons I asked. The thought of taking the heavy bike upside down scares me. May be I can ask for a help if I need it in the field.


Taking the wheel out (especially the rear one) from the Vado and replacing the tube were one of the most appalling experiences I had; replacing the wheel was just horrific, even if I had the workstand and could rotate the bike freely. The major problem was everything was so heavy and the Electrak tyres were very stiff. I wouldn't dare to replace the tube in the field myself.@Stefan Mikes. Hey. So I got this stuff.
Thanks for the info. Lbs has a workshop on Thursdays. Due to COVID-19 it's shutdown until further notice. How do you know it's tightened to 15 nm with a regular 5 mm hex? I have regular . I thought there was a special tool at lbs for that but I only was able to get 4 nm one. I'd like to see a Video of someone changing out the tube in on the side of the road on the Vado. I know practice makes perfect. I learn better with visual and someone showing me or hands on. Explaining doesn't do much for me. I need to see. And then do it myself. For example, I watched a step by step instruction video of how to take apart a hp computer, upgrade processor, ram, WiFi card and fan. After taking it apart and putting it back together a couple of times with pictures, I was able to confidently do on my own pretty fast. That being said, Vado is not a laptop. A whole new ball game.Taking the wheel out (especially the rear one) from the Vado and replacing the tube were one of the most appalling experiences I had; replacing the wheel was just horrific, even if I had the workstand and could rotate the bike freely. The major problem was everything was so heavy and the Electrak tyres were very stiff. I wouldn't dare to replace the tube in the field myself.
That's the reason I keep very strong Elektrak Armadillo tyres on the Vado and the Marathon E Plus ones on the Lovelec. To increase the chance of survival, I have used the Michelin Protek Max inner tubes (durable and self-repairing). Other people -- especially in the U.S. -- use Tannus Armor and fill their inner tubes with Slime.
In case of a flat, I try having a "support and gear" car available by a phone call. As I am alone now, Mr. Andrzej the local cab driver would be happy to drive to help me. I can at least take the front wheel off (with a simple size 5 Allen key) to shorten the bike for the transportation in the car so he could take me and the Vado home.
Sierratim has described the procedure very well. The point is, I couldn't do that on the ride myself. I could do that with a traditional bike: Just place the lightweight bike upside down on the handlebars and the saddle, remove the wheels with the quick release and so on. The e-bike is just too heavy.
One important thing already explained is you need to tighten the thru-axle bolt with 15 Nm torque, using the 5 mm hex bit.
You unscrew the bolt with the regular wrench. You tighten it with the torque wrench, which is both a tool and an instrument.How do you know it's tightened to 15 nm with a regular 5 mm hex? I have regular .
I'm not promoting Blevo over Mission Control App. I'm a consumer of both. I do think Blevo does better in real time stats of showing what you are trying to explain. Way better.This is from the emtb forum. Came from someone who rep'd Specialized. Thought it was useful so here goes. Here is the link to the full thread also.

Mission Control - Understanding Support vs Peak Power in Mission Control App v2.0
Hi Specialized I have a 2019 Turbo Levo. I'm wanting clarification of Support vs Peak Power plse. Have read forum answers where I can and I think I've established that at 100% Support and 100% Peak Power, with a 500w battery, say rider input of 100 watts then bike will deliver 320w (3.2 x...www.emtbforums.com
Support = the multiplier of rider power added by the motor
Peak Power = maximum electrical power available to supply the motor
In terms of support, each e-Bike motor is slightly different. 100% on the slider means 4.1x rider power for 2019 Levo (2.1 motor), 3.8x for 2018 Levo (1.3 motor) and 3.2x for older Levo (1.2)
When you talk about motor power, bear in mind that two types of power regularly get confused when discussing e-bikes:
a) Electrical input power (battery power that the motor consumes)
b) Mechanical output power (motor power that is added to rider power at the crank)
Mission Control (+ all other apps using ANT data) measure the electrical input power to the motor (Battery Voltage x Current). This is what you see if you view the stats page whilst riding, and it's what you limit when you reduce peak power - if you reduce peak power to 50% you're effectively limiting the motor to draw up to 50% of maximum permitted battery current. Reducing peak power therefore helps you to preserve battery life/range.
In the real world, what you actually care about/feel is the mechanical output power of the motor. Motors are not 100% efficient, some power is lost to heat so let's use 75% efficiency as an arbitrary estimate. In this example, for every 100W of electrical power the battery supplies to the motor you'd get 75W mechanical power at the crank.
However there are two other things to bear in mind - YOU are not 100% efficient either, often riding in the wrong gear and asking the motor to do all the hard work - PLUS the motor is happiest when you ride in the right gear at a good cadence - let's say 70-90 rpm. So when you're riding in optimum gear and around 80rpm, you're turning 75% of the electrical power consumed into mechanical power - but when you're riding in the wrong gear at 40rpm uphill don't expect the same results!
Below is a graph (data presented by us but measured/validated by an independent lab) showing how power varies with cadence for a number of motors - you can see that aiming for a constant cadence of around 80-90rpm will not only give you optimum power but also efficiency. Whether you are after power or range, pedaling at the right RPM makes a big difference.

To put all of this together, let's talk through the default support settings in Mission Control. You can change these to suit your riding style at any time, but let's use these as an example.

In Turbo mode on a 2019 Levo with 4.1x rider support at 100%, you'll only need to put in about 140W rider power for the motor to supply you with the maximum assist of 560W (taken from the graph above), assuming you're spinning at about 80-90 rpm. Lots of fun, also useful to get to the trail but possibly too powerful for steep climbing - especially if the ground covering is loose.
On the same bike with Support set to 35%, you're getting approx 1.5x rider support. This will feel much more natural to ride and you'll use less battery - in Trail mode with 100% peak power the motor will still reach it's maximum assist of 560W but this time you need to put in 390W rider power to get there. You get more of a work out and in practice you'll use far less battery. Aim for this mode to give you the best blend of power and efficiency so that you also have optimum control for trail riding.
In Eco mode with support set to 35% you still have approx 1.5x rider support - however you're now limited to 35% peak power (35% of 560W is approx 200W maximum motor assistance). In practice this means that you'll get linear support from the motor up until you put in about 140W rider power (200W added from the motor), but above 140W rider power you'll still only receive 200W support from the motor. This is great to preserve battery life but if you hit that peak support limit whilst climbing something steep, you have to make up all the extra with your legs.
Note: All power mentioned in this Mission Control example is mechanical power output by the motor. If you look in the stats screen of Mission Control whilst riding you will see electrical power consumed by the motor which will be higher. Re-read this article a few times and if still completely unsure...
An adjustable torque wrench is a tool that you'll want to get for your shop. 2-24Nm is a good range. These are ~$50 and up. They're too big to take in the field. In the field you need to improvise. 1Nm = ~0.74ft-lbs so 15Nm = 11ft-lbs. If your 5mm hex is 6 inches long you'd need to apply 22lbs of force to get the right torque on the through axle. My bike multi-tool is ~4" long so i need to apply 33lbs of force, i.e. I need to really crank on that guy. When I get home I correctly set the torque with the torque wrench.Thanks for the info. Lbs has a workshop on Thursdays. Due to COVID-19 it's shutdown until further notice. How do you know it's tightened to 15 nm with a regular 5 mm hex? I have regular . I thought there was a special tool at lbs for that but I only was able to get 4 nm one. I'd like to see a Video of someone changing out the tube in on the side of the road on the Vado. I know practice makes perfect. I learn better with visual and someone showing me or hands on. Explaining doesn't do much for me. I need to see. And then do it myself. For example, I watched a step by step instruction video of how to take apart a hp computer, upgrade processor, ram, WiFi card and fan. After taking it apart and putting it back together a couple of times with pictures, I was able to confidently do on my own pretty fast. That being said, Vado is not a laptop. A whole new ball game.
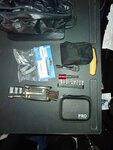
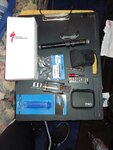
Here's what I have. Do I need any more tools than these for flat out in the field?An adjustable torque wrench is a tool that you'll want to get for your shop. 2-24Nm is a good range. These are ~$50 and up. They're too big to take in the field. In the field you need to improvise. 1Nm = ~0.74ft-lbs so 15Nm = 11ft-lbs. If your 5mm hex is 6 inches long you'd need to apply 22lbs of force to get the right torque on the through axle. My bike multi-tool is ~4" long so i need to apply 33lbs of force, i.e. I need to really crank on that guy. When I get home I correctly set the torque with the torque wrench.
Yes. In addition to your multi-tool with a 5mm hex you'll need 2 tire levers, a patch kit, a spare tube, and a Presta compatible pump. Why a patch kit and a spare tube? Because on some days one flat is not enough. My record is 3.Here's what I have. Do I need any more tools than these for flat out in the field?
Thanks. Then I guess I'm all set. Now comes the practice. Also, I don't have patches, just guessing spare tubes are good enough. I think you mentioned that you didn't get any added protection in your original tires. I had these installed in my triggers when I first got my Vado. I was going to slime them too but the bike mechanic told me this would be enough against thorns along with tire liners. I did put slime in my marathon plus tires for additional protection. That ebike has shraeder valve. It was easy and straight forward. The presta valve seems it would be more complicated.Yes. In addition to your multi-tool with a 5mm hex you'll need 2 tire levers, a patch kit, a spare tube, and a Presta compatible pump. Why a patch kit and a spare tube? Because on some days one flat is not enough. My record is 3.
I also carry a CO2 inflator. I find using the pump to be way too tedious, esp when its hot. The larger volume Vado tires need either a 25gram (more $) or the most part of 2-16gram (less $) cartridges.
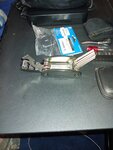
I forgot attachment.Thanks. Then I guess I'm all set. Now comes the practice. Also, I don't have patches, just guessing spare tubes are good enough. I think you mentioned that you didn't get any added protection in your original tires. I had these installed in my triggers when I first got my Vado. I was going to slime them too but the bike mechanic told me this would be enough against thorns along with tire liners. I did put slime in my marathon plus tires for additional protection. That ebike has shraeder valve. It was easy and straight forward. The presta valve seems it would be more complicated.
Looks like you're good to go.I forgot attachment.
Thank you. I didn't mean throw away. I would patch the tube at home instead of in the field. I'm thinking of having them slimed for extra protection, the one in there now.Looks like you're good to go.
I do patch my tubes, just can't stand throwing away a $6 tube when a patch costs pennies (sheets of 50, Ebay). Never had a patch fail.
@Sierratim you probably already know this. @Deacon Blues, I asked Andy Wilkoff (the owner and inventor of Handlebar Jacks) about the best way to tip a heavy ebike upside down without hurting yourself. He is very responsive.Or, you coild leave it upright and lean it against a tree. Just sayin'...
Good for you @TS25I was heading to a barbecue invitation of a friend living app. 18 miles away. The fine summer weather made me choose to take the Vado. I had to pass a smaller mountain area on the last part of my way and decided to take the shorter path through the woods. Didn't meet anybody on my route. Coming down from the top I had a puncture on my rear Trigger tire.
In the middle of nowhere, no cell phone connection. No cab to be called to this place.
So I was quite happy to have thought of this situation although I never expected it to occur.
I had a spare tube and the right tools in my emergency package with me and changed the tube in the field. Didn't turn the bike over, too complicated and not necessary. It was sufficient to lay it down to the left hand side leaning slightly to a bush.
This was the first tube change after 25 years bio biking but with Schwalbe Marathon plus tires. It helped to have read the Shimano manuals and looking up some how-to-YT videos beforehand.
What I hadn't put in my emergency package but is now: small tissues to clean the grease off my hands. Luckily I had found some bigger fresh leaves in the woods which didn't look that fresh anymore after misusing them.
No need to worry about the 15Nm the axles need to be tightend with afterwards. It's enough to check that back home.
Finally: I didn't miss any barbecue steaks because it was a bring along party. I patched the tube at my friends place. And I rode back exactly the same route at night confident I'd cope - OK, who isn't confident after a few beers.

I use a similar technique to move our mechanicals around the shop; squeeze the tear brake andflip 'em up on the rear wheel. They turn on a dime and can be easily maneuvered anywhere I want them. Hadn't tried it with the Vados. Looks like it's doable. Have you tried this yet?@Sierratim you probably already know this. @Deacon Blues, I asked Andy Wilkoff (the owner and inventor of Handlebar Jacks) about the best way to tip a heavy ebike upside down without hurting yourself. He is very responsive.
he sent this YouTube.
I tried it and works. The concern could be with Vado having a fender, one could be concerned about the rear fender and light damage. As soon as the pressure is increased on the fender the bike carrier kicks in, interferes, and bears the weight of the bike without too much pressure on fender and light.
I carry an additional patch kit too but do no trust that there is only one puncture point when it happens. So I'd rather change to a new tube and check the old tube at home under water afterwards. Taking the wheel and complete tire off you can check the inner side of the tire for sticking glas etc more easily. The time saved without taking the wheel off you're loosing waiting for the patch to dry.Good for you @TS25
I had a patch kit which I used to fix the flat (didn’t use my spare inter tube). This way I didn't have to take the tire out.
The Triggers still look OK specially the rear tire with lots of threads left on them. I have kept them to give to anyone who needs it.