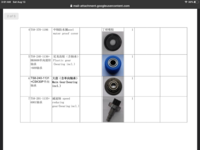
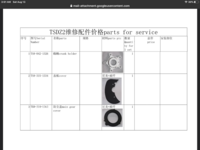
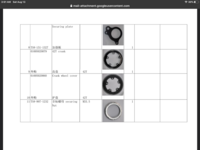
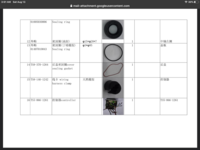
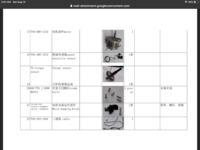
Spare parts list for TSDZ2

jplanaux

Member
Region
USA
I am completing my first year of eBike ownership. Me and my wife have two (2) bikes each for a total of four (4) converted TSDZ2 bicycles. We have two homes - so each home has two bikes. We ride almost everyday - so I really don't want to wait around for parts. We don't ride them hard. We cruise and do not use a lot of assist. I am hoping that things may not wear out too quickly. I want to maybe buy a complete motor to have on hand to make a quick swap in case of failure. Then I can leisurely repair the broken motor.

Should I order a complete motor replacement? Or should I order a list of spare parts to keep on hand? Is there a list of recommended spare parts?

Thanks for any input.
 
Honestly, I wouldn't bother with any spare parts for lightly used TSDZ2 because in my experience they don't seem to have any particular weakness. I have two of them, a 48v 750w and a 36v 500w version. They both get ridden hard because I live on a mountain and they get a workout assisting me on every ride. The 36v I've had apart twice, once to make it coaster brake compatible (which involves changing the main gear on the right side of the casing and the reduction gear which is removed from the left side of the casing - after removing the motor and the blue plastic gear to access the reduction gear) and once to return it back to the stock non-coaster brake version. I'm not sure how many miles I have on the 36v motor but probably close to 1,000 more or less. The blue plastic gear still looks like new and nothing else had any sign of wear. That said, I did buy a spare blue gear to have on hand a while ago for $8 including shipping (as well as the straight cut reduction gear and solid main gear for the coaster brake conversion). I haven't read that much fails on these motors, blue gear and the main gear's sprag clutch apparently uncommonly. Buying all of the internal parts including the motor, gears, axle with torque sensor, controller and bearings would probably be close in cost to just buying a complete new motor for $400 (depending on seller) plus you would get a new display, wiring, speed sensor, crank arms and motor casing by buying a complete new motor. As well as the convenience of just throwing the new motor on the bike and waiting for a convenient time to work on the problem one.

In my opinion these TSDZ2 are an amazing value compared to other ebike options. Perform as well as premium mid drives (Yamaha, at least) and so quick and easy to install or buy parts and service if ever needed, which seems unlikely.
 
An important item to have is a hardened M8, 1.25, 55mm, hex cap screw. Paint the hardened one so it does not rust. The shorter vertical stainless one that comes with the kit is prone to sheer inside the motor mount behind the bottom bracket. All of my new installs use these. The thicker the tubes, the longer the screw. Also practice 'Pedal Like A Pro.' There are videos on this. Spinning gives greater miles per charge and more power delivery assistance but also applies less stress to the internal components than lugging it. If you care to know who is recommending this, go to Google.com/maps. Zoom to the West Coast. Zoom in 35 miles North of the Golden Gate Bridge and enter '5-star bike conversion' into search. I am happy to be useful anytime.
 
I stopped using the stabilizer mounts a long time ago but when I did use it I had no problems with the hex screw. Post up if you've had any other TSDZ2 component failures, your much more extensive experience is appreciated.
 
I stopped using the stabilizer mounts a long time ago but when I did use it I had no problems with the hex screw. Post up if you've had any other TSDZ2 component failures, your much more extensive experience is appreciated.
Okay, here is one. If you really tighten down the side plate, those screws are on the top-side of the motor. It will tend to want to open the seam on the bottom of the motor enough to cause some capillary action (how trees get water to the top) which can by pass the O-ring. Use some thread lock on the seam with the bike upside down. Let it dry 24-hours. It will migrate into and along the seam. Then paint the seam with black nail polish. Getting water into the controller/motor area is not good. These motors have occasionally shipped without O-ring lube on that seal. Get the spacers right for that side plate. Today one took a standard spacer and a presta lockring to get it right. Lock tight goes on everything with threads. On the left side, use a chunk of one inch PVC pipe to extend the bottom bracket lockring tool for leverage.
 
A high mileage motor here needed a new plastic gear, large main gear w/clutch, and speed sensor. But this bike is ridden very hard and the fellow I gifted it to is pretty careless.


I understand there have been changes, this list is from my 2017 evaluation motor
 

Attachments

  • 55ECD41C-00EA-427C-8FE7-9D3C4F6ECDF5.png
    55ECD41C-00EA-427C-8FE7-9D3C4F6ECDF5.png
    476.5 KB · Views: 653
  • A7EB2B72-D3E1-4FC7-AEF9-904910E4C0F1.png
    A7EB2B72-D3E1-4FC7-AEF9-904910E4C0F1.png
    384.2 KB · Views: 624
  • BD8E8C23-F937-4D09-80E5-757965127E11.png
    BD8E8C23-F937-4D09-80E5-757965127E11.png
    355.2 KB · Views: 586
  • EAF9FCFE-209E-4223-B1CA-D64F97AE920D.png
    EAF9FCFE-209E-4223-B1CA-D64F97AE920D.png
    455.4 KB · Views: 589
  • 1FD9085D-6801-4E26-B822-E57542BB072B.png
    1FD9085D-6801-4E26-B822-E57542BB072B.png
    485.2 KB · Views: 653
Thanks for posting Tom.
Things you know but for clarification:
The sprag clutch (one way) bearing can be replaced in the large main gear, the main gear itself is heavy steel and should be indestructible. Though for someone without a press just buying the entire main gear with the clutch bearing already installed would be much easier.
The manual is nice to have as a parts diagram. It shows a special puller for the main gear - I didn't need it.
These motors are very user friendly, simple to work on and virtually every part is currently available on ebay, amazon or even walmart.com. To me that adds significant value compared to big name products like my bike with the Yamaha motor.
 
I need to replace a torque sensor. I modified a regular motor to fit a fat bike. It worked fine for a while but I must have damaged the TS when driving through the longer shaft. This is a huge job. Everything needs to be taken apart to get to the very deepest part.
 
Here is a video showing cracks in the torque sensor collar which appears to have caused a wire to be sheared. Maybe that happened to yours also when you drove the longer axle shaft through it? Replacement looks pretty straightforward.

 
Back