R1U Ltd problem's, verified solutions and aftermarket accessories that work ... Fast n' Furious

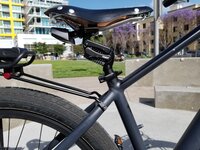
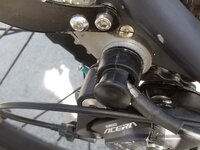
'Couple more photos of details.
Still no word from Grin on the controller.
Not sure on how much of a priority to you, but if I pull the lever and buy a Baserunner - nearly certain - I'll have to ferret out the wiring (see: 739). I can pass on the diagram and photos - after I know what works.
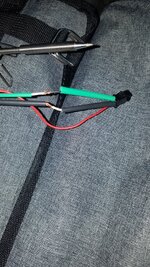
Installing the twist-throttle showed me "don't trust, just verify" and don't expect the colors don't match. The colors of the apparent shrink-fit are correct in that photo. The Black and the White wires were not. White became Green and Black became White.
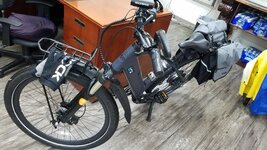
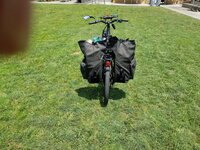
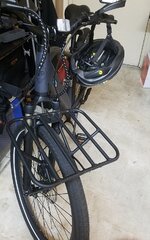
Mrs Dog is politely requesting a doggy-seat (406), is getting more aggressive, demanding to come along, every day (406).
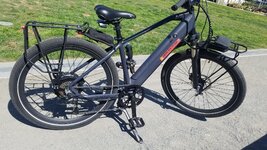
Not on that front Pizza Rack I had (See: 551). Bad Geometry, bike falls over (except w/ the URSUS stand). On the back should work though.
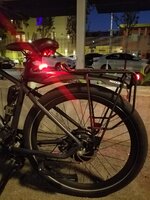
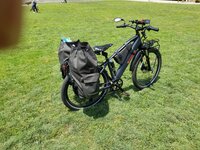
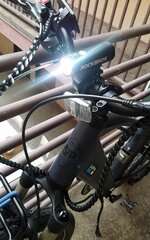
734. 'Rock'ing the daytime with the 20,000 Lumen, (11hrs @ 10k) headlamp (RockBros at AliExpress). Beware cars High-Beaming you.
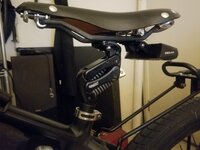
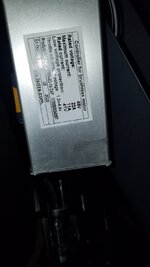
717. Here's your Controller. There's the full factory specs: 11Amps nominal (and more like, minus 20% = 8.8Amps) .
I guess R1U could offer an upgrade. Let's see; $180 - $220 to Grin; + deviation from assembly line costs (NO WAY Grin would license those Electronics to China); + North American installation; + testing AND +++ R1U could take on legal responsibility for unleashing the beast in that MXUS - well past Class 3 limits. Hmmmm, a bit more complicated than initially thought.
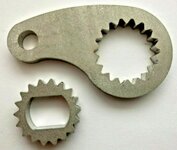
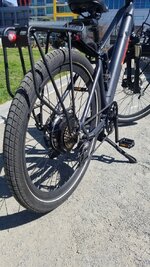
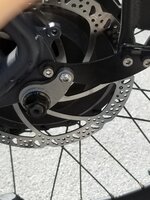
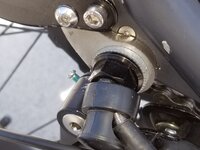
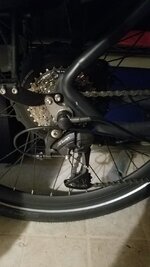
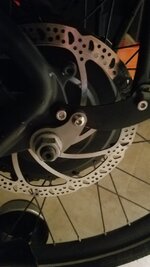
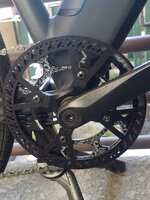
And then there's those aluminum dropouts. I suggest at the very least you dismantle and check what's going on down there.
Micrometer the flats on the steel axle. Are they really 14mm x 10mm ??? Any subtle damage ? No cracks? Great !!!
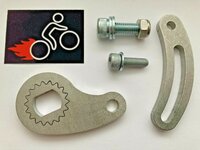
Install splined, 5mm torque arms (2 of them). Not Grin's 6mm type, which are too thick and you won't be able to fit washers.
When I make the small steel upper plates (I've described previously), I can supply a template for you and, if you don't have a rack, that piece will work perfectly for a bottom bracket as well. I may have a bunch laser cut if it's cheap enough. Pretty simple part that creates a monocoque frame box form.
I've contemplated using the other attachment on the lower frame. Too spindly and awkwardly situated on the linear plane. Too 'Rube Goldburg' for me. Spacers, half-size thick washers; the stress point 10mm from the fixed point = 10mm of "flex-arm" where I come from, means 10mm of leverage at the fixed insert point. That's the point of the sandwich concept. Force on a linear plane, unable to twist.
I'm also contemplating: Could that single 5mm plate be drilled to accurately match the hole on the dropout plate? Looks simple.
Sounds easy, but it'd have to have a lot of slop to set up. Those splines are laser cut. They have a zero-tolerance fit. Maybe the slop on that axle will then come in handy enough to effect a pre-loaded spot where the bolt would fit tightly?
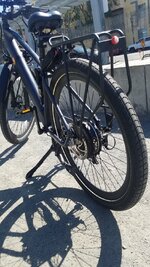
Then consider this: If you mount any rear rack (with a torque arm like this) you'll likely have no choice but to go the same sandwich plate route. For me it was better to get the proper rack, drill it (took 10 minutes) and bolt up. Now I'll create a small top plate to bulletproof the assembly.
Sandwiching two 3mm drilled plates, w/ 5mm of spacer/ washers should work just as well without a rack - and preserve the option of mounting a rack at another time.

Regards, and always cavalgue como o vento !!!

Fn'F
 

Attachments

  • 20210321_104201.jpg
    20210321_104201.jpg
    154.8 KB · Views: 357
  • 20210321_104218.jpg
    20210321_104218.jpg
    134.6 KB · Views: 351
  • 1ring.jpg
    1ring.jpg
    254.9 KB · Views: 378
  • 20210316_184739[1].jpg
    20210316_184739[1].jpg
    174.8 KB · Views: 348
  • 20210317_145602.jpg
    20210317_145602.jpg
    582.2 KB · Views: 365
  • 20210313_090406.jpg
    20210313_090406.jpg
    221.7 KB · Views: 348
  • 20201228_160551.jpg
    20201228_160551.jpg
    292.8 KB · Views: 374
  • 20210112_155734.jpg
    20210112_155734.jpg
    259.4 KB · Views: 387
  • 20210226_121128.jpg
    20210226_121128.jpg
    782 KB · Views: 390
  • 20201123_204331.jpg
    20201123_204331.jpg
    188.1 KB · Views: 371
  • 20210317_130718.jpg
    20210317_130718.jpg
    154.2 KB · Views: 381
That link is excellent!

Nice innovation but not all of us can fabricate and I think a designed part may be more effective with greater strength
Citrushills -- It's not an "Innovation". Torque arms were in avid use when I was building BMW rally cars in the 70's, I've seen them on 1940's dragsters and the principle predates the invention of flywheels, thousands of years ago.
You don't need a TA for most ebikes, so the meaning of "designed" for a Pedigo or Alibaba/ Amazon Bafang or no-name, front-hub conversion kit, for a 10 Speed (15mph) set-up - is as different, and relevant, as problems with a 105HP Ford Fairlane eating U-Joints and my Titanium solutions for my 800HP Lambo V12's problems shearing off axles banging second gear. This thread relates to the 100nm, MXUS powered, R1U Ltd machines, and while I agree in substance, I'm not sure what "designed part" means to you.
These parts are torque arms designed for ebikes from Ian of uk_cycle_spares in Great Britain. Do you mean "Designed by R1U", or the pretty colors from China - with vague, often glaringly contradictory specs, materials and tolerances in their advertising; 'it said it worked' and was on ebay; a fabulous photo layout ?
These are not "purpose made" for our specific product, nor are any that exist.
You do bring up salient universal issues - for R1U Ltds and others: One size does not fit all. We don't want contraptions, or have machine shop.
"Purpose Built" parts are largely superior, and yes, "a designed part may be more effective with greater strength", if you think about it, mass produced "designed" parts are also, always the weak links that keep failing. And that's what we are correcting, a weak link.
This undertaking is actually the best "purpose built" - short of actually prefabbing ballistic steel dropouts - that I could locate.
Many people are timid to (undertake mechanical ventures) "fabricate". Assuming you don't suffer that issue do you own a drill ?
If not, $20 - $30 and $10 for bits. Use it once, it paid for itself. Buy one on Craigs or Offer up, with bits for $20 total.
The high quality rack supplying the bracket mounting point was under $40 total.
If you have an Ltd, you know already you need a rack. R1U stopped selling them and the (none as good as this one) aftermarkets are usually over $75. A total Win Win situation.
So, assuming you're 'from the same (Bike Type owner) planet' on this topic, if I there was a 'You 'fabricate' by drilling two holes and bolting on in an afternoon', ' TA on the market', 100% custom solution 'designed' specific for our bikes would you buy it?
-
$80 for the arms. $40 for the 4 brackets, or $20 for two if you have the rack - but no "pretty colors" on these laser cut parts. Actually they're butt ugly, rough, grey Stainless Steel.
$100 - $120 plus your afternoon. $140 - $160 if you go buy a drill from home depot.
That's the real decisions. Can I afford a drill and what do I want/ need? Pretty colors, low price and BS or a bulletproof machine?
-
The parts are "designed". How we attach them is our job.
Already three in line, if I can find a few more R1U owners (Ltd's and Core 500's only) that're aboard, I'll have a sheet of these brackets (takes two per side without a rack) laser cut from 3mm Steel plate and distribute them at cost. If it's more than $10 each, I'll look elsewhere.
Best ... and stay tay tuned.

Fn'F
 

Attachments

  • Torque arm 2.jpg
    Torque arm 2.jpg
    139.1 KB · Views: 314
Citrushills -- It's not an "Innovation". Torque arms were in avid use when I was building BMW rally cars in the 70's, I've seen them on 1940's dragsters and the principle predates the invention of flywheels, thousands of years ago.
You don't need a TA for most ebikes, so the meaning of "designed" for a Pedigo or Alibaba/ Amazon Bafang or no-name, front-hub conversion kit, for a 10 Speed (15mph) set-up - is as different, and relevant, as problems with a 105HP Ford Fairlane eating U-Joints and my Titanium solutions for my 800HP Lambo V12's problems shearing off axles banging second gear. This thread relates to the 100nm, MXUS powered, R1U Ltd machines, and while I agree in substance, I'm not sure what "designed part" means to you.
These parts are torque arms designed for ebikes from Ian of uk_cycle_spares in Great Britain. Do you mean "Designed by R1U", or the pretty colors from China - with vague, often glaringly contradictory specs, materials and tolerances in their advertising; 'it said it worked' and was on ebay; a fabulous photo layout ?
These are not "purpose made" for our specific product, nor are any that exist.
You do bring up salient universal issues - for R1U Ltds and others: One size does not fit all. We don't want contraptions, or have machine shop.
"Purpose Built" parts are largely superior, and yes, "a designed part may be more effective with greater strength", if you think about it, mass produced "designed" parts are also, always the weak links that keep failing. And that's what we are correcting, a weak link.
This undertaking is actually the best "purpose built" - short of actually prefabbing ballistic steel dropouts - that I could locate.
Many people are timid to (undertake mechanical ventures) "fabricate". Assuming you don't suffer that issue do you own a drill ?
If not, $20 - $30 and $10 for bits. Use it once, it paid for itself. Buy one on Craigs or Offer up, with bits for $20 total.
The high quality rack supplying the bracket mounting point was under $40 total.
If you have an Ltd, you know already you need a rack. R1U stopped selling them and the (none as good as this one) aftermarkets are usually over $75. A total Win Win situation.
So, assuming you're 'from the same (Bike Type owner) planet' on this topic, if I there was a 'You 'fabricate' by drilling two holes and bolting on in an afternoon', ' TA on the market', 100% custom solution 'designed' specific for our bikes would you buy it?
-
$80 for the arms. $40 for the 4 brackets, or $20 for two if you have the rack - but no "pretty colors" on these laser cut parts. Actually they're butt ugly, rough, grey Stainless Steel.
$100 - $120 plus your afternoon. $140 - $160 if you go buy a drill from home depot.
That's the real decisions. Can I afford a drill and what do I want/ need? Pretty colors, low price and BS or a bulletproof machine?
-
The parts are "designed". How we attach them is our job.
Already three in line, if I can find a few more R1U owners (Ltd's and Core 500's only) that're aboard, I'll have a sheet of these brackets (takes two per side without a rack) laser cut from 3mm Steel plate and distribute them at cost. If it's more than $10 each, I'll look elsewhere.
Best ... and stay tay tuned.

Fn'F
Fn’F,
If you are going to create these torque arms, count me in as well.
Thanks,
Michael
 
Fn’F,
If you are going to create these torque arms, count me in as well.
Thanks,
Michael
Michael,
Certainly. I highly recommend that Axiom Streamliner Disc DLX Bicycle Rack Pannier Carrier 27 - 29” 700C. www.ebay.com/itm/284032147103
Currently $24.99 ($38.00 after shipping costs). As we speak, I'm ordering a second for the Core 500 build. Be sure the tubular attachment arms are included (ask the seller beforehand) and (mine were red) billet blocks.
I purchased from freewheel_bikes_madison on ebay -- $42.86 + tax https://www.ebay.com/itm/Axiom-Stre...e=STRK:MEBIDX:IT&_trksid=p2057872.m2749.l2648
and they came with both type arms (Tubular rods and flat the stainless plates with slots).
Since the four brackets will no doubt cost $10ish each, using the rack's brackets eliminates the need for two off the brackets means the Rack will cost you -$20.00.
I'm going to ask Ian if he can supply just the splined arms and 10 x 14 splined inserts - at a bit less cost. Now roughly $45 per side, perhaps I can get a deal on several sets. So, $46.50 (w/ tax & shipping) for the rack, tentatively ($10.00ea), $20.00 for two outer plates and between $60.00 and $90.00 for the two arms = total outlay of $126.00 -- $156.00. I probably have spare hardware I'll enclose when I send the custom plates.
I have a black ballistic nylon bag (See 128) for bungee cords, attached to the tubular arms. That bolt sticking up (since removed) is to attach a milk crate for shopping - lol. My panniers now do that duty and the crate I purchased is for additional loads.
In Photo 956, I have the plastic rear fender in place - it had rained and it works great. I cut squares out of the plastic and fit the blocks therein, but installation/ removal that takes 5 --10 minutes. I want snap on, snap off ease - so I'm working out a quick release/ attach mechanism.
Also, I see Grin answered my queries. Haven't opened the email yet. I'll update what I find out on that controller.
Still not sure people will want to spend that kind of cash ($220) when a Chinese, 35A controller (really half that for nominal rating) is only $35 - $40.00 on ebay. No doubt, the difference in the quality of the electronic components is huge. Grin does not skimp on quality. Cheap capacitors fail. Quality lasts but costs 5 - 10 times as much.
If someone would send me a bad R1U controller I could disassemble and see what is going bad. I've got 20 bucks says it's the capacitors - anyone can tell in a flash. Capacitors have score marks on the slightly convex tops, expanded inward. When they go bad expanded outward, swollen. I know because I replaced so many, many on Dell Optiplex motherboards. FoxCon (China) made those boards and nearly put Dell out of business. I de-soldered and installed Japanese capacitors. Never had one go bad again. It came out that FocCon was using capacitors that maybe one out of a hundred had traces of Oxygen contamination inside and over time they began to fail. Within a year 50% of those Dell mobos were failing. All because FoxCon tried to save $0.05 each on 6 capacitors.

Regards,

Fn'F
 

Attachments

  • 20210226_121155.jpg
    20210226_121155.jpg
    387.5 KB · Views: 344
  • 20210226_121205.jpg
    20210226_121205.jpg
    460.1 KB · Views: 347
  • 20210226_121128.jpg
    20210226_121128.jpg
    782 KB · Views: 364
  • 20210217_180956.jpg
    20210217_180956.jpg
    283.6 KB · Views: 353
So I don't plan to push limits on my LMT'd but this is a matter of safety. The Grin torque solution seems an acceptable compromise if it fits and sometimes stainless hose clamps are effective. I will never soup up an e-bike or push limits like Fn'F because I don't have the skills or knowledge to do so, but it must be fun!
That touching story begs the question: Why did you buy the absolute most powerful e-bike R1U makes (Asking for a confused friend) ?
Don't you feel intimidated? He say's "you like the power on tap (and you're a potential 'closet hot-rodder')".
"Skills or knowledge" ? You'll catch me quick if you try. My wisdom's analog, outdated tech. I have a ton to un-learn.
Wise choice in machine. Very upgradable, but at the mercy of techs if you don't understand, just like a car -- except these are simple devices -- it's your pocketbook ... and while I'd rather buy super cool parts than pay a tech to do my light work, I get it.

Hey, no wanna 'ride like the wind', 'ride like a zephyr' !

Best always,

Fn'F
 

Attachments

  • 20210325_165615.jpg
    20210325_165615.jpg
    475.8 KB · Views: 320
Michael,
Certainly. I highly recommend that Axiom Streamliner Disc DLX Bicycle Rack Pannier Carrier 27 - 29” 700C. www.ebay.com/itm/284032147103
Currently $24.99 ($38.00 after shipping costs). As we speak, I'm ordering a second for the Core 500 build. Be sure the tubular attachment arms are included (ask the seller beforehand) and (mine were red) billet blocks.
I purchased from freewheel_bikes_madison on ebay -- $42.86 + tax https://www.ebay.com/itm/Axiom-Streamliner-Disc-DLX-Bicycle-Rack-Pannier-Carrier-29-700c-27-USA-Charity/254650984301?ssPageName=STRK:MEBIDX:IT&_trksid=p2057872.m2749.l2648
and they came with both type arms (Tubular rods and flat the stainless plates with slots).
Since the four brackets will no doubt cost $10ish each, using the rack's brackets eliminates the need for two off the brackets means the Rack will cost you -$20.00.
I'm going to ask Ian if he can supply just the splined arms and 10 x 14 splined inserts - at a bit less cost. Now roughly $45 per side, perhaps I can get a deal on several sets. So, $46.50 (w/ tax & shipping) for the rack, tentatively ($10.00ea), $20.00 for two outer plates and between $60.00 and $90.00 for the two arms = total outlay of $126.00 -- $156.00. I probably have spare hardware I'll enclose when I send the custom plates.
I have a black ballistic nylon bag (See 128) for bungee cords, attached to the tubular arms. That bolt sticking up (since removed) is to attach a milk crate for shopping - lol. My panniers now do that duty and the crate I purchased is for additional loads.
In Photo 956, I have the plastic rear fender in place - it had rained and it works great. I cut squares out of the plastic and fit the blocks therein, but installation/ removal that takes 5 --10 minutes. I want snap on, snap off ease - so I'm working out a quick release/ attach mechanism.
Also, I see Grin answered my queries. Haven't opened the email yet. I'll update what I find out on that controller.
Still not sure people will want to spend that kind of cash ($220) when a Chinese, 35A controller (really half that for nominal rating) is only $35 - $40.00 on ebay. No doubt, the difference in the quality of the electronic components is huge. Grin does not skimp on quality. Cheap capacitors fail. Quality lasts but costs 5 - 10 times as much.
If someone would send me a bad R1U controller I could disassemble and see what is going bad. I've got 20 bucks says it's the capacitors - anyone can tell in a flash. Capacitors have score marks on the slightly convex tops, expanded inward. When they go bad expanded outward, swollen. I know because I replaced so many, many on Dell Optiplex motherboards. FoxCon (China) made those boards and nearly put Dell out of business. I de-soldered and installed Japanese capacitors. Never had one go bad again. It came out that FocCon was using capacitors that maybe one out of a hundred had traces of Oxygen contamination inside and over time they began to fail. Within a year 50% of those Dell mobos were failing. All because FoxCon tried to save $0.05 each on 6 capacitors.

Regards,

Fn'F
Fn’F,
If you are going to create these torque arms, count me in as well.
Thanks,
Michael
The arms listed in the post and pictured work perfectly in conjunction with the rack.
Align the splined torque arm to full "loaded" position and drill only one hole in rack's brace to mount - with included hardware.
Attaching hardware is included and you don't need the other 'arm' parts. I have no apparent flex. Pretty bulletproof.
I can send a tracing of the rack brace arm part that will work perfectly with a decent piece of 1/16th plate steel?

LMK if I can help
 
FnF,
Any updates on your experimenting with torque plates, motors and controllers?
I'm looking at these:
https://www.aliexpress.com/item/400...earchweb0_0,searchweb201602_,searchweb201603_

17 x 35amps, but seems to be too long at 190mm.
The 12 x 25amp looks about 140mm
Ideally seeking a 'real' 16 x 32amps (768watts x 1536watts) controller - with the upper current limit set via the display to 22 - 23amps (1056 - 1140watts). But, minus 10% for typical overrating, the 12 x 25 is still not enough current (690watts nominal) for a 750watt nominal motor.
The torque arms work great. Two pieces of 2mm thick, 20 x 30mm steel plate suffice for the attachment to the frame. Use a file to shape. A vice is a big plus here. That massive 5mm thick arm has the meat required to hold the axle, but leaves little room for the Nordlocks.
Drill one hole (each) centered (5mm from end on 10mm center) on one end and bolt to the frame.
Locate the best position for the spined axle part where you can adjust the torque arm's matching spines to the correct position, pre-loaded to the end of any possible travel.
Now tighten everything down a bit and use the holes in the torque arms as your guide to drill the plates.
Bolt plates to the arm with hardware that comes with the TA kit, and torque down (I used 60lbs).
I strongly suggest Nordlock washers. Quite likely they could suffice without a torque arm - but with damage to my dropdowns I can't risk it.
The destined failure of the stock "pressure washer" and locks, I've shown in photo evidence elsewhere.
A last item. The stock automotive style Lug Nuts. Did you see my comments on them?
I'm waiting on two sizes M12 1.5mm and M12 1.25 Titanium Flange Shoulder Hex Nuts Grade 5 Ti 6Al-4V. I see conflicting info on these axles, size, but it looks 1.25mm pitch, not coarse 1.50mm. Will update
The stock Lug Nut's deep 'blades' (commonly used with cheap steel automotive wheels and never with washers) make maybe 10% contact.
The flat faced contact surface, Ti types should mesh beautifully with the Nordlocks, fine side out. I'm considering milling 2mm off the lug face, so I can use a 2-piece Nordlock to lock the Lug to the frame - or to the rack's mounting plate's face, if you're going that route.
Object is to stop that nut from moving, so using half an NL, fine side to soft aluminum dropouts and coarse to the steel, will (while providing reduced face contact) still eliminate flex, while using both NL parts between the lug and the torque arm keeps it from moving.
I'm contemplating the Black colored Ti M12 1.25's. $8 each, but gotta wait for that 'slow boat'. Oh, but why not then? The stock are so ugly they require plastic covers. lol
I've also contemplated bolting straight to the hole in the dropout triangle, but compared to the (current) "V" shape attaching to a plate, when directly bolting down 1.5" away, (IMHO) the loss of leverage would require the hole to be drilled out and heavier hardware used.

Hope this helps !

Fn'F
 
I'm nuts. I admit it. I built and drove rally cars. Now I quit driving cars and it's e-bikes. Nuts.
As a Ltd owner with an engineering background and a compulsive disorder that drives me to ever improve, my mistakes are a less brave souls profit.
Push the machine; find the flaws and if it breaks find the solutions.
I spun my hub. Now what?
Happened to you (yet)? My brain is screaming :Better listen up and take proper steps because it does happen.
Unlike front wheel drive, the Ltd's rear drive is a blessing if - literally - the wheels come off. Regardless, it could get you killed.
My R1U Ltd bike came with the rear wheel/ frame assembled. I neglected to take the entire assembly apart and check for loose, improperly torqued parts - underneath the ones that I did test and were on nice and tight. 68 miles and suddenly - cruising at 20mph - I feel a major drag. Pull over. Inspect. Gee, the wheel is rubbing against the left frame?
Roll/Carry bike home, research, disassemble and result is apparent: Spun Hub.
I've since re-assembled and torqued everything proper, no problems for 30 miles, but are you willing to risk this happening to you? Should I feel safe to go 10 miles away, or should I install a high quality Torque Arm from Grin?
Anyone else been here?
I had plans to upgrade this bike, this is a big setback.

Thanks F n' F

What does R1U's new ad:

"LMT’D

https://electricbikereview.com/forums/\"https:\/\/ride1up.com\/return-and-pre-order-policy\/\"

FRAME TYPESTXR
COLOR
Midnight Gray
Midnight Gray
Sand/Brown
Sand/Brown

This generation now features a cadence sensor."
Mean ?
A problem with the PAS "torque" sensors?
I know mine has a mind of it's own, and it's eccentrics' vary from 'nothing' to 'touch me, full power mode'.
My plan has been - when I have time - take the battery plate/ comp apart and check all the wiring. I did replace the throttle and a week later display started reading at 10% (1.2 for 12mph, when it worked at all), and the Odo quit entirely. Something could have come loosened.
Bike is quite powerful. Twist Throttle is massive improvement - once accustomed to it. R1U advised me to try a twist type and I love it. Between the throttle and the torque sensor, it balances nicely at higher speeds - can't tell what 'speeds' they are, but leaving the busses well behind.
The Throttle never cuts out. The sensor does.

-
Any one know - esp those who high-fived R1U for switching to the torque type?
Is there some reason, Ltd owners should be aware of with the Torque type PAS sensor and switch to Cadence type?
I hear some bikes run both. Is that an option?
Any clarification from R1U?

Thanks

Fn'F
That link is excellent!

Nice innovation but not all of us can fabricate and I think a designed part may be more effective with greater strength.
It is a "designed part". See photo. Specifically for powerful e-bikes.
The cheaper, thin (3mm), suspect metal, PRC copycat types of the real, 5mm Stainless, laser cut's are also quite "designed", but "more effective with greater strength", I have doubts.
Two 1" by 2" pieces of 3mm plate steel with two holes drilled (try 'online metals'), edges rounded and one side filed to fit bolted in the triangle, isn't very difficult. It's all about determination, not the vice, hacksaw, couple files and a drill and burning 250 calories.
If you spin your hub, you risk the wires being torn loose from the motor and several hundred dollars in damage to your dropouts.
The tools cost me less than $100 and fit in a box in my apartment's closet.
You can use the arm bracket that comes with the (see photo) kit, but the monolith structure created by the two 3mm steel brackets is, similar to a cube, much stronger than a single piece of 5mm steel. For one side to compress the other must buckle and each plane enlists the strength of the entire monolith, so it would have to collapse in different directions contrary to their geometry, but a single piece can simply bend with no geometric counterforces to offset it. A cube has 6 sides. I'm using 6 x 3mm = 18mm vs 5mm, and the thickness multiple is enhanced by the distance between the (virtual) block's surfaces.
For instance, all other things being equal, the breaking strength of a 6' long, 1" x 4" stick is not near as strong as a 6' long 1/2" thick walled hollow 4 x 4 cube. It's a big reason they don't machine car frames out of thicker, solid steel. A monocoque structure exploits geometry and is far stronger with less material. Such structures have voids and virtual "walls" that act like solid parts.
The bigger fear is the bolts shearing. The fasteners are the weakest link. Don't like that? You can use supertanium bolts.
I once had a ring gear on a rally car that (due to the horsepower upgrades) kept breaking loose from the carrier. All 12 bolts would shear.
Three times it spun. A consequence of taking a 2liter, 110HP, 4 banger to 2200cc's and +250HP = rear end can't handle it.
Third time cost me a win. Furious, on the advise of a retired Stockcar mechanic I installed supertanium bolts -- end of story.
Car was further enhanced with a hotter cam, bigger TI valves and flowed head. Still nary a problem.
The problem was common among my set of rally drivers, so I spread the news and no more spun ring gears. Now the power simply stripped the teeth clean off. lol
Tensile Strength: Grade 9, 180,000 PSI. https://www.lawsonproducts.com/Supertanium/Hex-Cap-Screw-Grade-9/P55488.lp
You can also use ARP bolts.

Hope this clarifies !

Fn'F
 

Attachments

  • Torque arm.jpg
    Torque arm.jpg
    248.9 KB · Views: 277
Bike is still running perfectly - but for the eratic display showing 1/10 the speed.
Torque sensing is superb. Twist throttle is a breeze and a joy to mix in with the TS and pedaling.
Toted some groceries home yesterday - +60lbs.
The Selle Anatomica X2 saddle and KINEKT work perfectly - now that I installed the right springs, an adjuster bolt and changed out the Selle's stainless rails for carbon fiber -- and I installed a titanium clamp - as seen in the before and after saddle photos.
The Carbon really does add additional spring I didn't expect. An expensive journey, but a perfect outcome. The ride is awesome comfortable.
A wonderful City cruising/ commuter machine. The parts added really let it strut it's stuff.
I didn't show the quick detach, front basket I use for beer runs. Holds a 12 pack, two bottles of vino and some snacks.
The panniers are Rock Bros 24liter, quick detach bags. When fully open - like I have them, the capacity is 60 - 70% more.
Normally they would be filled up, level to the outer bag. That's 24liters.
I've decided to keep the Ltd a while while I work out the bugs on the Ti, Ultra powered bike I'm building.
The bugs worked out and bulletproofed, this R1U Ltd is really reliable as my daily driver. I'm sure I will be breaking stuff w/ the Ultra's huge, 160mn - +200nm, so just like when I built 'streetable' rally cars, I need a daily driver and only sell it after Christmas, when I've build No. 3 for my GF. Need be, she'll let me use hers. lol
If I had it to do over, would I buy this machine again? Absolutely!
Thank you Ride1Up !!!
It was great as my first bike, is holding up good, plenty quick and parts - for the most part - are easily obtained.
I have my rear fender removed right now - incorporating some Blumenthal's I picked up. Stuff does fit. It may take some minor engineering, but it fits perfectly.

Make a man a fire, you'll keep him warm for the night.
Set him on fire, he'll stay hot the rest of his life.

Maybe even Fast an Furious?

FnF
 

Attachments

  • 20210722_135946.jpg
    20210722_135946.jpg
    1.2 MB · Views: 303
  • 20210521_163209.jpg
    20210521_163209.jpg
    461.3 KB · Views: 286
  • 20210724_145754.jpg
    20210724_145754.jpg
    289.5 KB · Views: 302
  • 20210722_135955.jpg
    20210722_135955.jpg
    1.1 MB · Views: 307
Last edited:
So I don't plan to push limits on my LMT'd but this is a matter of safety. The Grin torque solution seems an acceptable compromise if it fits and sometimes stainless hose clamps are effective. I will never soup up an e-bike or push limits like Fn'F because I don't have the skills or knowledge to do so, but it must be fun!
When you say you don't plan to push limits on your Ltd, understand the major force on that dropout is when you take off, not when cruising along or going fast - but I was just cruising along, maybe 15mph when the hub spun? I can't call it.
I do stand accused of failing to torque the rear down when I assembled - insultingly doubtful, but still ever on my mind.
-
Yes, it is a safety issue. Maybe one in a million, I don't know. I like power and people steered me right, here and elsewhere.
With my 'gear-head' background it was easy for me to understand when people steered me right, here and elsewhere.
Happy to say the fix is still holding strong.
On trusting stainless hose-clamps: I've stripped out many.
Understand, Grin created torque arms for bicycles adapted to hub motors. Such machines are contraptions from the outset, used in a way never intended, or tested for by the frame's manufacturer ... just like those hose-clamps are being used - In an unintended manner.
Grin has a problem 'creating great products laden with inappropriate parts' that ruin the package - and I love Grin, a giant among midgets, so don't get me wrong, but things like that 1990's, B&W displayed Cycle Analyst - I'm doomed to when using their products?
-
The final touch on my torque arms are black, Titanium lug-nuts with a 'fine splined' face. Disassembly/ inspection showed they melded perfectly with the Nord-lock's. Included some photos.
-
My advice: all Ltd owners should remove the stock lug-nuts/ washers, replacing with Nord Lock washers and suitable 'fine splined' lug-nuts with a flat face.
I've published the data on correct sizes. "Suitable" means 'of softer, but competent material'. I Chose Titanium.
-
My observations: The Ltd's stock lug-nuts are automobile type. They have huge toothed splines (that reduce contact area by 80%) which are meant to dig into Steel wheels on a 3000lb car. Such 'splined' Steel lugs don't use washers and are not suitable for them.
On the other side, flat Steel washers Against aluminum drop outs creates 'spin risk' from the git-go
.
Absorbing all that force: the Steel works to get loose from the aluminum. There is a smooth contact at that point.
There's a 20% contact between the (coarse toothed) lug-nut and the (flat) steel washer. So, the slightest wear (on the hard Steel to soft Aluminum contact end) and the weak Steel to Steel lug-nut contact spins.
It's all about surface area.
Skip details version: Black Titanium looks way cooler and complements the machine's theme.
 

Attachments

  • 20210521_163131.jpg
    20210521_163131.jpg
    247.3 KB · Views: 267
  • 20210521_163047.jpg
    20210521_163047.jpg
    363.8 KB · Views: 273
  • 20210521_163039.jpg
    20210521_163039.jpg
    346.6 KB · Views: 271
Hey, I just got a new LMT'D - the new series with the cadence sensor - and it came with a torque plate pre-mounted (see pictures). Seems like Ride1Up is listening and developing ....
View attachment 98570View attachment 98571
Very nice, and on both sides. Always felt that hole looked made for TA.
An upgrade option for the plates would be nice. Perhaps R1U will offer one to Ltd owners?
The Ltd is a nice machine at a great price. I've never regretted my buy. Nearing 3200 mile service interval. Daily driver.

20210829_155620.jpg
 
Last edited:
That link is excellent!

Nice innovation but not all of us can fabricate and I think a designed part may be more effective with greater strength.
Well, now R1U has "a designed part" 'torque plate' and it's not "more effective with greater strength", but it does the job.
My solution is quite overbuilt and they were good enough to send me a set, with the caveat this may not work with the damage I suffered.
I've filed my dropouts as new - wasn't hard since the spin was the results of axle working loose, dropping lower than fully seated, then lacking the support on the axle flats.
I really have to mention R1U has exceeded all my expectations and I'd buy the same machine again.
From the machine itself to the service, I'm totally impressed.

Fn'F
 
Update: Recently switched to the R1U stock torque plates and they seem to work fine.
I like the Torque Sensor, so it's good news they have gone back.
The new Judy Gold fork is super plush and my rewiring complete.
Next upgrade brake/ twist throttle with a cut-out.
 
The fix is in
... but hose-clamps. Come on guys, really? REALLY ??? I had to skip Grin for now.

It's from our Bros' across the pond and they ain't cheap.
Note that laser cut splined key-way and look where it attaches. I'd found the right one, but the price - More than a Benjamin for two and one won't work. In the end, I queried the seller and yes, he provided combined shipping plus 10% off if I bought two, so I did.
Expect a full report in Feb on a bulletproof installation (and no damn hose-clamps).
You may ask why I want such robust hub spinning prevention. After I test the limits of the MXUS motor (30amp controller is next), I intend to upgrade to an MAC 8T w/ phaserunner. I might sheer the whole triangle off, but I'm not spinning that hub, again. And if the triangle goes south, I'll install a stainless triangle and dropouts - which ain't so bad, considering I'm also going to belt drive and have been working on what frame splitter to use anyhow.
F n' F
Hello, I see hammer-bikes.com offer these for 11.99£ out of UK. I assume they could ship, Did you get the 14mmx10mmx3mm option?
TY
 
I'd say the new, stock work better than any aftermarket solution I used. Much harder steel.
Ride1Up fixed it, w/ tool steel.
I believe they were 14 x 10, but PRC made Axles are always ground cock-eyed.
The imports showed a lot of damage when removed. More play than acceptable. Too soft.
If you ride hard like I do, the stock may get beat up too. I see that I'll post it, but +700miles, changing cassette and they look like new.
I'm not harsh or brutal, but demanding.
R1U should add the torque arms to their accessory section and aftermarket them.
No mods, just bolt on.
I still recommend using Nord-Locker washers tho.

Fn'F
Thank you very much. First time ebiker and your posts on the R1U LTD have been incredibly helpful. Just ordered 2 today. Question - Who makes your front rack? Have an iPhone mount recommendation? Thx again.
 
I've installed and removed 3 different front racks. They lacked utility and made the bike tippy, so when I went to a lighter fork (RockShox Judy Gold), I dumped the rack too and lost nearly 4lbs total.
My installation was 'unusual'. I drilled a hole through the fork crown (between the cast matrix) and filed the rack's fitting to a slant, for a snug fit, then bolted through with a compression nut on the backside. Worked great.
I've little experience with mounting my phone (only my GoPro) but see that blue cap? And there are handlebar clamp types that look pretty sturdy. The Jones Bars go good with about anything. You have options.
The first thing you need is real estate on your bars. The Jones H-Bar SG Loop provided that and better geometry, but I still found the cockpit cramped, even with my saddle as far back and as high as possible.
I added an 80mm bar stem, centering the the grips position on the axis of the fork tube by replacing the stock 45mm clamp. It depends on how you ride, more upright or less so; your height and the length of your legs.
20221008_141350[1].jpg
20220929_214750[1].jpg

The second must have I discovered is a Cirrus Cycles Kinekt Seat-Post - that (once you set it up) provides serious ride comfort improvements.
Not cheap, it's what I call an heirloom part and worth every cent. Great Sales and Service. You will need the 'adjuster' and possibly a set of springs to put you, or your wife in the correct weight slot.
There are topics here dedicated to them. Very suggested reading.
An easy, inexpensive upgrade is to install the red Tektro P20-11 pads. The difference will astound you and if you're doing some of your own maintenance, here's where you learn how to gap the pads.
A nice alloy rear rack and panniers are great.
A nice saddle, a Brooks, not another Selle Anatomica. Only the best for my butt.
Sadly my journey may be over with the Lm'td. I have a new bike coming any day, so the prospect of sale for lack of room looms large.
 
I've installed and removed 3 different front racks. They lacked utility and made the bike tippy, so when I went to a lighter fork (RockShox Judy Gold), I dumped the rack too and lost nearly 4lbs total.
My installation was 'unusual'. I drilled a hole through the fork crown (between the cast matrix) and filed the rack's fitting to a slant, for a snug fit, then bolted through with a compression nut on the backside. Worked great.
I've little experience with mounting my phone (only my GoPro) but see that blue cap? And there are handlebar clamp types that look pretty sturdy. The Jones Bars go good with about anything. You have options.
The first thing you need is real estate on your bars. The Jones H-Bar SG Loop provided that and better geometry, but I still found the cockpit cramped, even with my saddle as far back and as high as possible.
I added an 80mm bar stem, centering the the grips position on the axis of the fork tube by replacing the stock 45mm clamp. It depends on how you ride, more upright or less so; your height and the length of your legs.
View attachment 137387 View attachment 137398
The second must have I discovered is a Cirrus Cycles Kinekt Seat-Post - that (once you set it up) provides serious ride comfort improvements.
Not cheap, it's what I call an heirloom part and worth every cent. Great Sales and Service. You will need the 'adjuster' and possibly a set of springs to put you, or your wife in the correct weight slot.
There are topics here dedicated to them. Very suggested reading.
An easy, inexpensive upgrade is to install the red Tektro P20-11 pads. The difference will astound you and if you're doing some of your own maintenance, here's where you learn how to gap the pads.
A nice alloy rear rack and panniers are great.
A nice saddle, a Brooks, not another Selle Anatomica. Only the best for my butt.
Sadly my journey may be over with the Lm'td. I have a new bike coming any day, so the prospect of sale for lack of room looms large.
Dumping your LMTD? What did you order for its' replacement? inquiring minds want to know. After all the improvements you made to it, the new one must be Good.
My LMTD is still in limbo; after replacing the controller and the motor cable, it turns out I needed a new motor stator, ETA next week sometime. I'm becoming an experienced ebike mechanic.
Yes. Apartment living has drawbacks and my next beast is crouched and growling in the corner. Waiting a year for the titanium frame I built the Lm'td - test-bedding the throttle; electronic, wireless shifting; Magura brakes and rotors; saddle; fasteners; suspension; bars; grips - you name it.
Have to find a good home for the Lm'td unleashed.
WattWagons Ti CrossTour Fattie.jpg

Here's my custom, WattWagon titanium CrossTour fattie.
The battery was damaged during shipping and a new one's on the way. I've changed some things, but there you see it until I get rolling and take some real pics.
-
That's awesome. You trouble-shot and replaced the controller and motor cable to the motor stator, so now you do it.
Hell yes, you're becoming 'an experienced ebike mechanic', a great trade-off, experience of real worth.
I sure know the feeling of down time.
We should both be up about next week.

Tally ho !!!

Fn'F
 
Back