R1U Ltd problem's, verified solutions and aftermarket accessories that work ... Fast n' Furious

Fast n' Furious

Well-Known Member
Region
USA
City
San Diego
I'm nuts. I admit it. I built and drove rally cars. Now I quit driving cars and it's e-bikes. Nuts.
As a Ltd owner with an engineering background and a compulsive disorder that drives me to ever improve, my mistakes are a less brave souls profit.
Push the machine; find the flaws and if it breaks find the solutions.
I spun my hub. Now what?
Happened to you (yet)? My brain is screaming :Better listen up and take proper steps because it does happen.
Unlike front wheel drive, the Ltd's rear drive is a blessing if - literally - the wheels come off. Regardless, it could get you killed.
My R1U Ltd bike came with the rear wheel/ frame assembled. I neglected to take the entire assembly apart and check for loose, improperly torqued parts - underneath the ones that I did test and were on nice and tight. 68 miles and suddenly - cruising at 20mph - I feel a major drag. Pull over. Inspect. Gee, the wheel is rubbing against the left frame?
Roll/Carry bike home, research, disassemble and result is apparent: Spun Hub.
I've since re-assembled and torqued everything proper, no problems for 30 miles, but are you willing to risk this happening to you? Should I feel safe to go 10 miles away, or should I install a high quality Torque Arm from Grin?
Anyone else been here?
I had plans to upgrade this bike, this is a big setback.

Thanks F n' F
 
Even with things assembled, the shipping process is a usually pretty rough on the boxes and the bikes themselves inside. That said, I personally went over my ebike with tools to make sure they were tightend properly, not just with your hands. People who have owned regular bikes and have maintained them don't consider that an ebike really needs to have a good saftey check before you are riding at 20-28mph speeds.

I would say make sure, with tools, all the nuts and bolts on the bike are properly tightened and you should be good. Otherwise we would hear moreso of problems like these on the forum...I dont think we have.
 
If you rounded off the straight edges in your frame dropouts, it's good peace of mind to be installing torque arms. You could fabricate a torque plate. This one only used one of the available mounting holes.

Nova-1.jpg
a hose
 
If you rounded off the straight edges in your frame dropouts, it's good peace of mind to be installing torque arms. You could fabricate a torque plate. This one only used one of the available mounting holes.

View attachment 77048 a hose
Thank you my Brother. Not very much damage. I stopped as soon as one side came out and tire began rubbing frame. It did it a second time, same side. Dropout is not elongated though, except last "1/4 on that side.
The dropouts are aluminum. Rather a flaw. Steel inserts would be appropriate if that XF19 motor makes 100nm.
Never-mind crying I tell myself. Yes a torque arm. I'm thinking Grin: TorqArm_V4 and hoped to elicit comments from someone who'd already installed. 6mm thick and the curvature appears to fit over the rear rack mounts, and I super like these people, so I don't mind the price 3 x the cheap 5mm knock offs.
I'd considered using that hole, but the frame is alloy, that spot is thin and rather spindly to face 100nm, on my Ltd. Also a hardened bolt could easily sheer off/ crack and break the frame - where I'm planning to go with a new controller this machine.
I have a week before I order - they are moving so no business for a week.
Thanks
F n' F
Update: Photos below. I've used the hole in the dropout frame, via the 3mm plate steel rack attachment, on both sides, with Nord-Loc washers.
I did a full write up elsewhere.
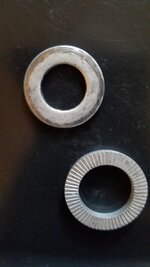
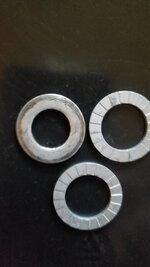
Sure glad I didn't listen to the "make it tighter" crowd. As you can see in the photo 163109, the stock washers (the other washer's a Nord-loc) are making contact with very little of their surface. Look at 050003. You can see where the contact was tearing off the aluminum - right through the crushed paint. That's NOT from being TOO LOOSE. Just the opposite.
The biggest problem is the hardened steel axle's flats are much smaller than claimed and there's a ton of slop. Even in the 14 x 10 cutouts on the torque arm where others have had so file because of the axle's tight fit, the MXUS axle can move easily 20 degrees back and forth.
Unfortunate. Solution? Preload to the furthest point the arm can turn, and the axle can turn in the cut-out, then bolt down.
Another point. I think using that Steel Automotive Lug-Nut is a big mistake. The mating face has large teeth that eliminate 80% of the contact surface. Okay, visualize: The teeth grip the flat washer (which the wear indicates has spun in the photo). So, slick aluminum abuts a hardened steel washer with the Lug-Nut's teeth imbedded in the other side of the washer. NOTHING IS LOCKED TO THE ALUMINUM - except perhaps crushing a soft metal against a very hard metal, both with slick surfaces, while the torque keeps banging away rearward and down.
So you make it tighter, but the tighter you get, you start crushing the soft aluminum (at about 60lbs in fact), creating more space, never able to keep a proper torque - and the powdering aluminum is also a lubricant. LOL
Since I've learned a bit more, I'd make these bikes with a steel dropout insert and a snug, 14 x 10 plate bolted over the axle.
The sloppy axles are the result of poorly ground flats - way past 10mm, more like 8.5mm. That machine work appears to be done by eye, the depth of the cut being widely varied and inconsistent rather than fixed in a jig and thus consistently cut the same exact depth.
From what I read, such defects in Chinese Motor axles are somewhat common - except for the MAC's (Grin's GMAC), which the Guru's say is the best consistent quality, and the only one that tells the truth about the specs.
Thank you for the insight and correct solution - to the actual cause, not merely the symptom.
-
Cavalgue como o vento !!!

F n' F
 

Attachments

  • Torque arm.jpg
    Torque arm.jpg
    248.9 KB · Views: 452
  • 20210205_150003.jpg
    20210205_150003.jpg
    197.9 KB · Views: 451
  • 20210321_104201.jpg
    20210321_104201.jpg
    154.8 KB · Views: 458
  • 20210321_104218.jpg
    20210321_104218.jpg
    134.6 KB · Views: 417
  • 20210206_163109.jpg
    20210206_163109.jpg
    152.3 KB · Views: 449
Last edited:
If you rounded off the straight edges in your frame dropouts, it's good peace of mind to be installing torque arms. You could fabricate a torque plate. This one only used one of the available mounting holes.

View attachment 77048 a hose
Isn't the direction of the cut-out where the wire comes out the hollow axel supposed to be pointing forward ? Was that motor for horizontal mounts ? It appears so.
 
I'm nuts. I admit it. I built and drove rally cars. Now I quit driving cars and it's e-bikes. Nuts.
As a Ltd owner with an engineering background and a compulsive disorder that drives me to ever improve, my mistakes are a less brave souls profit.
Push the machine; find the flaws and if it breaks find the solutions.
I spun my hub. Now what?
Happened to you (yet)? My brain is screaming :Better listen up and take proper steps because it does happen.
Unlike front wheel drive, the Ltd's rear drive is a blessing if - literally - the wheels come off. Regardless, it could get you killed.
My R1U Ltd bike came with the rear wheel/ frame assembled. I neglected to take the entire assembly apart and check for loose, improperly torqued parts - underneath the ones that I did test and were on nice and tight. 68 miles and suddenly - cruising at 20mph - I feel a major drag. Pull over. Inspect. Gee, the wheel is rubbing against the left frame?
Roll/Carry bike home, research, disassemble and result is apparent: Spun Hub.
I've since re-assembled and torqued everything proper, no problems for 30 miles, but are you willing to risk this happening to you? Should I feel safe to go 10 miles away, or should I install a high quality Torque Arm from Grin?
Anyone else been here?
I had plans to upgrade this bike, this is a big setback.

Thanks F n' F
The fix is in
... but hose-clamps. Come on guys, really? REALLY ??? I had to skip Grin for now.
I note there are two M5 threaded mounting points on the Ltd frame that a torque arm could be screwed into5.
While I had trepidations about M5 bolts holding 100nm of torque, it appears I was wrong.
Notably, the rear triangle area where the attachments are (for paniers I believe) provide a flush surface, without spacers needed.
Big hassle designing and making my arm from stainless. Much easier to start with a stock, already drilled w/ 10mm x 14mm hole and drill the other two holes. More research.
Okay, I found a type arm that epoxies to the frame for fastening. This provides roughly 19,000 lbs of shear strength per inch.
One (alloy steel) M5 has 17,300 lbs. shear strength. Using two M5 points - 34,600 lbs. - on each side should do it. 69,200 Lbs.
I can also drill hose M5 holes out, tap and mount M8 '- which will approx. triple the strength.
Honestly, we're talking overkill. Considering there's about 5000lbs max torque for every 100Nmm., do the math.
Resigned to the hassle of grinding, milling and drilling, I made one last effort to find something better.
I found this: https://www.ebay.com/itm/143911979426?ViewItem=&item=143911979426
It's from our Bros' across the pond and they ain't cheap.
Note that laser cut splined key-way and look where it attaches. I'd found the right one, but the price - More than a Benjamin for two and one won't work. In the end, I queried the seller and yes, he provided combined shipping plus 10% off if I bought two, so I did.
Expect a full report in Feb on a bulletproof installation (and no damn hose-clamps).
You may ask why I want such robust hub spinning prevention. After I test the limits of the MXUS motor (30amp controller is next), I intend to upgrade to an MAC 8T w/ phaserunner. I might sheer the whole triangle off, but I'm not spinning that hub, again. And if the triangle goes south, I'll install a stainless triangle and dropouts - which ain't so bad, considering I'm also going to belt drive and have been working on what frame splitter to use anyhow.
F n' F
 

Attachments

  • image_2021-01-19_124201.png
    image_2021-01-19_124201.png
    2.2 MB · Views: 454
  • Torque arm 2.jpg
    Torque arm 2.jpg
    139.1 KB · Views: 420
  • Torque arm 3.jpg
    Torque arm 3.jpg
    227.5 KB · Views: 415
Oh man look at all the people lining up to help you with that attitude..


I note that everyone (everywhere on every Forum) who has contributed on the subject says exactly what I told you.
I note that everyone (everywhere on every Forum) who has contributed on the subject of this thread says exactly what hARRYs said. https://electricbikereview.com/forums/threads/why-dropout-lugs-break.25409/
I've heard some bad - even very dangerous advice (like "tighten things down better").
The Ltd's MXUS Motor has some serious torque. We're in "torque arm necessity" territory around 500 watts - I read. This motor pulls 1000 and anecdotal evidence abounds that it's not could, it's "likely will" rip loose of your drop-outs over time. The solution is certainlt NOT to torque down those lugs to 150lbs every week. You'll kill the aluminum; the hardened steel will crush it and micro-crack it to death.
Ridiculous.
Fizicx for Dummies says: "For every action, there is an opposite reaction".
Okay, so this action needs an immovable wall "reaction to push off off - or it goes nowhere.
The ratio of that reaction "wall" to push from. The problem is, the ration of force is 58 to 1 for 26" wheels.
That better be a damn strong "wall".
No sense debating the veracity of the Manufacturers Literature that say's it has 100nm of torque, when half that is beyond the safe line.
Educate yourself or pay the price.

F n' F
 
Last edited:
Even with things assembled, the shipping process is a usually pretty rough on the boxes and the bikes themselves inside. That said, I personally went over my ebike with tools to make sure they were tightend properly, not just with your hands. People who have owned regular bikes and have maintained them don't consider that an ebike really needs to have a good saftey check before you are riding at 20-28mph speeds.

I would say make sure, with tools, all the nuts and bolts on the bike are properly tightened and you should be good. Otherwise we would hear moreso of problems like these on the forum...I dont think we h
If you rounded off the straight edges in your frame dropouts, it's good peace of mind to be installing torque arms. You could fabricate a torque plate. This one only used one of the available mounting holes.

View attachment 77048 a hose
Have you seen my post on the torque arm?
Pictured fork has both the holes needed for a safe 250nm torque w/ two M5 alloy steel bolts. M8's much stronger. Those are rather close to the edge, but that appears to be a steel frame. Regardless. I have a strong starting point to modify to Ltd's aluminum frame.
 
I'm nuts. I admit it. I built and drove rally cars. Now I quit driving cars and it's e-bikes. Nuts.
As a Ltd owner with an engineering background and a compulsive disorder that drives me to ever improve, my mistakes are a less brave souls profit.
Push the machine; find the flaws and if it breaks find the solutions.
I spun my hub. Now what?
Happened to you (yet)? My brain is screaming :Better listen up and take proper steps because it does happen.
Unlike front wheel drive, the Ltd's rear drive is a blessing if - literally - the wheels come off. Regardless, it could get you killed.
My R1U Ltd bike came with the rear wheel/ frame assembled. I neglected to take the entire assembly apart and check for loose, improperly torqued parts - underneath the ones that I did test and were on nice and tight. 68 miles and suddenly - cruising at 20mph - I feel a major drag. Pull over. Inspect. Gee, the wheel is rubbing against the left frame?
Roll/Carry bike home, research, disassemble and result is apparent: Spun Hub.
I've since re-assembled and torqued everything proper, no problems for 30 miles, but are you willing to risk this happening to you? Should I feel safe to go 10 miles away, or should I install a high quality Torque Arm from Grin?
Anyone else been here?
I had plans to upgrade this bike, this is a big setback.

Thanks F n' F
 
Kickin' it,

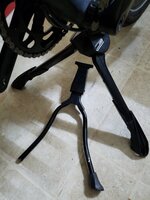
UIpdate: March 20, 2021. Loving this kickstand. Best of the best and utterly dirt cheap. Compare it, and the next best (noodle tube) in the photo.
I bought another for my next bike build.
$61.00 price will only go up.
Motorcycle duty construction, w/ cast aluminum weight and strength.

No flex, rattles, play and no matter how deep the turn, never yet scraped.
Tough as nails and the plastic feet take whatever beating you bestow, but show little wear. Also, those feet have tabs that assure they CANNOT fall off.
Lift up a few inches by rear rack; lightly, but firmly kick arm forward (Click) and (Kuthunk) it locks in place, open, firmly planted and level w/ 18' stance (did I say "NO FLEX" ???). To close, lift same same place and kick same same, (Click) but to rearward, (Kuthunk) it locks closed only inches from the frame. You get it down, you hardly even scrape the feet, lift kick, set it down planted perfectly. It doesn't damage my linoleum floors either.
The secret that sets it apart from all the rest ? The "Scissors Mechanism". It gets skinny (8") as it closes, and spreads out to (18") as it opens.
The Bonus "behind door number 1" is as a fulcrum for maintenance work. You can easily lift either the front or rear and be perfectly balanced. Need to work with the rear able to spin ? Add some weight on the front. Perfect.
Viva Italia !!!
.........................................
Original post: I tried $200+ in aftermarket junk, PRC made, noodle-stand failures to get here. Learn from my error + chips to my frame when bike fell over.
Today I installed the only (Ursus double leg) 'Kickstand' that works worth a damn.
Well worth it. No wobble. No play. No nothing but a firmly placed bike you can load stuff on-to, or work on without it tipping over. 18" of base footprint?
Yep. This is the one for your R1U e-bike.
I've posted a review with photos on the installation on Amazon. Remember if you go there: The long bolt works PERFECT, but it's a ny-loc so you need to crank it down. Just follow the posted instructions and you'll end up with a perfect installation.
The review and pics are posted on Amazon under the product and,

I am,

Fast n' Furious
 

Attachments

  • 20210124_152852.jpg
    20210124_152852.jpg
    236.7 KB · Views: 394
  • 20210226_121155.jpg
    20210226_121155.jpg
    387.5 KB · Views: 444
Last edited:
Kickin' it,
I tried $200+ in aftermarket junk, PRC made, noodle-stand failures to get here. Learn from my error.
Today I installed the only (Ursus double leg) 'Kickstand' that works worth a damn.
Well worth it. No wobble. No play. No nothing but a firmly placed bike you can load stuff on-to, or work on without it tipping over. 18" of base footprint?
Yep. This is the one for your R1U e-bike.
I posted a review with photos on the installation on Amazon. Remember if you go there: The long bolt works PERFECT, but it's a ny-loc so you need to crank it down. Just follow the posted instructions and you'll end up with a perfect installation.

This site does not allow Jpg photos .... bwaaahaaahahahahaha.
Is there another format people post photo's in? Not when your still using XP w/ the little dog wagging his tail to search.
Try anywhere else that's out of the stone age.
Indefatigable, the review and pics are posted on Amazon under the product and,

I am,

Fast n' Furious
 
I note that everyone (everywhere on every Forum) who has contributed on the subject of this thread says exactly what hARRYs said. https://electricbikereview.com/forums/threads/why-dropout-lugs-break.25409/
I've heard some bad - even very dangerous advice (like "tighten things down better").
The Ltd's MXUS Motor has some serious torque. We're in "torque arm necessity" territory around 500 watts - I read. This motor pulls 1000 and anecdotal evidence abounds that it's not could, it's "likely will" rip loose of your drop-outs over time. The solution is certainlt NOT to torque down those lugs to 150lbs every week. You'll kill the aluminum; the hardened steel will crush it and micro-crack it to death.
Ridiculous.
Fizicx for Dummies says: "For every action, there is an opposite reaction".
Okay, so this action needs an immovable wall "reaction to push off off - or it goes nowhere.
The ratio of that reaction "wall" to push from. The problem is, the ration of force is 58 to 1 for 26" wheels.
That better be a damn strong "wall".
No sense debating the veracity of the Manufacturers Literature that say's it has 100nm of torque, when half that is beyond the safe line.
Educate yourself or pay the price.

F n' F
That link is excellent!
If you rounded off the straight edges in your frame dropouts, it's good peace of mind to be installing torque arms. You could fabricate a torque plate. This one only used one of the available mounting holes.

View attachment 77048 a hose
Nice innovation but not all of us can fabricate and I think a designed part may be more effective with greater strength.
 
The fix is in
... but hose-clamps. Come on guys, really? REALLY ??? I had to skip Grin for now.
I note there are two M5 threaded mounting points on the Ltd frame that a torque arm could be screwed into5.
While I had trepidations about M5 bolts holding 100nm of torque, it appears I was wrong.
Notably, the rear triangle area where the attachments are (for paniers I believe) provide a flush surface, without spacers needed.
Big hassle designing and making my arm from stainless. Much easier to start with a stock, already drilled w/ 10mm x 14mm hole and drill the other two holes. More research.
Okay, I found a type arm that epoxies to the frame for fastening. This provides roughly 19,000 lbs of shear strength per inch.
One (alloy steel) M5 has 17,300 lbs. shear strength. Using two M5 points - 34,600 lbs. - on each side should do it. 69,200 Lbs.
I can also drill hose M5 holes out, tap and mount M8 '- which will approx. triple the strength.
Honestly, we're talking overkill. Considering there's about 5000lbs max torque for every 100Nmm., do the math.
Resigned to the hassle of grinding, milling and drilling, I made one last effort to find something better.
I found this: https://www.ebay.com/itm/143911979426?ViewItem=&item=143911979426
It's from our Bros' across the pond and they ain't cheap.
Note that laser cut splined key-way and look where it attaches. I'd found the right one, but the price - More than a Benjamin for two and one won't work. In the end, I queried the seller and yes, he provided combined shipping plus 10% off if I bought two, so I did.
Expect a full report in Feb on a bulletproof installation (and no damn hose-clamps).
You may ask why I want such robust hub spinning prevention. After I test the limits of the MXUS motor (30amp controller is next), I intend to upgrade to an MAC 8T w/ phaserunner. I might sheer the whole triangle off, but I'm not spinning that hub, again. And if the triangle goes south, I'll install a stainless triangle and dropouts - which ain't so bad, considering I'm also going to belt drive and have been working on what frame splitter to use anyhow.
F n' F
So I don't plan to push limits on my LMT'd but this is a matter of safety. The Grin torque solution seems an acceptable compromise if it fits and sometimes stainless hose clamps are effective. I will never soup up an e-bike or push limits like Fn'F because I don't have the skills or knowledge to do so, but it must be fun!
 
Yes (and I apologize for not posting sooner). *** WARNING. THIS IS LONG AND BORING ***
The Controller: I've settled on Grin's Baserunner-L10, and Yes $220.00 is way too expensive.
Awaiting for some answers from Grin to clarify we can keep our KD218 displays. From what I can tell our displays are as good as it gets and Grin's B&W units not so much, so at $220 downgrading to a black and white display would be a deal breaker.
-
Yesterday, I finished installing a twist throttle. It's much better than the 'thumb-breaker', and on the (correct) right side, which was a bit awkward at first. My major goal of making the bike actually cruise at a given speed has been achieved and now, 'Hell bent for leather, or decelerating' have become choices rather than the only modes available.
A couple quick comments on that installation: The &%$#*@ lock mechanism is very &%$#@ difficult to reinstall. I advise to scroll a line on the plastic bottom plate to show exactly how far forward the battery connector plate must be for the screw to align - then it will only take 10 or 20 tries instead of 50! You must reassemble the bottom (long) screw first and be sure the stiff wires from the plate are not causing a spatial conflict with the controller.
Also, the ground/ signal wires on the new throttle were incorrect on the cable's plug - which had larger size wires, a better quality plug and about 3 extra feet - so I cut the wires shorter, soldered them correctly and shrink fit wrapped.
-
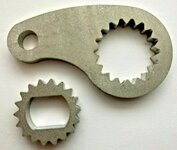
On to the Torque arms: I went with the "Adjustable Angle Torque Arm by hammer-ebikes" from uk_cycle_spares on ebay.
The (Super cool) seller accidentally left out the secondary arms, so I waited for them to ship. Shipping time was literally months and while I aged like a wine, waiting I decided 'Hmmmmmm, wouldn't a hole in that rack's steel bracket do that ???? So, I to drilled the 3mm steel plates connecting the Axiom Streamliner Disc DLX Bicycle Rack Pannier Carrier and bolted up the (pre-loaded) torque arms. Viola !!!
I told the evil demon trying to spin my hub, 'flex that, you ^%$#@. Demon's dilemma? That short plate is way stronger than the aluminum frame's attachment. So, if it breaks it'll be by shearing the frame attachment, and it was all hopeless anyhow (See more on plan 'B', below).
Did I say I was involved in building rally (and demolition derby) cars? You run it 'till it fails, bulletproof that, then crush the next weak link, bulletproof that and so on. You don't "fix" stuff that breaks, you make it stronger than the next ten weak links, break more stuff and try to destroy everything. Over, and over.
Yes, we crushed the competition. LOL
-
My end plan is to fabricate two more small steel plates, w/ longer bolts (using 5mm spacers where required), creating a sandwich eliminating a secondary arm. Let's see how strong that aluminum attachment really is. The other, upper attach points are so ill spaced they're virtually useless and I just can't see them adding any strength, with the spacers required to fit flush.
-
To complete the assembly, I used (Must Have ALERT) "Nord-lock" washers. Not cheap. Well worth it though.
Set-up: Fine spine side facing the aluminum frame> torque arm> second fine side facing torque arm and the coarse facing the R1U's Steel, automotive lug-nut.
A 200mile Inspection indicates zero movement since this installation method.
Note the washers. Pic 163213 shows a stock washer and two Nord-locks (Coarse sides out). That wear you see is how much that stock lock-washer was making contact !!! Same with photo (Stock washer and Nord-lock Fine side out)163109.
Look how little of the contact surface is marred? Really? 100NM of torque relying on that little contact?
Is there any amount one can torque that lug-nut down that could actually improve that situation, perhaps increase the contact surface from it's now unacceptable 20%, to even, say 30% ? The Lug-nut has even (way, way) coarser locking spines. Maybe 10% of it's surface is making contact with the washer. You want weak-link fail, there it is.
I also tried simply using Nord-lock washers, but upon disassembly, comparing to the dots I scrolled I detected movement. Another FAIL.
The torque arm on the derailer side had to be sanded down to eliminate clearance conflicts.
Never mind paint damage. When the hub spun, transporting it home in the back of a Tow truck meant scratches and when we tried to unlock that axle, anything those 1/2 drive tools touched they scratched.
I don't care because if the fix doesn't work and it spins again - with the baserunner pumping 80A Peak Phase Currents (~45-50A Continuous), I'll cut the aluminum dropouts off, weld drilled aluminum plates on and bolt up ballistic steel dropouts. Then when I finish, I'm going to strip and paint the frame in polyurethane and until then a scratch is a broken nail crisis.
IMHO a 40A controller would spin the stock set-up with ease. This motor is putting out maybe half it's rating with the stock controller. "Maybe", if that. 100nm is no joke. 173220 shows what you face - a spun axle. I'm not installing that Baserunner until I have that second plate installed.
The last point: Be sure to pre-load the arm before bolting down.
Visualize the wheel's going forward force pushing the opposite way, rearward, away from the frame. Adjust to tension, removing all slack in that direction and tighten down.
I highly recommend this Streamliner rack for our bikes. It's quality aluminum with steel brackets; heavy black finish; bolts right up and works to mount the torque arms perfectly ... $39 freewheel_bikes_madison on ebay. Even the arms are round steel stock with billet clamps , not cheesy flat steel like the rest - even Tubus.
And again, I cannot stress enough what great seller Ian of uk_cycle_spares is for the torque arm. Highly recommended and honest. This is buying on the ground floor, direct and exactly what it says it is.
-
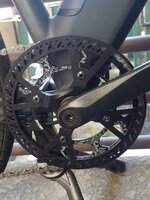
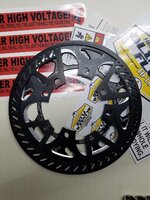
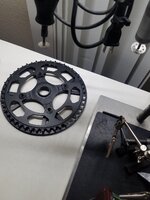
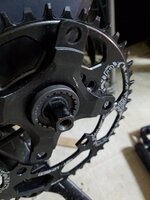
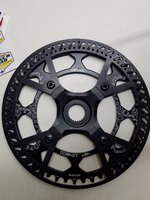
I've also replaced the stock 44T Chainring and guard ('bash-guard' to me) with a 48T 1048CD, Deckas Narrow Wide Chainring w/ custom, laser-cut (US Made) Bash-guard. Included a few photos below. Compare that ugly stock bash ring - LOL.
If anyone cares, I have full photos and the particulars. If anyone can tell me the name of the company that makes my bash-guard, please do. A custom shop, they seem to have disappeared.
It looks sick, the chain feels far smoother and the new 48 tooth cog, 9% larger than the stock 44 tooth ??? yes, I detect an added 2mph top end pedaling now - 31.5mph.
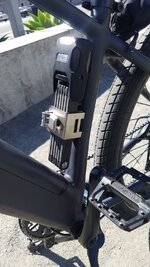
More on the rest coming: Laser lights/ wireless turn signals; F & R fenders; front racks (two types); HD Ursus double arm kickstand; (various brands) extender bars to mount display/ GoPro/ Lighting; the 20,000 lumen 18650 rechargeable, +11 hours at "a brightness cars will high beam you", detachable LED Headlight, and the ABUS A6000 (attached to the seat tube), which works nice, but (every damn time) is a real pain to open and close without the alarm squealing and you looking like a dolt.
My boomerang GPS tracer is not yet installed.
I have to remove the rear wheel, drill the frame and insert/ epoxy in standoffs to mount where I prefer (180 degrees behind the lock bracket, in front of rear wheel). I may change my mind, so not ready yet.
AND I LOVE the R1U Panniers (pics coming). Crazy room inside. Abercrombie Fitch quality. I can haul two sixer of 8.0% IPA, a bottle of Chardonnay and all the fixin's for a Rack-of-Lamb Easter Dinner for me and mine, easy - insulated and cold too!!
The Center of Gravity beats groceries on my rack by a mile.
Unfortunately, it's brackets make it +6" higher than my rack (great for hauling a rack battery !!!) which interferes with my Lamborghini class side laser taillights, so I'll have to fabricate a rod for the brackets and attach it to the rack. I assure you it won't be tacky, hose clamped, duct taped, or with a pink ribbon. I have solid aluminum rods that I may use. Half moons dremelled out at appropriate points and a 1" piece of same stock with same cut outs and a bolt through each side. Also, sewing a veclro strap on the bottom to attach to those neat slots on this Streamliner rack's bottom bracket (See Photos), YES !!! Then you can simply undo bottom strap and lift the whole shebang off the rack, sling over your shoulder and in true John Wayne style bring the chilled wine to your damsel !!!
Hard day, burned out hope this helps all. Anything I can add with, feel free to ask direct. Anything you can help me with PLEASE post.

Cavalga como o vento !!!

F n' F
 

Attachments

  • 20210226_121214.jpg
    20210226_121214.jpg
    381.5 KB · Views: 478
  • 20210131_173220.jpg
    20210131_173220.jpg
    188.4 KB · Views: 439
  • 20210206_163213.jpg
    20210206_163213.jpg
    137.6 KB · Views: 447
  • 20210217_180947.jpg
    20210217_180947.jpg
    324.7 KB · Views: 466
  • 20210226_121205.jpg
    20210226_121205.jpg
    460.1 KB · Views: 461
  • 20210206_163109.jpg
    20210206_163109.jpg
    152.3 KB · Views: 455
  • 20210130_131221.jpg
    20210130_131221.jpg
    254.6 KB · Views: 457
  • 20210130_120908.jpg
    20210130_120908.jpg
    258 KB · Views: 478
  • thumbnail.jpg
    thumbnail.jpg
    140.8 KB · Views: 478
Last edited:
More pics. Sorry for using phone, not my my gopro.
Here's some stuff. Photos by last three digits or name.
237 Bash Guard comparison, Stock v Custom.
Torque Arms.jpg. Splined insert.
809 What comes off via special splined tool that came with bike.
Torque arm 2.jpg detail.
610 Disassembly and Micrometer verification, contrary to posts on Amazon, Ursus Kick-stand does indeed fit perfectly.
429 Front rack attachment with special 135mm skewers.
346 Mounted ABUS 6000A folding lock (2.69lbs)
004 Shows the slop on the axel.
208 URSUS Kickstand - save your money on anything else. All weak, made for bicycles. Plastic feet that fall off. They bend. Not this Cast Aluminum baby. A must have to work on your bike - unless you like lossening everything up on the bars and turning upside down, which is still not as good. You can put load on the wheels with the stand and align the locks best.
843 Stock Bash guard.
616 Pulling the Crank Arms.
737 New Ring assembly.
820 " " reassembly
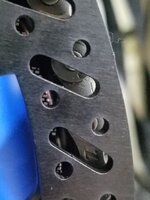
816 Billet workmanship on new Bash guard. I ask again, can anyone ID that part ??? I can't find the company and it was trans-shipped. I found one (an image) on picklick, an old ebay Great Britain listing - over $100. Then stumbled onto the same image and a company with a sparse website that said they'd cut one just for me, $50 -60 as I recall. They cut a bunch at a time to order. The size was the problem. They made BMX (5 hole type)/ MTB bike high-end custom ring-gear parts and not much with even 44 teeth, let alone the 48T I wanted to replaced the stock 44T with and I had to take a chance on the clearance. It said it would cover a 44T - Maximum - and it did. You can see how close the clearance is in this photo and 304.
No my pants don't get caught, yet.
Compared to stock, the guard is substantially thicker and made of high end aluminum alloy.
Please don't get me wrong. These bikes are the finest compromise and a wonderful base to build a dream machine - no, I'm not sold on a chain killing, loss of power (duh) required to transfer to my rear wheel Mid-drive.
IMHO you can't touch R1U when it comes to value. I don't have 10k to plonk down, but I bet my 5k, customized R1U'll go toe to toe with that 10k machine. So, don't get me wrong, the stock parts are fine and I dare say that for $50 you can replace with semi-stock types. They're pretty much all the same, made in Taiwan, same aluminum material and stock, 10 different cut-outs and 20 colors, but the same.
If I could have found a better gear and ring guard, I would have bought it. I wanted to go with 52T, but (Checked w/ Micrometer) it would almost certainly conflict with the chainstay. 48T was the limit and Dekas makes a great ring. The 'high low' cut is quieter, smoother and w/48 teeth, faster.
For looks. You can't touch this. I watch admiring people's eyes gravitate to the ring, look away and come back again. It's a laser cut piece of functional art and sets the machine out from the rest by a mile.
Yes, I'm going to drop a name and a quote:
"That new crank ring look BOSS!
Regards,

Steven
Ride1up Team"
So, thank you Steven - who took a shine to it as well.
It's the evolution of your child and wait'll you see the Core 500 I'm building for my GF (spoiler alert: Guess where the MXUS is going when I do the GMAC install on my Ltd?).
-
627 again, shows the puller on a crank arm.
737 shows the difference in size between the bash guards. Old in front.
I have a full installation post and photos for the URSUS Kickstand, nearly prepared. Not sure if anyone cares, but after two moths use I give it 5 Stars.
Hey Mike. Be sure and let me know what you find. Prices are climbing. I still probably know the best prices on alibaba - and which sellers work to deal with. A lot of trash there, but those plastic fenders - must have for after rain (and hell, I ride in the rain too) - the best lighting and rear signal types (I've tried three. One is great, the rest are FAILZ) , even black nuts/ bolts/ washers (must have to fully exude bat-bike attitude. I cringe at shiny on my black/ grey machine, so one at a time I'm replacing all such hardware), brackets, etc. BTW: The $0.99 Disk Brake spacer tools work great.
I hope your machine's treating you well. I know you're at a wonderful spot in history, a Renaissance, on the cusp of a paradigm shift to required to accommodate a looming future.
Regulations of "Class Three" e-Bikes are akin to regulation of Corvettes. A stock 1953 130HP 235 L6, or a 1968 427 ZL1 (550 - 680HP 'estimated for insurance purposes') 'balanced and blueprinted' to 850HP, as you please - and all perfectly street legal to register and drive.
In a few years it'll all be gone and we too'll have to don the "20mph" Lemming costumes.
But Meanwhile,
Whatever your hand finds to do, do it with all your might ...
King Solomon; Ecclesiastes 9:10

F n' F
https://www.google.com/url?sa=t&rct=j&q=&esrc=s&source=web&cd=&ved=2ahUKEwj72ab-wL_vAhUqGTQIHddzCqQQFjACegQIBBAD&url=https://biblehub.com/ecclesiastes/9-10.htm&usg=AOvVaw3IllwCb-JrvYYqr1ZVa2R-


Attachments

  • 20210130_122237.jpg
    20210130_122237.jpg
    317.6 KB · Views: 390
  • Torque arm.jpg
    Torque arm.jpg
    248.9 KB · Views: 387
  • 20210130_122809.jpg
    20210130_122809.jpg
    203.3 KB · Views: 379
  • Torque arm 2.jpg
    Torque arm 2.jpg
    139.1 KB · Views: 369
  • 20210124_151610.jpg
    20210124_151610.jpg
    195.3 KB · Views: 356
  • 20210226_142429.jpg
    20210226_142429.jpg
    398.8 KB · Views: 407
  • 20210226_121346.jpg
    20210226_121346.jpg
    250.5 KB · Views: 369
  • 20210205_162004.jpg
    20210205_162004.jpg
    240.5 KB · Views: 376
  • 20210226_143208.jpg
    20210226_143208.jpg
    181.7 KB · Views: 357
  • 20210130_120843.jpg
    20210130_120843.jpg
    223.3 KB · Views: 371
  • 20210130_124616.jpg
    20210130_124616.jpg
    157.1 KB · Views: 357
  • 20210130_124737.jpg
    20210130_124737.jpg
    215.3 KB · Views: 354
  • 20210130_121820.jpg
    20210130_121820.jpg
    206.6 KB · Views: 354
  • 20210130_125816.jpg
    20210130_125816.jpg
    204.7 KB · Views: 344
  • 20210130_124627.jpg
    20210130_124627.jpg
    164 KB · Views: 349
  • 20210130_124304.jpg
    20210130_124304.jpg
    248 KB · Views: 376
  • 20210130_121737.jpg
    20210130_121737.jpg
    192.4 KB · Views: 365
Last edited:
Back