Quick-E+

Has anyone here gone tubeless with the "tubeless-ready" G-Ones? Keen to hear feedback.
After each flat tyre I get enthusiastic about converting... then never get around to it since there's a bit of extra cost and it's a process i'm unfamiliar with. Do the rims need tape or is the tape lining that's there already good to go?


I got mine set up tubeless from the get go. The shop put gorilla tape for a liner, but I e heard that’s not the best. You want something wide. I would say it’s worth going tubeless. I did invest about $160 on a nice lezyne overdrive with the canister so I can set the bead without a trip to the lbs. so worth it. A few bucks in sealant and you’re good. Absolutely love not having to fix flats on a tube. Even had a nail go in and damage the rim and it still sealed up. It’s been 1700 miles and I’m getting another tire. Probably the same, can’t find anything better
 
I got mine set up tubeless from the get go. The shop put gorilla tape for a liner, but I e heard that’s not the best. You want something wide. I would say it’s worth going tubeless. I did invest about $160 on a nice lezyne overdrive with the canister so I can set the bead without a trip to the lbs. so worth it. A few bucks in sealant and you’re good. Absolutely love not having to fix flats on a tube. Even had a nail go in and damage the rim and it still sealed up. It’s been 1700 miles and I’m getting another tire. Probably the same, can’t find anything better

Thanks for sharing @MattsQuickE I've been getting flats once or twice a month mainly from small glass shards on the road that I can't seem to avoid. Think i'll have a DIY crack at going tubeless, probably without getting a compressed air canister to begin with (i'm a sucker for punishment).
 
Thanks for sharing @MattsQuickE I've been getting flats once or twice a month mainly from small glass shards on the road that I can't seem to avoid. Think i'll have a DIY crack at going tubeless, probably without getting a compressed air canister to begin with (i'm a sucker for punishment).

I put extra thick tubes in mine. See earlier post. No flats since and I hardly have to top up pressure. Good alternative to tubeless. Also went with Schrader valves so I can top up in garage forecourts.
 
I put extra thick tubes in mine. See earlier post. No flats since and I hardly have to top up pressure. Good alternative to tubeless. Also went with Schrader valves so I can top up in garage forecourts.
Thanks @Alan111S . Thicker tubes are an option I hadn't considered. Might be a good option for me. Able to recommend the brand /model that you went with?
 
Bike back from LBS, and they have (not Giant) come up with a solution for the rear wheel moving. Likely this is also adding to some of the chain and cassette wear, some people are seeing, with the wheel being, especially in low gears the increased drive line angle.

Anyways they took out the old derailer hanger and have replaced it with one from a "10 yr old Giant model" that fits (its brand new). The wheel has been moved over a bit and retightened. Derailer has had a link taken out. Im told it has fixed the issue on all the Giant Quick e+ they have done it to. They weren't going to tell me too much but I have a bit of extra colour now, and it didn't cost me.

Great service from LBS.

Hmmmmm. Looks very similar to the hanger that was put on mine (as part of a fix to for the problem of the tyre rubbing on top right of mudguard/rack frame). I did wonder about the blue, but wasn't too fussed since whatever they did seemed to fix the problem. I saw the bike mid-repair with the blue hanger installed, and the back tyre still rubbed the rack frame (mechanic was still scratching his head trying to figure out the fix at that stage), so there must be more to it than just the hanger replacement.... My LBS was a little cagey too about what else they did, but said they had the local Giant rep come in to diagnose and "repair" the problem. I'm unsure if the derailleur was also modified as yours was. The back tyre is still quite close to the frame (see photo)... @Onewbrew is yours still sitting this close?
My LBS is Evo Britomart (Auckland), would you mind sharing who your LBS is as i'd be keen to check that it has had the mods that yours has had.

Anyways, if anyone is interested, i've included a (very green) pic of my setup with the new MIK rack and Vaude bag.
 

Attachments

  • Quick-E_v001.jpg
    Quick-E_v001.jpg
    123.4 KB · Views: 450
  • Quick-E_v002.jpg
    Quick-E_v002.jpg
    172.3 KB · Views: 454
  • Quick-E_v003.jpg
    Quick-E_v003.jpg
    184.6 KB · Views: 456
Last edited:
@M8tt looks good. Evo Ellerslie is my LBS, so I suspect they are sharing knowledge across the stores. They adjusted the spokes and shifted the rim over a few mm. I’ve not had reason so far to take the wheel out to have a better look.
 
Downhill tubes are usually heavier an
@M8tt looks good. Evo Ellerslie is my LBS, so I suspect they are sharing knowledge across the stores. They adjusted the spokes and shifted the rim over a few mm. I’ve not had reason so far to take the wheel out to have a better look.

Out of interest I checked the dishing on my wheel, thinking it may be contributing to the tiny LHS clearance, and it was perfect. Seems the frame chainstays are not designed for symmetrical clearance.
I may still adjust the dishing to get a couple more mm clearance, if I see any rub marks.
 
I had a pair of ortlieb panniers that fit just fine on the stock rack that came on the 2018 Quick E ( the low one without the flat top.) I had no problem with the original rack at all.
 
Have the one pannier bag to fit everything. Its the 26L Vaude ComYou Pro.

The click system is fully adjustable and fits the 16mm tubes of the standard Quick E+ rack quite snugly. Plus the bag is totally waterproof - essential in the wet Irish climate. Had considered Ortlieb panniers but I took a chance on this in the end. I'm satisfied with the choice and feel its a pretty decent option.

Vaude ComYou Pro
 
Last edited:
Hi all,

Just wondering if anyone has had any experience with replacing a standard Quick E rack with a Metro E rack and whether it allowed you to mount panniers higher or further back than the standard rack.

I'm mounting an Ortlieb QL3.1 bag on my 2019 Quick E with MIK deck, and I'm really struggling to get it to fit without my heel hitting the bag. I've managed to just squeeze it in but I need to be pretty careful with my foot placement to make it work. Admittedly, I have pretty big feet (Size 47 EU/US13) so it's a bit of a challenge, and it's not helped by the bag being briefcase shaped, rather than a more traditional pannier (tall and narrow).

I basically need to get the bag as high and as far back as possible and the awkward shape of the integrated rack that starts wide and then narrows towards the top is really not helping things. I bought the MIK deck hoping that it would help, and whilst it has improved things a bit it's still less than ideal.

In the end I've mounted the QL3.1 system to the MIK deck with the clamps upside down, which sort of works, but the clamps have a tendency to rotate with the weight of the bag, so it's not ideal. With the older Ortlieb system you could adjust the angle of the rails on the bag, so that it angled the bottom of the bag towards the back of the bike, which helped for larger soled gentlemen such as I.

I'm contemplating going to the Metro E rack, as this is cheaper than buying a different bag (and I quite like this bag), but I'm curious to know if this actually gets you much additional height on the Rack deck. It looks like it does in the pictures on Giant's website, but I'd be interested in hearing from anyone with first-hand expertise in doing this.
 

Attachments

  • IMG_3895.jpeg
    IMG_3895.jpeg
    267.6 KB · Views: 423
  • IMG_3896.jpeg
    IMG_3896.jpeg
    240.2 KB · Views: 407
  • IMG_3897.jpeg
    IMG_3897.jpeg
    251.7 KB · Views: 425
@2019QuickE - I'm thinking that you will get some extra height with the Metro E Rack. I was surprised at how high the deck is when I replaced my 2018 stock rack. You would have to hang your bag on the top of the rack instead of the lower pannier bar but it might work if you only need an inch or two.

These photos show the differences on how the racks sit compared to tire height. Side by side, there is some difference but its not a whole lot.

1568303411837.png
1568303101770.png

The only downsides to getting the Metro E rack I see are:
1- you will have the forward supports now, where the stock racks have a cleaner look.
2- the stock rack has a bolt support in the center of the fender where the Metro E rack does not. Giant compensates for this with a bracket (that you have to purchase separately) at the end of the rack. This leaves an open hole in the center of your fender (which is easily filled with some silicone)
Here is a photo a member posted of a custom bracket that his shop built before Giant released the Metro E Bracket. His shop did a really good job and it is almost better than the Giant one but both will work. You can see how much clearance there is between the fender and rack in this photo too.
1568303588958.png
The metro E bracket by giant:
1568303618985.png


I keep my panniers on the lower bar of my Metro E Rack and have a trunk bag that will snap into the MIK deck.
 
Last edited:
@2019QuickE - I was going back through some of the forums and I read that you can bolt the MIK deck on 2 ways which allows some forward/aft movement. Maybe bolting it on the other direction will help give you room to push your bag back. That might be your easiest solution. @Alan111S was the person who had posted this information so they might have some photos or can explain it better than I did.

This would put the 'unlock' portion of the MIK bags at the front of the rack, near the saddle, which might be a slight bit harder to operate for you but might actually confuse a thief more... so that could be a good thing!
 
Last edited:
Spinning the MIK deck around will def gain an inch or so. Here's a couple of pics of a Metro rack on a Quick E (not mine)
 

Attachments

  • IMG_3814.JPG
    IMG_3814.JPG
    189.2 KB · Views: 410
  • IMG_3815.JPG
    IMG_3815.JPG
    221.9 KB · Views: 390
  • Like
Reactions: CDB
Have the one pannier bag to fit everything. Its the 26L Vaude ComYou Pro.

The click system is fully adjustable and fits the 16mm tubes of the standard Quick E+ rack quite snugly. Plus the bag is totally waterproof - essential in the wet Irish climate. Had considered Ortlieb panniers but I took a chance on this in the end. I'm satisfied with the choice and feel its a pretty decent option.

Vaude ComYou Pro
So you're not using the MIK deck? Does the Comyou Pro get very close to your heels? I like the look of this bag but don't want to deal with heel interference...
 
Thanks everyone, that’s really very helpful.

It does look like the Metro E might be a better fit, but I’m going to try spinning the top deck around first. Part of the problem is the Ortlieb QL3.1 system doesn’t attach very well at the lower point, compared to the traditional Ortlieb system. I’ve already had to cable tie it to the rack, because it slides out when you try to remove the bag. I’ll give it a crack tonight and see how it goes.
 
So you're not using the MIK deck? Does the Comyou Pro get very close to your heels? I like the look of this bag but don't want to deal with heel interference...
Not using the MIK deck, hooking directly onto the integrated rack.

The system Vaude use is excellent with a decent range of adjustment that allows you to move the bag up and away from the heel area. I wear a size 9 shoe (EU42) for work and find there is still plenty of clearance on a medium size frame.

May be worth mentioning that the ComYou Pro is a fairly sizeable bag and while it's not such a big deal on an electric bike, it wouldn't be described as a compact bag if that's what you're after. I can take a picture or two if that would be useful.
 
Last edited:
Not using the MIK deck, hooking directly onto the integrated rack.

The system Vaude use is excellent with a decent range of adjustment that allows you to move the bag up and away from the heel area. I wear a size 9 shoe (EU42) for work and find there is still plenty of clearance on a medium size frame.

May be worth mentioning that the ComYou Pro is a fairly sizeable bag and while it's not such a big deal on an electric bike, it wouldn't be described as a compact bag if that's what you're after. I can take a picture or two if that would be useful.

Thanks; that'd be helpful. I'm looking at alternatives to a backpack, and while a 11L trunk bag would work for normal minimal commute gear, it prob won't work for those days where it feels like you're moving house.
 
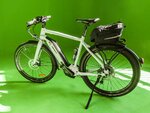
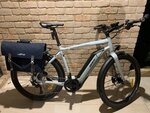
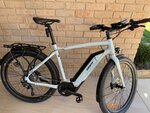
So I did a bit more experimenting yesterday with placement and I think I've got a solution that works. I also learned a few more things that might be helpful to anyone else trying to mount an Ortlieb QL3.1 bag on a QuickE+ 2019.

For anyone else trying this, the following may be helpful.

1. The Ortlieb bolts have the same thread diameter as the mounting holes for the MIK deck, so you can just screw the mount directly to the MIK deck holes. This may work well for people with smaller feet than me, who don't want to buy the MIK deck.

2. The rails on the MIK deck are smaller than the rails on the factory rack (the 2019 rails seem to be a larger diameter than the 2018 models). You will need to buy the additional clamps from Ortlieb if you want to clamp to the factory rails - https://www.ortlieb.com/us/e190

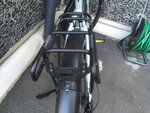
3. The angles on the stays for the factory rack , make it very hard to get the QL3.1 to fit if you need to mount the bottom attachment point of the QL3.1 behind the stays, as you most likely will if your foot is larger than say an EU 42.

4. You can't mount the QL3.1 clamps upside down (with the bolt above the rail) as the leverage this creates makes the QL3.1 mount rotate regardless of how tight you torque them (and Ortlieb only spec's 1.5 nm, so you shouldn't really do it up particularly tightly.

5. There is very little space in the middle of the MIK deck to fit any kind of clamp in (including the QL3.1 clamps, however, you can get them in there and once you tighten them, they rotate down into a better position.

6. If you do put the clamps in the middle you need to be careful when tightening them, as the bolt protrudes out of the rear of the clamp and scratches the factory rack (learned that lesson the hard way, but you cannot really see it with the clamp in place).

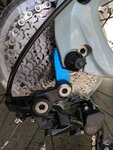
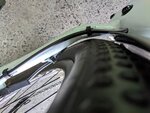
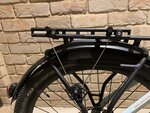
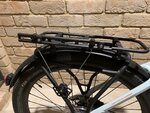
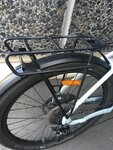
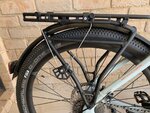
After a lot of messing around, I realised that the main issue was actually the bottom mounting hardware, which uses bracket to sit behind the rack stays and holds the bottom in place. The problem is that this is really not made for stays as large in diameter as the Giant factory rack, so needs to be offset quite a bit to the rear. It seems to fit okay if you put it in front of the stay, but this won't give your ankle very much space, and you'll probably still get the occasional heel clash.

The end solution was to remove the bracket on the bottom mounting point and substitute it for one of the larger clamps that I had already purchased (but didn't actually need as the top of the QL3.1 was clamped to the MIK deck with it's smaller rails. This actually gives a better mount than the standard QL3.1 and looks much neater as well. I did have to buy a longer bolt for the clamp (40mm to replace the Ortlieb 35mm) so that it was long enough to fit through the QL3.1 hardware as well, but I've got a really nice solution now.

I did try turning the MIK deck around, which gave a bit more support to the top rail of the QL3.1 (and offered more rack in a more usable position rather than squished under the seat), but I ended up turning it back to the recommended position as I'm thinking of getting a MIK bag for the top, so decided to leave it as is.

Thanks again everyone for the good advice, and I hope the above is helpful to anyone else wanting to use a QL3.1 bag. It was a real hassle to make this work, but I love not having the pannier mounts on the back of the bag which makes it much nicer to carry around when it's not on the bike.
 

Attachments

  • IMG_3902.jpeg
    IMG_3902.jpeg
    273.3 KB · Views: 558
  • IMG_3904.jpeg
    IMG_3904.jpeg
    244.6 KB · Views: 599
Back