Magnum Premium Folder to KT controller saga

vincent

Well-Known Member
started this in the magnum forum but think others can learn from my mistakes


believe this is a 2017-18 magnum folder, practically brand new but the controller is wide open in pas 1, just a flat out crappy controller which had been my experience with magnum all along, i expected this when i bought this bike cheap and expected to have to change the controller
whether they have resolved this problem in newer bikes i have no idea

too bad because other than that really nice little bike, the people rode it only 5 miles... sucks to think of all the people that got out of ebikes because of so many crappy controllers

contacted electrobikeworld about getting a KT setup, they were EXCELLENT to work with and all mistakes in this process are my own

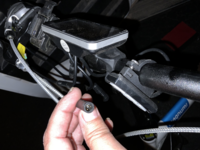
2 biggest mistakes is i did not measure the old controller box, mine is just slightly too small, the controller barely fits but not with all the wiring..
and then mainly because the controller had to be moved up the wiring is too short in a lot of places

with shipping times the way they are this really set stuff back

this came with the original wires thru the frame, this is what i wanted to do and as far as i can tell is not possible
i can get display extensions and have 3 to make it work but electrobikeworld does not sell a throttle extension.. grin seems to have one that might work??? about to order it and try it
another 4-6 day delay

what is weird to me is this is a small 20 inch folding bike and yet i dont have enough cable? i am guessing all these kits are meant to run the cables the shortest way possible not the most clean looking
this was disappointing to me and i am not happy with how the bike will eventually turn out
would help if every wire had extensions available to buy

this KT has most of the wires at the controller, like the throttle wire has to go all the way down there vs most of my other bikes that have it come off the display

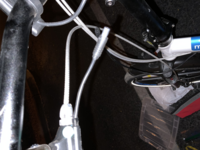
my brake cutoffs wont work, they are 2 pin but a weird higo? type connecter ..
so i will have to change the brakes out, have not even started with that yet, looks like electrocbikeworld has those on back order

Tom wondering if you can make me an adapter... will send you pics

my pas sensor was the same plug so we tried and it worked, that was nice

the only wire i had to actually cut and put together was the battery wire

my gripes about the Kt controller
i am happier with the bafang units that have the wires go to the handlebars, this is easier for testing problems where you can easily unplug throttle,brakes etc right there and much easier to just swap a display
being more familiar with the bbs mid drive programming i thought the KT would be similar and it is not at all

right now this is on the bike and functioning although the wiring is a mess and i am waiting for more extensions so spent some time changing parameters etc last night and understand this system more

right off the controller is light years better than stock, it would be ok- not great but ok right out of the box, still too fast for the bike trail in pas 1
someone please correct me if i am wrong but my understanding now is that people that are using these to calm down pas are mostly just turning down the bike overall power- plus the controller is better overall
and the others are trying to increase power and speed

did not understand or expect that
wanted full power or even a little more but controlled pas
also did not realize i could not set individual pas levels , for some reason thought it would go further into the settings and get to this and that is not the case

do have more messing around with the programming, Ahicks sent me some good info to try and plan to watch wattage and see how much changes on that in different settings
i ride slow but am a big believer in having full power there when i want it with throttle or pas 5

also do not like the KD8 display i got, would rather have watts bigger so i could see it, did not pick this display this is what electrobikeworld sent me with the kit
think i would have been happier with the older one with bigger numbers in the blocks

Disappointed there is not a wire for front and rear lights, that surprised me


i am going to do a little research on ASI controllers like ravi suggested
may end up using this on the bike but would not have done this again

one caveat is i dont ever want to do any of this, want to pay someone and i dont have people to really do this kind of stuff, wanted a really clean install and thought i could take the time and do that myself but dont think it is possible without extensions that are not available or that you will have to get multiple different sources
if anyone knows of a shop in AZ doing this kind of stuff i would love to drop it off lol

project is over 300 right now and need to buy new brakes , if the install was as clean as stock i would be ok with this but it wont be at all
 
anybody know where to get an adapter for that, nothing other than tektro on the lever
 

Attachments

  • tempImagelTKmd0.png
    tempImagelTKmd0.png
    2.7 MB · Views: 183
  • tempImageD2mD8R.png
    tempImageD2mD8R.png
    3.8 MB · Views: 181
  • tempImagehyE8bs.png
    tempImagehyE8bs.png
    3.5 MB · Views: 179
think by the time i buy wire to get to the controller and change the plug end will just be easier and costs about 50 more to swap over to the electrobikeworld hydraulic kit if they get it back in stock

will see how long they think it will be, i can ride it without brake cutoffs for programming etc
 
it is and i need to learn to do it!

maybe will watch some videos etc tonight and see what i need to buy

honestly i would love to pay someone to do this, dont work on any of my bike stuff, just want to ride

and it is very unlikely i will be doing another controller swap and my bikes rarely to never need electric repair

my next bike will be a ZEN and then maybe a m600 in something
Here is all you need, beside a 5 min tutorial.
 
Personally, I don't think Electrobikeworld did you any favors selling you a controller that requires you to run the throttle all the way to the controller. There are MUCH neater installs that don't leave you dealing with a big wad of wiring to deal with down near the controller. The one I'm thinking of would use what they call a 1T4 cable that runs from the controller up to the handlebar area. It comes with 1 connection at the controller, then 4 connections up by the handlebar (2 brakes, throttle, and display).

Something like this one-

This model has a lead going to the motor, to the PAS sensor, the connection for the 1T4 cable that leads to the handlebar area, and the battery wires. There's another VERY similar controller that comes exactly the same way, but also includes a light wire that's switched using the "up" arrow.

1T4 cable-

I use Amazon frequently, but you have to be careful with delivery dates. Some stuff is available pretty quickly as it's stocked state side, other stuff can take weeks as it's coming from China. For cables search "higo cable" or julet cable".

And don't feel bad. I learned the hard way, as you are, with the rat's nest near the controller. Now totally spoiled by the newer style. They're both quicker AND much neater. -Al
 
that is exactly what i want wire wise, much cleaner

my controller looks like the pic you sent but the wires all come from the individual units down from the handlebars, does that make sense? i will ask them if they have a 4 wire set up like that, that is how all my other bikes have been
i guess maybe connectors might now get as wet IF they would fit in the controller box, but they wont

have to wonder how much of this stuff is supply chain related and they just sell you what will work
 
Betting they sold you this one, which is the same internally, but clearly not nearly as neat an install -

Do an Amazon search on 22a controller to see all of the different KT-22a models. They have the same thing for the 17a controller. That uses the smaller case with a little less power available - still works fine with a 500w motor.

As far as why they sold you what they did, could be ignorance/lack of experience, could be price or availability, but compared to Amazon, they can't possibly compete regarding what they have available....
 
so to be clear all these higo ends on that 4 wire harness matched up perfectly with the kt controller you have? or did you have to cut/wire some connectors etc?
 
so weird that there are different KT controllers

they sold me the first one you listed with the higo connectors not that last one, but i agree a 4 wire harness would be better, the way mine is the throttle wire runs down to the controller separate, the display wire same thing, brake cutoffs same thing instead of in one unit

hard to change it once you get going because you will end up with a ton of wire at the handlebars unless you cut it off and redo connectors

the hydraulic brake kit that match this are completely back ordered everywhere , be a while before i get those
 
so to be clear all these higo ends on that 4 wire harness matched up perfectly with the kt controller you have? or did you have to cut/wire some connectors etc?
The only variable on the 1T4 cable will be the brake ends. The 2 vs. 3 wire is messing a lot of people up. Never any issue with the fit going to the display, and I've never had an issue with the throttle, although there are throttles that have extra "stuff" (e.g. battery condition LEDs) built in requiring more wires. The first controller I listed, here:


has no place to plug in a throttle, so I'm a little confused when you say that's the one you received?

Generally no need for a ton of wire(s) at the handlebars using the 1T4 system. After installing, to tidy up you would remove as much slack as necessary up there by pulling the 1T4 cable toward the controller, then coiling and securing any excess near the controller.

To help understand the 2 vs. 3 wire brake wires, the 3 wire includes a brake light circuit where the 2 wire does not. If the brake lights were not important to you, it wouldn't be hard to come up with/make an adapter.

Wish I was nearby to give you a hand! -Al
 
Last edited:
i am going to do a little research on ASI controllers like ravi suggested
may end up using this on the bike but would not have done this again
If it ever rains where you are, ASI controller will self ignite and burn the end off your motor harness too. +48 and ground too close together. A drop of rainwater burnt 2 pins off the ASI controller plus burnt the pins into the harness connector of the motor. No, its potted, I can't repair it.
Those old fashioned controllers with the wires all coming out the end, which I point down to make a drip loop, are my style. All controllers (even ASI) come with garbage electrolytic caps that leak so badly the harness will spark if you unplug it and plug it back again in 30 seconds. I put industrial grade caps in my ebikeling controller, that will hold a charge for hours. Also not dry out in 2 years from all the leakage heat.
 
All controllers (even ASI) come with garbage electrolytic caps that leak so badly the harness will spark if you unplug it and plug it back again in 30 seconds.
You’ve said this before and that’s just not true. It’s not accurate to make industry wide comments based on limited use of a very few controllers.
 
UPDATE

finally got it together
not loving my wiring setup but think i can shorten the taillight wire and do some more organizing to get it decent

also am not finished because i cannot get the brake set until august so those wires are not done and in the way

pretty much every thing hooked up plug wise but the battery feed and for some reason all the 2 pin taillights come with the opposite higo needed so had to wire that
had to change display and throttle
throttle is blah in the sense it is a big wide one and takes up way too much room but the wiring is totally different than any of my bafang mid drive throttles, it is what it is

this bike did not have wired lights to begin with , they are aa battery lights
electrobikeworld told me to run a usb headlight, think this is because the controller cannot handle much power on the full power wire, the board burns out or something
so got a cheap blitzu 450 watt light and it seems to run fine plugged in and charging on the display USB port, not sure all headlights will run while plugged in but i read reviews on this one first and they said it would, working fine for me

have another higher powered niterider, i always run at least 2 lights
did find 2 pin higo taillights so purchased one of those and put it on here, seems to be working fine so far
Turns on and soon as the key is turned to on
and dont know if the display port times out eventually but it seems to be charging until i turn the key completely off

i have a ton of battery on this bike and am fine with those being on all the time , actually like that


did my first soldering/shrink wrapping and not sure how all that will do but i can fix it later if there is a problem

some observations

got a soldering kit and shrink wrap kit from amazon, it all seems to work ok, soldering kit came with a book to download and watched a couple of videos

but what i did not realize was that i would need a helping hands stand to hold wires to do this and a magnifying light
so this set me back a few days waiting on more stuff
would definitely get all that, some of you young people may can do the soldering without the magnifying light but not me!

another thing i would purchase would be a set of Velcro straps, some rubber grommets and some high quality zip ties

would like to secure the controller with something other than zip ties so am waiting on more orders

planning to paint the controller black and waiting on split wire loom to try and cover those up some
got the spiral wrap but it is too big of a bunch of wires and it looks crappy that way- once the brake stuff gets here if some of that is split up i may go back and use the spiral wrap

AHicks has been invaluable helping me program, finally got that dialed in tonight
it is pretty decent
watched a lot of videos but mainly ended up following what AHicks said to do

Not sure where the power topped out on this bike originally but i turned it down a few watts from where this controller full power is
it is a 500watt motor and i am topping out with the throttle pegged at 865 or so, before i turned the power down to make me happier with the pas it was running maybe 960 pegged
if i get to flagstaff and climbing hills is not going great may turn it back up slightly but it makes level 2 pas too much for me using the multi use paths
will probably be in pas 1 90% of the time , it is about 50 watts
tried the speed based set up and in some ways liked it a little better but it made the mph weird when i was coasting and level 2 was too much

the power based is ok now with this set up
 
Glad to see you've made it through. Congrats on having the patience/determination to do that.

Clearly, a lot of "lessons learned" it sounds like. Hopefully this project will encourage you/give you the confidence to try another. Safe bet THAT project will go MUCH better, producing a much cleaner install!! Be a shame to waste what you've learned on this one....

Don't be shy of doing a little experimenting with the power settings (C5/C14). C5 for the big changes, then C14 for final fine tuning. For instance, with full power (C5=9 or 10), then go to C14 and turn it down a bit (C14= 1 or 2) so your PAS 1 setting is something you can live with for maneuvering at low speeds. It'll be easy to see your final setting are a compromise that take some diddling and test riding. Worth it though, especially as compared to your options with the controller that came on the bike....
 
UPDATE

finally got it together
not loving my wiring setup but think i can shorten the taillight wire and do some more organizing to get it decent

also am not finished because i cannot get the brake set until august so those wires are not done and in the way

pretty much every thing hooked up plug wise but the battery feed and for some reason all the 2 pin taillights come with the opposite higo needed so had to wire that
had to change display and throttle
throttle is blah in the sense it is a big wide one and takes up way too much room but the wiring is totally different than any of my bafang mid drive throttles, it is what it is

this bike did not have wired lights to begin with , they are aa battery lights
electrobikeworld told me to run a usb headlight, think this is because the controller cannot handle much power on the full power wire, the board burns out or something
so got a cheap blitzu 450 watt light and it seems to run fine plugged in and charging on the display USB port, not sure all headlights will run while plugged in but i read reviews on this one first and they said it would, working fine for me

have another higher powered niterider, i always run at least 2 lights
did find 2 pin higo taillights so purchased one of those and put it on here, seems to be working fine so far
Turns on and soon as the key is turned to on
and dont know if the display port times out eventually but it seems to be charging until i turn the key completely off

i have a ton of battery on this bike and am fine with those being on all the time , actually like that


did my first soldering/shrink wrapping and not sure how all that will do but i can fix it later if there is a problem

some observations

got a soldering kit and shrink wrap kit from amazon, it all seems to work ok, soldering kit came with a book to download and watched a couple of videos

but what i did not realize was that i would need a helping hands stand to hold wires to do this and a magnifying light
so this set me back a few days waiting on more stuff
would definitely get all that, some of you young people may can do the soldering without the magnifying light but not me!

another thing i would purchase would be a set of Velcro straps, some rubber grommets and some high quality zip ties

would like to secure the controller with something other than zip ties so am waiting on more orders

planning to paint the controller black and waiting on split wire loom to try and cover those up some
got the spiral wrap but it is too big of a bunch of wires and it looks crappy that way- once the brake stuff gets here if some of that is split up i may go back and use the spiral wrap

AHicks has been invaluable helping me program, finally got that dialed in tonight
it is pretty decent
watched a lot of videos but mainly ended up following what AHicks said to do

Not sure where the power topped out on this bike originally but i turned it down a few watts from where this controller full power is
it is a 500watt motor and i am topping out with the throttle pegged at 865 or so, before i turned the power down to make me happier with the pas it was running maybe 960 pegged
if i get to flagstaff and climbing hills is not going great may turn it back up slightly but it makes level 2 pas too much for me using the multi use paths
will probably be in pas 1 90% of the time , it is about 50 watts
tried the speed based set up and in some ways liked it a little better but it made the mph weird when i was coasting and level 2 was too much

the power based is ok now with this set up
Keep an eye on your motor temp if you are going to over volt it like that. If the windings get too hot, the varnish disintegrates and you get a short.
"but what i did not realize was that i would need a helping hands stand to hold wires to do this and a magnifying light"
You can easily do without helping hands and mag light, just pre twist the wires and get some reading glasses, if you need.
I have poor reading eyesight and have been fine without those "extras" for decades.

Note: Unless you bought a high powered soldering gun, avoid using a pair of pliers to hold the wires, the reason they use alligator clips(on the helping hands) is to avoid creating a heat sink. A heat sink will make it harder to get the wires to the best temp for bonding the solder to the wire. So the pliers will draw heat away from the wire.
 
Last edited:
Back