My bike to be received in a week even though I have a tracking number. They need to say that it can take a week for Fed Ex to pick up? More transparency. I would not have ordered again due to the back log and inaccurate shipping info. That being said, any good links for lectric rear derailleur adjustment videos? Im sure i will have to adjust.
You are using an out of date browser. It may not display this or other websites correctly.
You should upgrade or use an alternative browser.
You should upgrade or use an alternative browser.
Lectric XP
- Thread starter konea420
- Start date


Hikertrash
Member
My bike to be received in a week even though I have a tracking number. They need to say that it can take a week for Fed Ex to pick up? More transparency. I would not have ordered again due to the back log and inaccurate shipping info. That being said, any good links for lectric rear derailleur adjustment videos? Im sure i will have to adjust.
I ordered on 4/15 and it took 6 weeks to be delivered. Recently I saw where people are getting theirs in 5 weeks. If yours is taking a little longer, try to be patient, it's usually a FedEx problem.
On my bike nothing needed to be adjusted, however, I did make sure all the bolts were tightened and put Loctite on the pedals, and cleaned the brake rotors. Most derailleur problems can be fixed by pulling out the guard if it's against the derailleur. If it does need adjusting try this.
Last edited:


I think it also depends on how often you pedal with the power turned off. I often ride without the pedal assist on and without the low gear it would be substantially harder particularly with a head wind.
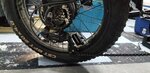
Darceman, did you have any issues at all with the installation of the 11t-34t freewheel? Some comments on YouTube cautioned it might be a bit large on the low gear side making the chain tight or something like that.
Darceman
Well-Known Member
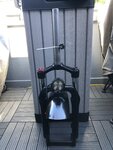
No problem at all...I read that this derailleur wouldn't work for with a 34t sprocket but tried it and it works fine. The chain length is good too..here's a pic of one of our bikes in first gear..Darceman, did you have any issues at all with the installation of the 11t-34t freewheel? Some comments on YouTube cautioned it might be a bit large on the low gear side making the chain tight or something like that.
Attachments
Garland
Member
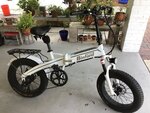
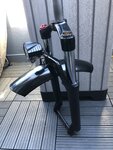
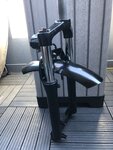
I finally got my front air suspension fork installed today- a big thank you to bobn4burton for finding the parts necessary! The only addition to his install procedure that I would include is to purchase a star nut and screw to install into the fork stem. The folding handlebar stem assembly has a fitted spacer/washer that the screw goes through and pulls the stem down to the fork. After tensioning that screw the two allen cap screws on the side can be tightened to clamp the handlebar stem down tight.
Regarding function, I think the fork is absolutely awesome! I can fly down trails that would have jarred the heck out of me before, and even riding on the street is much smoother. I lowered the recommended pressure in the fork to make it less firm. By the way, you also need to order a special pump to adjust the pressure, I spent about $34 for the pump as well as a star nut and screw from Amazon.
The only negative for me about the front suspension fork is that I preferred having the front fender both in looks and function. I think the fender added a traditional appearance, especially with my own upright/Danish style biking form. It also protected both me an the bike frame from mud and water. There are little mud flap things that can be attached to the upper fork but they look more at home on dirt bikes than these bikes.
If I was to remove both fenders and the rear rack (as others have done) the bike has a great stripped down look, but I for one can’t live without the rack. I am going to leave the rear alone for now but I have some ideas for the future.
All things considered the suspension fork is a great, great upgrade, especially in combination with the Suntour NCX seat post. I like it so much that if I ever were to ever replace this bike, I would not even consider one that had no suspension.
Attachments
sed6
Active Member
The only negative for me about the front suspension fork is that I preferred having the front fender both in looks and function.
Nice upgrade! I agree. Is there just not enough room or do the bolts not line up?
I'm awaiting my fork now. Do you by chance have a Amazon link, or can you direct us to a specific sized star nut and screw? TIA.The only addition to his install procedure that I would include is to purchase a star nut and screw...
... a star nut and screw from Amazon.
Garland
Member
This is the one I bought, but they are pretty much all the same. You only need the screw and star nut, not the washer.I'm awaiting my fork now. Do you by chance have a Amazon link, or can you direct us to a specific sized star nut and screw? TIA.
ONIPAX Lightweight Headset Top Cap & Star Nut with Aluminum Screw. https://www.amazon.com/dp/B07H2N34PW/ref=cm_sw_r_cp_tau_0lc3Eb4ADQKJS
Thank you very much, sir. I know so little about this stuff so EVERY bit of assistance helps.This is the one I bought, but they are pretty much all the same. You only need the screw and star nut, not the washer.
ONIPAX Lightweight Headset Top Cap & Star Nut with Aluminum Screw. https://www.amazon.com/dp/B07H2N34PW/ref=cm_sw_r_cp_tau_0lc3Eb4ADQKJS
Garland
Member
The stock fender is attached at 3 places, a single point at the top and at the bottom of the forks on each side. With a suspension fork the lower part moves up and down so is not suitable as an attachment point. You can “hang” a fender from the top of the fork but you really can’t snug one up to the wheel like the stock set up.Nice upgrade! I agree. Is there just not enough room or do the bolts not line up?
Edit* I was incorrect about this, stock fender works fine just need to add mounting straps to lower forks. See post below.
Last edited:
DarkCognac
New Member
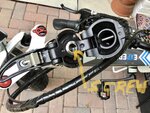
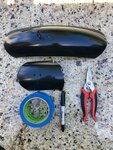
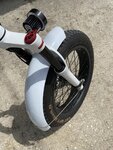
Why can’t you use the same front fender on the suspension fork? YES you can. Just being a little creative with yourself. All you need are some painter tape, marking pen and tin snip. Make yourself a template out of paper or rough cut one end to trace the same radius .Just less than a 15 minutes job. The shorter you cut the more ridged the fender become. My cut is 14.5 long. If later I can alway cut shorter. I am just waiting on my other parts to come in from Aliexpress to change over to more of a BMX setup. This way you can still have that traditional appearance
Attachments
-
 CC4A83C2-5971-4A6D-BF0D-9A104FCBCEBA.jpeg373.6 KB · Views: 671
 -
 C0970F20-2BC5-4D5E-9B65-90B79EA6D381.jpeg336.1 KB · Views: 693
 -
 FEAA09C9-8EF7-484C-AEAC-B916F76E0381.jpeg356.5 KB · Views: 664
 -
 AD4127D9-2CD9-4077-B0E9-818167C1AADF.jpeg344 KB · Views: 668
 -
 D251399E-DE82-402B-94C4-0DDA4FA69436.jpeg511.9 KB · Views: 703
Last edited:
Garland
Member
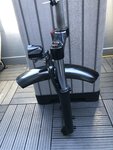
I ended up reinstalling the front fender onto the suspension fork using some 1 1/2” strap clamps around the forks to create mounting points for the wire arms. I may tweak it a bit but it works fine.
Attachments

Last edited:
How's the ride with both the suspension seat post and the forks?I ended up reinstalling the front fender onto the suspension fork using some 1 1/2” strap clamps around the forks to create mounting points for the wire arms. I may tweak it a bit but it works fine.
DarkCognac
New Member
I think if you went with my route you wouldn't be disappointed, but each its ownI ended up reinstalling the front fender onto the suspension fork using some 1 1/2” strap clamps around the forks to create mounting points for the wire arms. I may tweak it a bit but it works fine.
Darceman
Well-Known Member
That's one of the great things about these types of sites. We get various solutions and ideas for the same problems.I think if you went with my route you wouldn't be disappointed, but each its own

sed6
Active Member
I think if you went with my route you wouldn't be disappointed, but each its own
I love your setup! I see that you cut several inches off, but I don't see another modification. What did I miss in those pics? I have that light in my cart, which fork did you use?
DarkCognac
New Member
There isn't any more modification to it.....just cut to the length to your liking and round off the end cut with your radius. You have 1 contact point... bolt and nut to fork.. https://www.aliexpress.com/item/32989738786.html?spm=a2g0s.9042311.0.0.27424c4dYsT0kAI love your setup! I see that you cut several inches off, but I don't see another modification. What did I miss in those pics? I have that light in my cart, which fork did you use?
Garland
Member
The ride is much improved with both mods, and they compliment each other well. My wife has another black XP which is stock except for a softer replacement seat, so it is easy for me to compare. I enjoy riding trails and unpaved alleyways when I can, and having a suspension allows me to go faster and with much more comfort and control.How's the ride with both the suspension seat post and the forks?
Similar threads
- Replies
- 2
- Views
- 8K
- Replies
- 11
- Views
- 2K