L&M Lights Installation Guide on a 2017 Giant Road-E+ 1 with SyncDrive Sport Motor
DISCLAIMER: YOU ASSUME ALL RISK AND LIABILITY FOR WORKING ON AN E-BIKE. DOING THIS INSTALLATION MAY VOID THE WARRANTY AND IS ALSO POTENTIALLY HAZARDOUS GIVEN YOU ARE WORKING WITH ELECTRONICS.
This is a guide to install Light and Motion lights on my e-bike. You just as well could solder in the cables, but I didn't want to mess with the factory cabling by cutting off the connector, thus went and made my own cable with a somewhat esoteric connector I found online. The lights work well, but are not perfect because I don't believe I have all the power settings. I do use the front to see and to be seen by itself, so I am very happy with the setup. The rear is a slow strobe only, but works really well and is mounted high just below the saddle.
estimated total time: 4 hours
I think you could do all of this in 2 hours the second time around.
installed on: 2017 Giant Road-E+ 1
This model was just prior to the 5-assist option model in the United States. Technically, the 5-assist option is not a 2018 model but a mid-year model change.
parts needed to wire both lights with OEM connectors:
4X SWPT-001T-P025 (realistically get 8+ because it's easy to mess up the crimp)
2X 02T-JWPF-VSLE-S (realistically get 4+ for above reason)
This one would probably do the job. I used a $10 generic one which is no longer available from Fry's Electronics. This one is the Official JST Crimper.
main parts:
light and motion nip 800 frontlight:
https://www.lightandmotion.com/nip-800
I'm not sure if I'm getting the full power out of this light. There is a button on the light I was able to switch between settings, but the light output didn't seem to change, but I did get a flashing mode after some delay. I can, however, turn both FRONT and REAR off with a button on the Evo display.
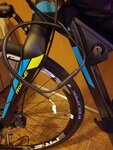
Cables pulled from downtube exposing existing connector on bike. I ran the front light's cable to this connector and tucked (read: crammed) it back into the tube. The existing rubber grommet seemed to fit all cables just fine and didn't need to be modified at all!:
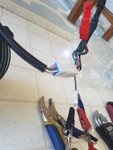
Testing voltage at connector at motor bundle using Connector and JST connectors I bought:
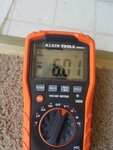
Meter reads 6V:
front light fender mount (optional, light comes with a rubber strap mount):
https://www.lightandmotion.com/shop/accessories/nip-fender-mount
light and motion tuck tail light:
https://www.lightandmotion.com/shop/bike-lights/lights-for-e-bikes/tuck-e-bike-taillight
rear light underseat mount (optional, light comes with a rubber strap mount):
I actually removed the seat, and drilled and filed a hole into the seatpost mount to a run a cable through the mount, down through the seatpost, to the motor's bundle. I really like that the cable is hidden. There are springs for the seatpost mount so you have to have patience when running the cable past that and retightenting the seatpost mount. I don't see this particular mount any longer on L&M's site, so I'm assuming it was discontinued. The closest thing they now have is a seatpost mount:
https://www.lightandmotion.com/shop/accessories/tuck-seat-post-mount
Edit: Universal Cycles seems to stock the mount:
https://www.universalcycles.com/sho...MI3ciHoaeM4QIVFZ7ACh2B0wU1EAQYAyABEgJg1fD_BwE
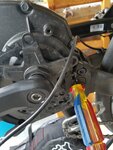
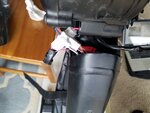
Motor dropped to run cable from rear light to motor bundle:
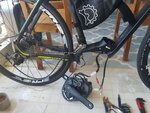
other resources I used, thanks all!:
video sources:
for motor removal, 0:10 to 2:35, then install, 3:20 to 6:02:
how to crimp video:
UK guide to light installation:
https://www.pedelecs.co.uk/forum/threads/wiring-lights-yamaha-motor-giant-2016.25560/page-2
how to crimp guides:
https://www.ebikes.ca/documents/GrinConnectorGuide.pdf
http://sparks.gogo.co.nz/crimping/index.html
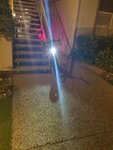
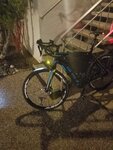
action shots:

DISCLAIMER: YOU ASSUME ALL RISK AND LIABILITY FOR WORKING ON AN E-BIKE. DOING THIS INSTALLATION MAY VOID THE WARRANTY AND IS ALSO POTENTIALLY HAZARDOUS GIVEN YOU ARE WORKING WITH ELECTRONICS.
DISCLAIMER: YOU ASSUME ALL RISK AND LIABILITY FOR WORKING ON AN E-BIKE. DOING THIS INSTALLATION MAY VOID THE WARRANTY AND IS ALSO POTENTIALLY HAZARDOUS GIVEN YOU ARE WORKING WITH ELECTRONICS.
This is a guide to install Light and Motion lights on my e-bike. You just as well could solder in the cables, but I didn't want to mess with the factory cabling by cutting off the connector, thus went and made my own cable with a somewhat esoteric connector I found online. The lights work well, but are not perfect because I don't believe I have all the power settings. I do use the front to see and to be seen by itself, so I am very happy with the setup. The rear is a slow strobe only, but works really well and is mounted high just below the saddle.
estimated total time: 4 hours
I think you could do all of this in 2 hours the second time around.
installed on: 2017 Giant Road-E+ 1
This model was just prior to the 5-assist option model in the United States. Technically, the 5-assist option is not a 2018 model but a mid-year model change.
parts needed to wire both lights with OEM connectors:
4X SWPT-001T-P025 (realistically get 8+ because it's easy to mess up the crimp)
2X 02T-JWPF-VSLE-S (realistically get 4+ for above reason)
This one would probably do the job. I used a $10 generic one which is no longer available from Fry's Electronics. This one is the Official JST Crimper.
main parts:
light and motion nip 800 frontlight:
https://www.lightandmotion.com/nip-800
I'm not sure if I'm getting the full power out of this light. There is a button on the light I was able to switch between settings, but the light output didn't seem to change, but I did get a flashing mode after some delay. I can, however, turn both FRONT and REAR off with a button on the Evo display.
Cables pulled from downtube exposing existing connector on bike. I ran the front light's cable to this connector and tucked (read: crammed) it back into the tube. The existing rubber grommet seemed to fit all cables just fine and didn't need to be modified at all!:

Testing voltage at connector at motor bundle using Connector and JST connectors I bought:

Meter reads 6V:

front light fender mount (optional, light comes with a rubber strap mount):
https://www.lightandmotion.com/shop/accessories/nip-fender-mount
light and motion tuck tail light:
https://www.lightandmotion.com/shop/bike-lights/lights-for-e-bikes/tuck-e-bike-taillight
rear light underseat mount (optional, light comes with a rubber strap mount):
I actually removed the seat, and drilled and filed a hole into the seatpost mount to a run a cable through the mount, down through the seatpost, to the motor's bundle. I really like that the cable is hidden. There are springs for the seatpost mount so you have to have patience when running the cable past that and retightenting the seatpost mount. I don't see this particular mount any longer on L&M's site, so I'm assuming it was discontinued. The closest thing they now have is a seatpost mount:
https://www.lightandmotion.com/shop/accessories/tuck-seat-post-mount
Edit: Universal Cycles seems to stock the mount:
https://www.universalcycles.com/sho...MI3ciHoaeM4QIVFZ7ACh2B0wU1EAQYAyABEgJg1fD_BwE
Motor dropped to run cable from rear light to motor bundle:

- disconnect charging cable from battery
- remove battery
- flip bike upside down
- remove chain from rings and let rest on front derailleur
- loosen 6 chainring bolts with 5mm (these were on TIGHT)
- remove big chainring
- remove 3 phillips screws
- remove with t20 torx screw 2 bolts nearest top of motor, drive-side
- remove downtube guard bolt with 4mm allen
- for non-drive-side, remove 3 torx bolts
- remove 4 torx in battery section (clearance is <9mm diameter for tool)
- slide non-drive-side cover off
- remove left and right bolts with t30
- loosen middle with t30
- wedge screwdriver in rear
- gently pull cable bundle out


other resources I used, thanks all!:
video sources:
for motor removal, 0:10 to 2:35, then install, 3:20 to 6:02:
how to crimp video:
UK guide to light installation:
https://www.pedelecs.co.uk/forum/threads/wiring-lights-yamaha-motor-giant-2016.25560/page-2
how to crimp guides:
https://www.ebikes.ca/documents/GrinConnectorGuide.pdf
http://sparks.gogo.co.nz/crimping/index.html
action shots:


DISCLAIMER: YOU ASSUME ALL RISK AND LIABILITY FOR WORKING ON AN E-BIKE. DOING THIS INSTALLATION MAY VOID THE WARRANTY AND IS ALSO POTENTIALLY HAZARDOUS GIVEN YOU ARE WORKING WITH ELECTRONICS.
Last edited:

