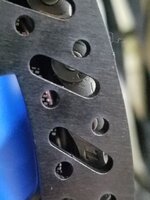
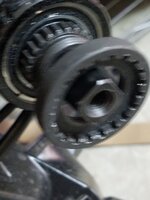
Jimmy666, I have the exact same problem on my Core-5. It just started doing the "surging" after returning from my mechanic for maintenance and a handlebar replacement. I own two Core-5 bikes and noticed one difference between the two regarding the PAS magnet ring by the pedals. My bike with the "surging" problem this magnet ring is loose and can be wiggled noticeably by hand whereas the other bike with no issues this ring is tightly attached. Have you found out the fix for your bike yet?Has anyone here had Core 5 power issues?
@krdugger I have recently been having power surges while riding. It feels like all in the sudden it goes from pas3 to 5 and then back again sporadically. Also every once in a while when I stop the motor wants to keep going like it is in walk mode and I have lost power twice after a stop.
I have never adjusted any settings on the controller and have not had any error codes or crashes. I did have to take the rear wheel off to install fenders two days before this started happening.
I have checked the cable going to the motor and nothing looks crimped or damaged,
Thanks in advance! It has been a fun 650 mile so far!
You are using an out of date browser. It may not display this or other websites correctly.
You should upgrade or use an alternative browser.
You should upgrade or use an alternative browser.
Known Issues & Problems with Ride1Up Products + Help, Solutions & Fixes
- Thread starter troehrkasse
- Start date
Someone reported the same problem on the FB group page, but no resolution has been posted, only speculation that it is a controller problem.Jimmy666, I have the exact same problem on my Core-5. It just started doing the "surging" after returning from my mechanic for maintenance and a handlebar replacement. I own two Core-5 bikes and noticed one difference between the two regarding the PAS magnet ring by the pedals. My bike with the "surging" problem this magnet ring is loose and can be wiggled noticeably by hand whereas the other bike with no issues this ring is tightly attached. Have you found out the fix for your bike yet?
 www.facebook.com
They sent out a new controller that I should get in a day or so. Hopefully that does the trick, other than this issue the bike has been great.Jimmy666, I have the exact same problem on my Core-5. It just started doing the "surging" after returning from my mechanic for maintenance and a handlebar replacement. I own two Core-5 bikes and noticed one difference between the two regarding the PAS magnet ring by the pedals. My bike with the "surging" problem this magnet ring is loose and can be wiggled noticeably by hand whereas the other bike with no issues this ring is tightly attached. Have you found out the fix for your bike yet?
It seems like I'm frequently reading about people getting new controllers from Ride1Up. Good luck. I haven't ordered mine yet, but I'll keep my fingers crossed.So I think the controller was the issue. After I replaced it I have ridden over 30 miles and no issues so far and I rode it hard in Pas 4 and 5 on purpose the first 15 miles and then my usual Pas 3 the rest
Limeybastard
Member
- Region
- USA
- City
- Florida Unfortunately.
Although not specific to this thread or this e-bike brand, what I find concerning in general are folks that use a store for repairs and maintenance and end up getting issues that were not present prior to the bike being brought in. I feel the store has an easy cop out since the product wasn't purchased through them thus they can deny anything, which leaves the biker in a quandary.
Fast n' Furious
Well-Known Member
- Region
- USA
- City
- San Diego
Amen,
Excellent thought and a classic fact. Being at the mercy of a mechanic is a fail in waiting. These are simple machines. We need to rely on our own education and wits.
Fn'F
Excellent thought and a classic fact. Being at the mercy of a mechanic is a fail in waiting. These are simple machines. We need to rely on our own education and wits.
Fn'F
Fast n' Furious
Well-Known Member
- Region
- USA
- City
- San Diego
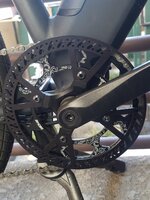
My Ltd also had a loose ring and it ate the chain, bash ring as a result. Did you dismantle the whole pedal arm assembly?They sent out a new controller that I should get in a day or so. Hopefully that does the trick, other than this issue the bike has been great.
I had to replace the whole shebang.
Attachments
When you say you had to replace the whole shebang what do you mean? Obviously the chain but The chain ring doesn't look original. I replaced a controller on my 700 series and it wasn't as bad as I thought it would be. It actually helps you figure the bike out when you work on it which is always good. My only concern working on it is availability of parts and even knowing which ones to get regarding some things. It Will be nice at these companies all mature to the point where they have complete parts lists like car companies. I pulled the brake pads off of it just to see which kind to order so I would have them on the shelf when needed and that was a really easy job. Even when as far as to watch a few videos on how to make your own hydraulic brake lines when / if the time comes.My Ltd also had a loose ring and it ate the chain, bash ring as a result. Did you dismantle the whole pedal arm assembly?
I had to replace the whole shebang.
Fast n' Furious
Well-Known Member
- Region
- USA
- City
- San Diego
When you say you had to replace the whole shebang what do you mean? Obviously the chain but The chain ring doesn't look original. I replaced a controller on my 700 series and it wasn't as bad as I thought it would be. It actually helps you figure the bike out when you work on it which is always good. My only concern working on it is availability of parts and even knowing which ones to get regarding some things. It Will be nice at these companies all mature to the point where they have complete parts lists like car companies. I pulled the brake pads off of it just to see which kind to order so I would have them on the shelf when needed and that was a really easy job. Even when as far as to watch a few videos on how to make your own hydraulic brake lines when / if the time comes.
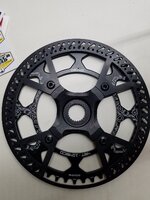
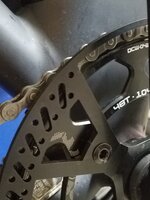
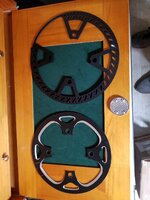
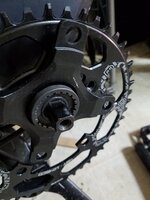
I replaced the stock 44T chain-ring w/48 tooth High Low type.
The guard (bash-ring) was cut by a custom company that seems to have vanished. The limited production laser work is quite nice.
USA made. Took a month after the order to cut. They make MTB stuff, so their largest, a 46T was a long shot, but it was perfect. There it is.
All the 48T bash-rings were actually color variations of a couple types from China and Taiwan. This one is three time the thickness (and the price), noticeably harder tempered aluminum. You can see how tight the clearances are. The chain seems fine. Didn't replace.
That's the spirit. I agree. Working on the bike helps figure it out too. I plan for a bike for the long run. Until makers can provide parts lists, all we can do is share what we know. It'll probably be largely standardized in ten years.
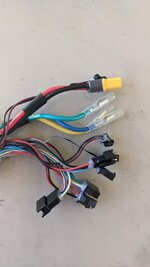
Hey ... I need a clear photo of that 22amp controller's wiring colors at the plugs. Do you have a dead one? I'm too busy to disassemble mine. Please post if you have one !!!
TY
Fn'F
Attachments
No they wanted me to send the controller back after I changed it. I do have some pictures of the new one before I put it in and the old one I think I'll see if I can find themI replaced the stock 44T chain-ring w/48 tooth High Low type.
The guard (bash-ring) was cut by a custom company that seems to have vanished. The limited production laser work is quite nice.
USA made. Took a month after the order to cut. They make MTB stuff, so their largest, a 46T was a long shot, but it was perfect. There it is.
All the 48T bash-rings were actually color variations of a couple types from China and Taiwan. This one is three time the thickness (and the price), noticeably harder tempered aluminum. You can see how tight the clearances are. The chain seems fine. Didn't replace.
That's the spirit. I agree. Working on the bike helps figure it out too. I plan for a bike for the long run. Until makers can provide parts lists, all we can do is share what we know. It'll probably be largely standardized in ten years.
Hey ... I need a clear photo of that 22amp controller's wiring colors at the plugs. Do you have a dead one? I'm too busy to disassemble mine. Please post if you have one !!!
TY
Fn'F
I replaced the stock 44T chain-ring w/48 tooth High Low type.
The guard (bash-ring) was cut by a custom company that seems to have vanished. The limited production laser work is quite nice.
USA made. Took a month after the order to cut. They make MTB stuff, so their largest, a 46T was a long shot, but it was perfect. There it is.
All the 48T bash-rings were actually color variations of a couple types from China and Taiwan. This one is three time the thickness (and the price), noticeably harder tempered aluminum. You can see how tight the clearances are. The chain seems fine. Didn't replace.
That's the spirit. I agree. Working on the bike helps figure it out too. I plan for a bike for the long run. Until makers can provide parts lists, all we can do is share what we know. It'll probably be largely standardized in ten years.
Hey ... I need a clear photo of that 22amp controller's wiring colors at the plugs. Do you have a dead one? I'm too busy to disassemble mine. Please post if you have one !!!
TY
Fn'F
Attachments
tlippy
Active Member
Off subject but you can help. I have a flat on my 700. Removed the rear tire. Watched the R1U video. Very specific about spacer placement. My 700 had one side different from the video. I posted a question on Facebook. Kevin replied with only a link to the video and didn't answer my specific questions. Someone replied that this had been discussed and the video is in error. I'm tending to believe the poster who gave info as to why the video is in error. How did you do the spacers?
I can't speak for anyone else or as to whether or not the video is correct but I put them back on the way they came off.Off subject but you can help. I have a flat on my 700. Removed the rear tire. Watched the R1U video. Very specific about spacer placement. My 700 had one side different from the video. I posted a question on Facebook. Kevin replied with only a link to the video and didn't answer my specific questions. Someone replied that this had been discussed and the video is in error. I'm tending to believe the poster who gave info as to why the video is in error. How did you do the spacers?
tlippy
Active Member
Thanks! Me2.I can't speak for anyone else or as to whether or not the video is correct but I put them back on the way they came off.
tlippy
Active Member
I thought when I reinstalled the rear wheel that it would bottom out like the front wheel and be centered. Not true on my rear wheel. In order to center I had to lift one side. The only thing keeping it centered is the torque supplied to both nuts. You also?I can't speak for anyone else or as to whether or not the video is correct but I put them back on the way they came off.
I found it easiest to put the wheel on when I flip the bike upside down and rested it on the seat and handlebars. I'm assuming you got those torque washer then right there's really only one way that makes sense with them the way they lock into the frame I push the wheel in all the way till the bottom down look like upside down then tightened the nutsI thought when I reinstalled the rear wheel that it would bottom out like the front wheel and be centered. Not true on my rear wheel. In order to center I had to lift one side. The only thing keeping it centered is the torque supplied to both nuts. You also?
Fast n' Furious
Well-Known Member
- Region
- USA
- City
- San Diego
Thanks cldlhd ! Now I have a basic comparison. This is the 11 x 22amp controller?
Gotta love that 'waterproofing'? I keep wondering: Is the major controller issue really crappy, poorly crimped connectors? The kind that a pin moves out-of-place when you plug them in, so they are making terrible contact to start, and being crimped on not soldered, the wire is inherently making poor contact - until the oxidation generated from the attendant electrolysis of septillions of septillions of little bzzzt, bzzzt shorts oxidizes enough area, changing resistance, reducing conductivity, exceeding the controllers tolerances and triggering "fail" mode.
Nothing but MHO. If that's the issue, the controllers would test bad - but be just fine.
When I changed my throttle out, new twist throttle was noticeably higher wiring grade than the stock 'thumber's'. I have other evidence seems to support, but this is way too long. Also keep in mind I neurotically solder wires and never 'crimp-on' anything, so my judgement's suspect as I could be somewhat 'partial'.
Hey tlippy,
I have some solutions for "washers" and such.
I'm running the MXUS motor, purported to put out 100nm torque, the 700 has 68nm. You are an orange, I'm a grapefruit. lol
While the risk of spinning your hub is much less, I have some relevant info.
My dropdowns may not be the norm, but we both note the same crooked seating of the rear axle. My wheel does not wobble, but when bottomed out in the dropdowns the wheel's 'caliper side' sits noticeably closer to the frame. I'm seeking a professional opinion.
There's also an issue with the space for the 10 x 16'mm flats. Slop.
I think GRIN had a comment about the common "uneven flats seating" phenomena, re: their claim to fame using their custom MAC T10 with built in torque arm - which seats perfectly level.
Another thing. My (You too?) bike's automotive style Lug-Nut's extremely coarse 'teeth' are not well received on the forums I tend to respect as 'the God's of E-bikes' - like https://endless-sphere.com/forums/ . "Great for a Dually Chevy 1.5ton 4wd's Steel Wheels, but not for E-bikes" is the read I get.
When using Nordlocks, the fine side firmly imbeds, so a smooth lug nut having the most surface area also has the best holding power.
I ordered these: https://www.ebay.com/itm/124318677891?var=425207167153&hash=item1cf1f87b83:g:TcgAAOSwFC9gaVL4
M12 x 1.5 Titanium Flange Shoulder Hex Nuts Grade 5 Ti 6Al-4V. Smooth surface for a Nordlock's fine teeth to imbed into.
My bike spun the hub and - as addressed elsewhere - I've installed torque arms using Nordlock washers. I recommend them. That's my opinion.
These photos are not my opinion.
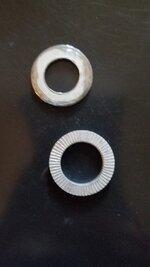
_163102 (top) washer is stock. Note the wear from contact friction. How much of the stock 'pressure washer' is actually making contact?
The other (bottom) is the Nordlock replacement ('fine side' that faces frame dropdown).
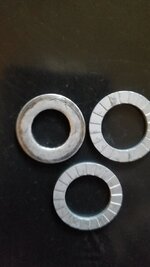
_163213, (left) shows the other side of stock lock-washer (that's the contact after torqueing down to 60lbs) and (right & bottom) the two part Nordlock (coarse side) interlocks.
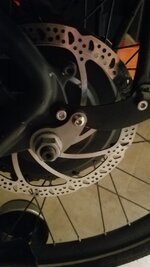
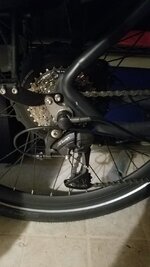
_104218 shows TA installation - caliper side. _104201 shows TA, derailer side - sufficient axle length.
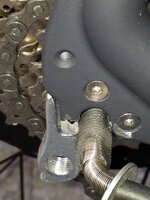
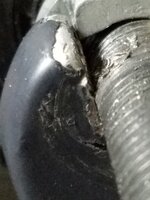
_131437 and _15003shows the damage done by spun hub. That's the "14mm" side of the 10 x 14 axle, jammed into the space that should be 10mm. Thing is, that dropdown is way too large even where only the paint was flaked off, the flats are like 13mm.
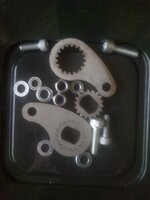
_070519 show TA's, imported from British source. 5mm stainless, laser cut (Happy to re-post source. I promote high quality, cottage industry).
-
To align the wheel, I tried aligning the axle in the dropdown and torqued down. WARNING. This eliminates being able to 'pre-load' axle flats on one side. You lose 50% of your innate holding power and given the slop I found being "V" shaped, if your washer's fail, the axle can work back and forth.
I have 'telltale' marks I punched in place. My axle moves, I know at a glance. I torqued down to 60lbs and within 20 miles it began to spin in the dropdown - again. GRRRRRRRRRRRRRRRRRRRRRRRRRRRRR.
So, I said hell with it and went nuclear, 'double torque plates" suitable for a 2 - 3000watt machine, with Nordlocks, fully pre-loaded axle and torque-arm, and if I sense any flex, I have a little 'cap plate' part designed and ready to be cut to top the arm connector in _104201 for an inflexible mono-structure and at that point, the bolts become the weak point, but those too can be changed out to 'supertanium' grade 20x stronger and now we're talking 5000watt bike w/ custom Steel Dropouts bolted to the frame via welded on Aluminum blocks.
Anyhow, I wander ... Reassembled, kept an eye on my 'telltales', looked good and 250 miles later disassembled. The axle had not budged. It pretty much can't. LOL.
Your axle should easily accompany using Nordlocks on both sides, but if you do, consider some flat lugs as well.
They're M12 1.5 type, or reply and when mine arrive I can post if they were right.
I'm interested to know your thoughts on adjusting/ filing the dropdowns to point that wheel straight?
My rally experience, we called it "doglegging" when front and rear didn't align - Oh the frames I bent - even rolled - and finished reasonably well. Great fun. So having driven thus damaged car's hundred's of miles I know effects: wearing the tires out quickly; reduced control; oversteer; understeer.
"But a 20 - 30mph bike?". Well, that's how I do everything. Why not?
-
Notes on 'turning bike upside down to service':
Not sure 'bout other bikes, but on the Limited you can easily damage components and it's a real pain to loosen everything up, then adjust and retighten down.
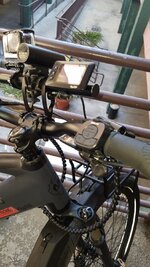
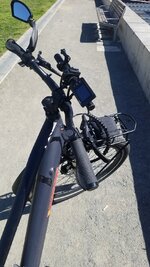
Also, after installing a twist throttle and mirror, I had to buy risers for my GoPro, Light and Display. I couldn't even get the stock stuff on the stock bars + a mirror. It 'kinda' fit; the light was too low; the display sat crooked; etc. Not my style.
The bars have tricky bends. The riser in the pictures (I have several types) and any with two stems must be loosened at all 4 corners. A real pain to get reinstalled perfect.
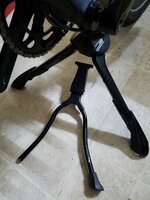
I said "forget it", bought a high quality "V" kick stand (See comparison with cheap, Chinese model) from Italy in photo _152852 and have limped along, but I'd prefer upside-down for major service - thinking 'bout some blocks.
-
I'm still searching out a suitable 15amp nominal controller (for 750 x 1000watt Ltd's MXUS) that will work with our KD218 displays.
Is there a special protocol? Why "KT" types won't interface, or will they?
I'm wondering what will interface and not afraid to spend a little finding out.
Any leads would be appreciated !!!
Regards and Ride on !!!
Fn'F
Attachments
-
 20210206_163102.jpg144 KB · Views: 442
 -
 20210206_163213.jpg137.6 KB · Views: 452
 -
 20210321_104218.jpg134.6 KB · Views: 446
 -
 20210321_104201.jpg154.8 KB · Views: 462
 -
 20201221_131437.jpg207.2 KB · Views: 458
 -
 20210131_070519.jpg203.8 KB · Views: 463
 -
 20210205_150003.jpg197.9 KB · Views: 458
 -
 20210124_152852.jpg236.7 KB · Views: 467
 -
 20210226_142439.jpg244.5 KB · Views: 484
 -
 20210217_180919.jpg358.4 KB · Views: 485
 -
 20210226_121137.jpg310.2 KB · Views: 508
Doug Goodenough
Member
Hi All,
I just past 1600 miles on my 700. I do a lot of gravel riding with it and I think something in the throttle internals has come lose as my power started cutting out while on bumpier terrain. I found that if I push the throttle lever to the right (not up or down to engage the throttle) things would improve somewhat. I don't every use the throttle and if it is now causing an issue with regular pedal power I would like to just remove it. Does anyone know if just cutting the wire from the throttle to the controller would cause any issues?
Thx
Doug
Have you tried adjusting the brake levers to make sure it is in the brakes cutting the motor out?Hi All,
I just past 1600 miles on my 700. I do a lot of gravel riding with it and I think something in the throttle internals has come lose as my power started cutting out while on bumpier terrain. I found that if I push the throttle lever to the right (not up or down to engage the throttle) things would improve somewhat. I don't every use the throttle and if it is now causing an issue with regular pedal power I would like to just remove it. Does anyone know if just cutting the wire from the throttle to the controller would cause any issues?
Thx
Doug
Similar threads
- Replies
- 1
- Views
- 9K
- Replies
- 0
- Views
- 4K
- Sticky
- Replies
- 0
- Views
- 4K
- Replies
- 0
- Views
- 5K
- Replies
- 0
- Views
- 4K

