Known Issues & Problems with Ride1Up Products + Help, Solutions & Fixes

Have you tried adjusting the brake levers to make sure it is in the brakes cutting the motor out?
No, I have not tried that yet. I found that pushing the throttle control to the right had a bit of an impact. But maybe it could be the brakes........I will play with it.
 
No, I have not tried that yet. I found that pushing the throttle control to the right had a bit of an impact. But maybe it could be the brakes........I will play with it.
Who knows I was just floating it. I had a couple of times where the power wasn't coming on or it was cutting out. Not sure if you're aware but there's a little screw, I believe it is 4 mm , that if you turn it clockwise it will adjust the sensor in the brake lever for the brake cut off.
 
I wanted to post this here again as a reminder - @harryS comment from one of the many threads for Ride1Up...

I installed a Bafang hub drive on our ROLL and after 150 miles or so several spokes were quite loose. The spoke nipples are larger than a regular bike so stop in your LBS and get a spoke wrench that fits.
Check all your spokes on a regular basis, especially when new as some seating and mating of the connect points takes place and can make the spokes loose. This especially exacerbated with greater rider weight - 180 and up to capacity is going to accelerate the wearing in process and spokes are bound to loosen.

If your spokes get loose then they work too much and can actually break. So this is likely preventable. Additionally, don't over-tighten as you can crack the nipple hole in the rim - so just keep an eye on everything and keep it tuned up, or drop the bike to a shop if you can't do it yourself. The tap-tap-tap ting-sound of spoke tuning is an easy thing to learn - you can easily hear the thud from a loose one. Give it a quarter turn and tap it again - all spokes should sound fairly close to the same. You also don't want to over-tighten or you'll pull the rim out of true. I have never had a rim go out of true from maintaining spoke tune.
I considered a Ride1up roadster, but specifically what made me hesitant was the spokes. They need
to be of a heavier gauge. Itś a good concept, simple maintenance, but I´m built like a linebacker, &
those spokes are just too frail. I check spokes at ´least´ once a week as part of a daily preflight inspection
which always includes tire pressure & brakes. When I check spokes, I also check my wheels for true.
Only a few times have I made minor tweaks to the spokes on my current bike in 3300 mi., but it has
12g, front & back.
 
Last edited:
Who knows I was just floating it. I had a couple of times where the power wasn't coming on or it was cutting out. Not sure if you're aware but there's a little screw, I believe it is 4 mm , that if you turn it clockwise it will adjust the sensor in the brake lever for the brake cut off.
Yea, I had had to deal with the brake code error a couple of times.
 
I wanted to post this here again as a reminder - @harryS comment from one of the many threads for Ride1Up...

I installed a Bafang hub drive on our ROLL and after 150 miles or so several spokes were quite loose. The spoke nipples are larger than a regular bike so stop in your LBS and get a spoke wrench that fits.
Check all your spokes on a regular basis, especially when new as some seating and mating of the connect points takes place and can make the spokes loose. This especially exacerbated with greater rider weight - 180 and up to capacity is going to accelerate the wearing in process and spokes are bound to loosen.

If your spokes get loose then they work too much and can actually break. So this is likely preventable. Additionally, don't over-tighten as you can crack the nipple hole in the rim - so just keep an eye on everything and keep it tuned up, or drop the bike to a shop if you can't do it yourself. The tap-tap-tap ting-sound of spoke tuning is an easy thing to learn - you can easily hear the thud from a loose one. Give it a quarter turn and tap it again - all spokes should sound fairly close to the same. You also don't want to over-tighten or you'll pull the rim out of true. I have never had a rim go out of true from maintaining spoke tune.
When truing, i locate the high or low point. With that spoke in the middle I grasp 5 spokes. Working in ´tiny´
increments, I´ll tighten a low side while slightly loosening those on the opposite side until it spins true,
checking both sides of the wheel to be sure it isn´t dished. Tight is good, too tight is bad. After 60+ years
on bikes, I don´t use instrumentation. I just pluck the spoke like a piano tuner and ´feel´ for the right note,,
having since gone deaf. I use small pliers,(one size fits all) I´m kinda fanatic about staying within at most
one or two mm.
 
Hi All,

I just past 1600 miles on my 700. I do a lot of gravel riding with it and I think something in the throttle internals has come lose as my power started cutting out while on bumpier terrain. I found that if I push the throttle lever to the right (not up or down to engage the throttle) things would improve somewhat. I don't every use the throttle and if it is now causing an issue with regular pedal power I would like to just remove it. Does anyone know if just cutting the wire from the throttle to the controller would cause any issues?

Thx
Doug
Or, you could just switch to a twist throttle. Doctor's agree your thumb isn't made for throttles, which lead to (dirty little e-bike secret) repetitive motion injury results.
https://www.ncbi.nlm.nih.gov/pmc/articles/PMC2654954/
But back to what you want to do. Why not unplug it and see?
I couldn't live with just my genkie PAS, but need to try a cadence type before I personally condemn them all - like so many do on forums, and that's not definitive either. I do remember reading 'it's no problem', but not where. Can't hurt to try.
I went the 'twist throttle' route, but there is a rub. I could only find one left-sided throttle that wasn't for a Bafang - which I have three of, all of which have extremely low grade wiring and the wrong type plug. This one has crimped on pronged wires set to plug in the supplied fitting in the proper order. The right hand twist I have now had wires in the plug that were in the wrong order, wouldn't come out, so wires had to be cut and soldered. I know it say's "half twist" but this throttle is really is a 'quarter twist', and my other, present throttle is a half twist. Good. 1/4 should be much less wrist/ hand fatigue as well.
I found it on Aliexpress. https://www.aliexpress.com/item/4000712041981.html?spm=a2g0s.9042311.0.0.54b34c4dwC3oNv $16 with tax, ordered May 3 and arrived last week.
I've been at this for a while. After numerous throttles, I know what will work and why. You must use a leftie for the back paddle of the shifter to properly fit over the grip's inside hump. Don't get me wrong. Right will work, but very awkwardly. That stock shifter is very picky where it's bolted down and you'll never get it correct.
I may try a twist shifter - and there's a another reason for the leftie: Twist shifters are ALL made with the cassette shifter on the right and the crankset on the left. ALL of them. Only other solution would be to mount it upside down.
While it's a pain taking the battery housing apart - rather getting it back together (uTube vids to the contrary aside) - it's not baffling or mysterious.
Simply match up the wiring on the throttle's provided plug and insert the red, the white and the black wired prongs in the correct order.
Two, usually the Red and Black are the same colors. The other wire corresponds with the other wire on the throttle's plug.
My present half twist works perfectly and never cuts out. Wish I could say that about the PAS. I think that's why they changed the Limited to a cadence type. This Torque type is terrible and intermittently cuts out, for no apparent reason, but never my throttle. I blast up hills and the bike, will exceed 30mph (yesterday it registered 29.9mph on 16Amp setting) at a full 20amp limit setting. My larger 48tooth chainring? That seems odd. 28mph should be the end. Is the speed sensed, at the torque sensor by measuring rotations? If so, my 48T Becker ring, being 1/12th larger than stock would mean 2.3mph faster = 30.3mph.
After 20 - 25mph the road beats me to death, so I also had to install a new seat and KINEKT energy absorbing post. Gigantic difference.
I like your idea. I'd probably be better off with no throttle going 10mph and exercising my legs more.
Sure would be a lot less expensive.

Fn'F
 

Attachments

  • 20210325_165503.jpg
    20210325_165503.jpg
    433 KB · Views: 396
  • 20210521_162217.jpg
    20210521_162217.jpg
    385 KB · Views: 398
  • 20210130_131221.jpg
    20210130_131221.jpg
    254.6 KB · Views: 363
Thanks cldlhd ! Now I have a basic comparison. This is the 11 x 22amp controller?
Gotta love that 'waterproofing'? I keep wondering: Is the major controller issue really crappy, poorly crimped connectors? The kind that a pin moves out-of-place when you plug them in, so they are making terrible contact to start, and being crimped on not soldered, the wire is inherently making poor contact - until the oxidation generated from the attendant electrolysis of septillions of septillions of little bzzzt, bzzzt shorts oxidizes enough area, changing resistance, reducing conductivity, exceeding the controllers tolerances and triggering "fail" mode.
Nothing but MHO. If that's the issue, the controllers would test bad - but be just fine.
When I changed my throttle out, new twist throttle was noticeably higher wiring grade than the stock 'thumber's'. I have other evidence seems to support, but this is way too long. Also keep in mind I neurotically solder wires and never 'crimp-on' anything, so my judgement's suspect as I could be somewhat 'partial'.
Hey tlippy,
I have some solutions for "washers" and such.
I'm running the MXUS motor, purported to put out 100nm torque, the 700 has 68nm. You are an orange, I'm a grapefruit. lol
While the risk of spinning your hub is much less, I have some relevant info.
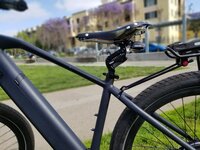
My dropdowns may not be the norm, but we both note the same crooked seating of the rear axle. My wheel does not wobble, but when bottomed out in the dropdowns the wheel's 'caliper side' sits noticeably closer to the frame. I'm seeking a professional opinion.
There's also an issue with the space for the 10 x 16'mm flats. Slop.
I think GRIN had a comment about the common "uneven flats seating" phenomena, re: their claim to fame using their custom MAC T10 with built in torque arm - which seats perfectly level.
Another thing. My (You too?) bike's automotive style Lug-Nut's extremely coarse 'teeth' are not well received on the forums I tend to respect as 'the God's of E-bikes' - like https://endless-sphere.com/forums/ . "Great for a Dually Chevy 1.5ton 4wd's Steel Wheels, but not for E-bikes" is the read I get.
When using Nordlocks, the fine side firmly imbeds, so a smooth lug nut having the most surface area also has the best holding power.
I ordered these: https://www.ebay.com/itm/124318677891?var=425207167153&hash=item1cf1f87b83:g:TcgAAOSwFC9gaVL4
M12 x 1.5 Titanium Flange Shoulder Hex Nuts Grade 5 Ti 6Al-4V. Smooth surface for a Nordlock's fine teeth to imbed into.

My bike spun the hub and - as addressed elsewhere - I've installed torque arms using Nordlock washers. I recommend them. That's my opinion.
These photos are not my opinion.
_163102 (top) washer is stock. Note the wear from contact friction. How much of the stock 'pressure washer' is actually making contact?
The other (bottom) is the Nordlock replacement ('fine side' that faces frame dropdown).
_163213, (left) shows the other side of stock lock-washer (that's the contact after torqueing down to 60lbs) and (right & bottom) the two part Nordlock (coarse side) interlocks.
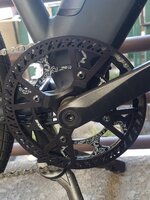
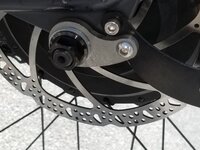
_104218 shows TA installation - caliper side. _104201 shows TA, derailer side - sufficient axle length.
_131437 and _15003shows the damage done by spun hub. That's the "14mm" side of the 10 x 14 axle, jammed into the space that should be 10mm. Thing is, that dropdown is way too large even where only the paint was flaked off, the flats are like 13mm.
_070519 show TA's, imported from British source. 5mm stainless, laser cut (Happy to re-post source. I promote high quality, cottage industry).
-
To align the wheel, I tried aligning the axle in the dropdown and torqued down. WARNING. This eliminates being able to 'pre-load' axle flats on one side. You lose 50% of your innate holding power and given the slop I found being "V" shaped, if your washer's fail, the axle can work back and forth.
I have 'telltale' marks I punched in place. My axle moves, I know at a glance. I torqued down to 60lbs and within 20 miles it began to spin in the dropdown - again. GRRRRRRRRRRRRRRRRRRRRRRRRRRRRR.
So, I said hell with it and went nuclear, 'double torque plates" suitable for a 2 - 3000watt machine, with Nordlocks, fully pre-loaded axle and torque-arm, and if I sense any flex, I have a little 'cap plate' part designed and ready to be cut to top the arm connector in _104201 for an inflexible mono-structure and at that point, the bolts become the weak point, but those too can be changed out to 'supertanium' grade 20x stronger and now we're talking 5000watt bike w/ custom Steel Dropouts bolted to the frame via welded on Aluminum blocks.
Anyhow, I wander ... Reassembled, kept an eye on my 'telltales', looked good and 250 miles later disassembled. The axle had not budged. It pretty much can't. LOL.
Your axle should easily accompany using Nordlocks on both sides, but if you do, consider some flat lugs as well.
They're M12 1.5 type, or reply and when mine arrive I can post if they were right.
I'm interested to know your thoughts on adjusting/ filing the dropdowns to point that wheel straight?
My rally experience, we called it "doglegging" when front and rear didn't align - Oh the frames I bent - even rolled - and finished reasonably well. Great fun. So having driven thus damaged car's hundred's of miles I know effects: wearing the tires out quickly; reduced control; oversteer; understeer.
"But a 20 - 30mph bike?". Well, that's how I do everything. Why not?
-
Notes on 'turning bike upside down to service':
Not sure 'bout other bikes, but on the Limited you can easily damage components and it's a real pain to loosen everything up, then adjust and retighten down.
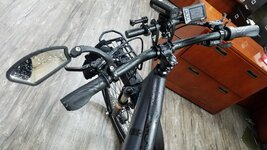
Also, after installing a twist throttle and mirror, I had to buy risers for my GoPro, Light and Display. I couldn't even get the stock stuff on the stock bars + a mirror. It 'kinda' fit; the light was too low; the display sat crooked; etc. Not my style.
The bars have tricky bends. The riser in the pictures (I have several types) and any with two stems must be loosened at all 4 corners. A real pain to get reinstalled perfect.
I said "forget it", bought a high quality "V" kick stand (See comparison with cheap, Chinese model) from Italy in photo _152852 and have limped along, but I'd prefer upside-down for major service - thinking 'bout some blocks.
-
I'm still searching out a suitable 15amp nominal controller (for 750 x 1000watt Ltd's MXUS) that will work with our KD218 displays.
Is there a special protocol? Why "KT" types won't interface, or will they?
I'm wondering what will interface and not afraid to spend a little finding out.
Any leads would be appreciated !!!

Regards and Ride on !!!

Fn'F
FINI !
These black Titanium lug-nuts have a flat face softer than the Nordlock's ridges.
Disassemble and inspection shows full imprint of the teeth. The contact is now 100%.
If you haven't had a spin, but want to prevent one or simply want to replace the stock fasteners, the washer is Nord-Lock 1531 Lock Washer, Steel M12, and I used an M12 x 1.25mm Pitch Titanium / Ti Sprocket Flange Nut - but any softer metal nut of that size, with a flat flange will suffice. This fits the Limited's MXUS axle. The 1.50mm Pitch does not.
I have 2 sets of Nord-Locks left over and wish there was a marketplace here. I like to recoup some of my money. Finding these parts is trial and error. No-one provides a kit. Nothing else comes close in form fits function. These washers are used in nuclear reactors, on space shuttles and wherever there's a risk of vibration loosening fasteners and that scenario is unacceptable.
I can also obtain the nuts, but across the board, real 'Black' Ti and all Ti is climbing rapidly in price.
Remember, these nuts will not work properly with the stock washers, not increasing holding power or contact.

Fn'F
 

Attachments

  • 20210521_163121.jpg
    20210521_163121.jpg
    345.2 KB · Views: 310
Just saw that R1U has gone back to a torque sensor on the LMT'D. Very interesting....
 
Cool, but only on the SR huh.
I wonder if they're using the newer plate type and dumped the BB style?
 
I have 28 on mine... I also have the cruise control instead of the walk mode. Mine was part of a batch in early spring (April)
? On the R1U 700 what should the battery voltage show when the charger light turns green?
I stopped charging and checked mine before red light come on and it already showed 55.7 volts...i was expecting it to cut off at 54.6 ?
 
? On the R1U 700 what should the battery voltage show when the charger light turns green?
I stopped charging and checked mine before red light come on and it already showed 55.7 volts...i was expecting it to cut off at 54.6 ?
My 700 maxed out at 54.6 V, which I've only done one time. Mine is the older 700 model and battery that was sold last year. This year's has a different battery. There is a thread about that here. I haven't heard of anyone reporting their battery charged to 55+ V.
 
My 700 maxed out at 54.6 V, which I've only done one time. Mine is the older 700 model and battery that was sold last year. This year's has a different battery. There is a thread about that here. I haven't heard of anyone reporting their battery charged to 55+ V.
At my last charging the light turned green at 56.6 volts. I think that may be ok..? I found this.

"48V batteries have a distinct advantage in being perfectly placed to remain just below the threshold 60V limit as defined above. You can easily set up the battery’s maximum output to 120% of the nominal output, which caps it off at 57.6V.
 
Last edited:
I try not to charge mine over 51.5 V most of the time to increase battery longevity. I charged it to 100% (54.6 V) a while back, but I rode it shortly afterwards so that it wouldn't sit around stressing the cells. There's also the possibility that the display is not reading the voltage accurately.
 
Or, you could just switch to a twist throttle. Doctor's agree your thumb isn't made for throttles, which lead to (dirty little e-bike secret) repetitive motion injury results.
https://www.ncbi.nlm.nih.gov/pmc/articles/PMC2654954/
But back to what you want to do. Why not unplug it and see?
I couldn't live with just my genkie PAS, but need to try a cadence type before I personally condemn them all - like so many do on forums, and that's not definitive either. I do remember reading 'it's no problem', but not where. Can't hurt to try.
I went the 'twist throttle' route, but there is a rub. I could only find one left-sided throttle that wasn't for a Bafang - which I have three of, all of which have extremely low grade wiring and the wrong type plug. This one has crimped on pronged wires set to plug in the supplied fitting in the proper order. The right hand twist I have now had wires in the plug that were in the wrong order, wouldn't come out, so wires had to be cut and soldered. I know it say's "half twist" but this throttle is really is a 'quarter twist', and my other, present throttle is a half twist. Good. 1/4 should be much less wrist/ hand fatigue as well.
I found it on Aliexpress. https://www.aliexpress.com/item/4000712041981.html?spm=a2g0s.9042311.0.0.54b34c4dwC3oNv $16 with tax, ordered May 3 and arrived last week.
I've been at this for a while. After numerous throttles, I know what will work and why. You must use a leftie for the back paddle of the shifter to properly fit over the grip's inside hump. Don't get me wrong. Right will work, but very awkwardly. That stock shifter is very picky where it's bolted down and you'll never get it correct.
I may try a twist shifter - and there's a another reason for the leftie: Twist shifters are ALL made with the cassette shifter on the right and the crankset on the left. ALL of them. Only other solution would be to mount it upside down.
While it's a pain taking the battery housing apart - rather getting it back together (uTube vids to the contrary aside) - it's not baffling or mysterious.
Simply match up the wiring on the throttle's provided plug and insert the red, the white and the black wired prongs in the correct order.
Two, usually the Red and Black are the same colors. The other wire corresponds with the other wire on the throttle's plug.
My present half twist works perfectly and never cuts out. Wish I could say that about the PAS. I think that's why they changed the Limited to a cadence type. This Torque type is terrible and intermittently cuts out, for no apparent reason, but never my throttle. I blast up hills and the bike, will exceed 30mph (yesterday it registered 29.9mph on 16Amp setting) at a full 20amp limit setting. My larger 48tooth chainring? That seems odd. 28mph should be the end. Is the speed sensed, at the torque sensor by measuring rotations? If so, my 48T Becker ring, being 1/12th larger than stock would mean 2.3mph faster = 30.3mph.
After 20 - 25mph the road beats me to death, so I also had to install a new seat and KINEKT energy absorbing post. Gigantic difference.
I like your idea. I'd probably be better off with no throttle going 10mph and exercising my legs more.
Sure would be a lot less expensive.

Fn'F
In picture 165503, what handlebar accessory mount is that. Looks great for extra lights.
Thanks
 
That extender worked okay. I tried several types. Can't recommend any. Absolutely, don't buy the carbon fiber type. Easily damaged.
None fit correctly on the stock bars. The breakthrough came when I picked up some Jones H Bars.
20220628_164833[1].jpg
20220929_205619[1].jpg

Then I installed the Judy Fork. Now, the additional offset caused handling issues.
Your grip must be even, or slightly forward of the fork head and as you can see in this photo (with the stock fork) it wasn't correct. The bars needed an 80mm clamp. Stock is 45mm, so I used a ti clamp.
20220929_214750[1].jpg

Here you see the string. Bar grips are even to slightly forward of the fork head.
The Surly Moloko bars also required a longer stem, a 65mm, but a 55mm would also work.
The ti stem is (+) or (-) 3 degrees rise. I'm using (-) to stretch the cockpit out a bit. (+) is for more upright seating, or if your seat is higher, 5' -11" sizes and up.
Another thing is bar width. The 710mm, while more awkward for doorways and narrow spaces provide superior control over the 660mm's.
For off-road trail work, 660's become more practical. Everything on this machine is a trade off to attain the most practical compromise. Wider bars provide slightly more leverage, but decrease steering range. Thus low-speed maneuverability suffers.
660's are fine for the Lm'td's geometry, I'd dare say 'correct'. My WattWagon's 4" tires benefit from the additional leverage of 710's .
The Lm'td is a great 'Mule' to test expensive ('Forever') parts.
The titanium stem now resides on my ti bike - I knew was coming (someday). I got to test various stems and best of all, a worthy chance to increase my ken so I know what's the most practical compromise for me.
Those Jones Bars provide the ultimate in clean, usable real estate Alloy bar practicality (Moloko's, maybe too). The compromise is you need that longer stem.
Worth the cost? Yes - if you buy the ($100) non-butted bars and use a $35 Alloy stem.
'It's great (and much more economical) to have a crash dummy find out what won't work', I always say !!!
Makes me feel good to see more owners taking control, upgrading, inspiring others to improve and create.
I recently had an LBS screw up all my fork settings - trying to find the air input. If I wasn't watching he could have damaged a $1000 Mastodon fork. He was gorilla-gripping one of the setting knobs (280lbs guy, red in the face with exertion) saying: "Gee, this one won't turn" and looking around for a tool to get some leverage (Vice-Grips come to mind), when I intervened and showed him where the nozzle was.
Certainly inspired me to take the time to learn.
You can do it yourself and get it right - skip the labor costs and buy nice parts - or you can risk paying someone to do it for you and having to fix what they broke. I can break stuff as good as anyone. Why pay somebody to?

Fn'F
 
I try not to charge mine over 51.5 V most of the time to increase battery longevity. I charged it to 100% (54.6 V) a while back, but I rode it shortly afterwards so that it wouldn't sit around stressing the cells. There's also the possibility that the display is not reading the voltage accurately.
That's really good info. Everyone knowledgeable that I trust says just that: 80% charge limit markedly increases battery life.
On the other end, not falling below 43.7 (I use 44v) will prevent a weak cell from shutting the BMS down.
You go under, immediately recharge or ...
... there are ways to force enough charge in, past the BMS and turn the battery back on. But I prefer not to have to find out how well they work.
A slightly weaker cell (common) will always be lower voltage, pulling the other batteries down seeking equilibrium.
You park the bike, it's still burning power - even off.
You fall below the BMS low voltage trigger, BMS sees a dead cell. No charge for you.
I also have a practice of balancing the cells every few months. Charge overnight to 100%, then promptly burn +10% off in the morn.
This should be done three times in a row initially balancing the cells, for a new battery.
Optimax lays down the best battery info I've read on these forums.
You can switch to 'Voltage' now, or later. We all (stubbornly) use '%' - hey, it sounds good. Nice and simple. Except that only Voltage matters.
I trust the V Meter's accuracy, but if you didn't, %, an extrapolation of battery VOLTAGE, would be nonetheless inaccurate and I can always memorize 47volts as the danger zone.
48v charging table.jpg

A very notable effect on the (older '22amp') Lm'td's is the bike's actually slower with a 100% charged battery.
52v Chart.png

This coincides with '52v' battery territory, 50.4v (50%) - 54.6v (75%).
54.6v is 100% for 48v packs. I've commented on the phenomenon that somewhere north of 51v and up to 54v , the MXUS seems to choke. Not stutter or cut out, it just feel heavy, slower acceleration. Like the bike just gained 40lbs.
It could be the controller is not for 52v, or the motor, but every last time I balance my cells (to 100%) I feel it.
I don't think the newer Lm'td's experience it.
I ordered a new display. It only went to 20amps. I thought 'aha, that's it (me running 22amps on the old display settings)', but no. I tried the old display set to 20amps. Same story.
 
Back