mbouck
Member
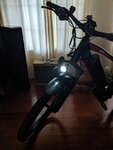
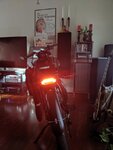
Just finished re-configuring my new Jugernaut Ultra 1000 in "commuter mode" complete with integrated 48V front and rear lighting! Before I get to the integrated lights (because that's it's own story) here are the changes I made to the stock configuration:
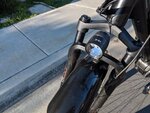
- Busch + Müller IQ X E headlight (150 lux - replaces weaksauce 6V stock headlight)
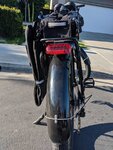
- Generic Chinese 48V tail light from Amazon
- Arkel trunk bag and panniers
- BBB Loud & Clear bike bell (my bike didn't come with a bell)
- Hanfy Bar End Bike Mirror from Amazon
- 29" Maxxis Hookworm tires mounted on an extra 29 x 3 wheelset from Biktrix
- For Dutch street cred 3' of Pewag 3/8" security chain secured by a Viro Panzer double shutter lock wrapped around the seat post
- A Cane Creek Thudbuster LT seat post from Biktrix
- A large Lizard Skins slap guard from Amazon
- An optically-isolated solid state relay to handle 48V up to a few amps. There are a few options but I love Opto 22's stuff and it's rock solid. A DC60MP should do the trick. Whatever you do, please don't use old-school mechanical relays - SSRs are silent, more reliable, optically-isolated and avoid issues like feedback current in applications like this.
- For circuit protection we'll need a polyfuse (a.k.a. resettable fuse). Littlefuse makes good ones - something like the 60R250X (2.5A hold current and 5A trip current) should work fine.
- Miscellaneous wiring, heat shrink tubing, cable ties and connectors.
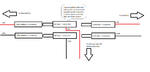
- Connect the existing 6V headlight wire to the VDC Control inputs (pins 3 and 4) of the SSR (red or white-striped wire to + and black to -).
- Tap the red positive feed of the main battery and connect that to the + side of the normally open relay on the SSR (pin 1).
- Connect the other side of the relay (pin 2) to one end of the polyfuse.
- Connect two red wires to the other end of the polyfuse and terminate with your connector of choice - these are your two new switched 48V lighting outputs.
- Tap the black negative feed of the main battery and split that to two new outputs, connecting them to the negative side of the 48V connectors coming off the polyfuse above.
Attachments


Last edited:


")